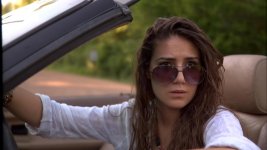
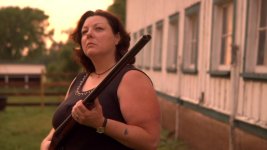
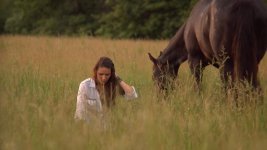
"A Verse Before Dying" - AF-100 Western Short

For those curious what how shallow DoF we could achieve...

One evening while hooking up a AF100 to a large TV at the crew house to watch dailies, we played with the DoF a little.

I placed a tape measure along the floor. Then pointed the camera at it. I *think* we had a 50mm ZF lens on there, but I'm not sure. The only light was a 60w table lamp about 6 feet away; and the glow of the nearby TV. I can't remember any other settings (we weren't taking notes); and the picture looked decent. Just playing around, using the ND's in the camera to stop down the lens; we got down to what I'd estimate a DoF of 4mm. Yeah, 4 Millimeters. That's about an 8th of an inch.

Of course, it would be insanely rare that one would shoot like that. I know my AC would kill me if I even suggested it.

- Mikko
 
And for those really bright situations, how low can you get the ISO, or gain? Can you set for -3db? Are there times, say when using an f/2.0 lens, when the camera's built-in ND wheel isn't enough to cut it down if you want a really shallow dof? BTW - I am the first to say that the ultra shallow DOF you can spot a mile away from 5D footage just seems unnatural for motion footage - it's a dead giveaway and distracting when too shallow at times. But say if I wanted a little shallower than what's in this trailer, would additional ND ever be needed in a daylight situations when using fast lenses (like 2.0) to get the exposure down with an open aperture on an AF100?
 
...And, with that said, there are many shots in this film that are *softened* with pro-mist filters! Timur liked the look of, what was it -- a 1/4 black pro-mist? So there's diffusion in front of some of these shots too.

BPM is my personal favorite for HD - softens without introducing blooming in the highlights. But don't go above 1/2 on any softening filter in HD - a 1 or 2 is too much.
 
And for those really bright situations, how low can you get the ISO, or gain? Can you set for -3db?
Gain can go to -3dB or -6dB. ISO goes down to 200.

Are there times, say when using an f/2.0 lens, when the camera's built-in ND wheel isn't enough to cut it down if you want a really shallow dof?
Not really. Six stops of ND gets you from f/16 down to f/2. Of course, if your shot calls for more than f/16, then obviously you couldn't get it down to f/2 with the built-in ND.

would additional ND ever be needed in a daylight situations when using fast lenses (like 2.0) to get the exposure down with an open aperture on an AF100?
Well, in direct broad daylight at ISO 200, it might be tough to get to f/2 without an external 2-stop filter.
 
I would never want to shoot @ a F2.0 out doors. it looks weird.

Well I don't know if this is an apples to apples comparison, but here's a look (DOF and Focal Length) I'm hoping to be able to maintain with the Af100, which I was able to get with the HVX/Letus/Nikon 2.0 50mm and 85mm f2.0, opened up wide. I like the look for the right mood - and I know the time of day (golden hours) perhaps makes 2.0 more appropriate than it would be mid-day.

LL 1 copy.jpgLL 7 copy.jpgLL 8 copy.jpg
 
Last edited:
The letus uses a full frame sized portion of the ground glass.

You cant really compare. If you need it, its possible. Just use a faster, longer lens.
 
The letus uses a full frame sized portion of the ground glass.

You cant really compare. If you need it, its possible. Just use a faster, longer lens.

Yeah that's pretty much what I thought. But....I still do not fully understand what will happen to my DOF when I go to that 4/3" sensor. Now I totally understand my field of view will appear different because the lens is throwing the image onto a smaller area than it did on the Letus. So, "Back up", they say. Alright, let's say I have my HVX Letus 3 feet from that car with the 50mm, take the Nikon 50mm off of the Letus and walk back three more feet to my imaginary AF100, mount the lens, and keep it open at 2.0. I should have about the same FOV, but has my DOF now changed, become less shallow because I'm on a smaller sensor, or is it the same? In my mind, it shouldn't change the DOF if I back up to keep the previous field of view. On the downside, I guess I loose the nice bokeh, because the 4/3 now is only seeing the center portion of the lens. Your thoughts?
 
Perhaps this thread can clear some things up for you:

http://forums.dpreview.com/forums/readflat.asp?forum=1041&message=34477945&changemode=1

Bob

Yeah that's pretty much what I thought. But....I still do not fully understand what will happen to my DOF when I go to that 4/3" sensor. Now I totally understand my field of view will appear different because the lens is throwing the image onto a smaller area than it did on the Letus. So, "Back up", they say. Alright, let's say I have my HVX Letus 3 feet from that car with the 50mm, take the Nikon 50mm off of the Letus and walk back three more feet to my imaginary AF100, mount the lens, and keep it open at 2.0. I should have about the same FOV, but has my DOF now changed, become less shallow because I'm on a smaller sensor, or is it the same? In my mind, it shouldn't change the DOF if I back up to keep the previous field of view. On the downside, I guess I loose the nice bokeh, because the 4/3 now is only seeing the center portion of the lens. Your thoughts?
 
There's a app for the iphone, a few of them actually, called "Simple DoF". It has nearly every still camera, cine camera, sensor size in it's database. You select the camera, then the fstop, the focal length and the distance to subject and it instantly spits out your DOF in a nice visual display. In front of subject, behind and hyperfocal. I'm constantly using it, even more then the "Fatbooth" app. Haha..
 
Very good point. A 50mm is a 50mm is a 50mm!!!!!!!!!!!!!!!

A thing to remember that Barry always stresses. When inputting the focal length of the lens, a 50mm is a 50mm is a 50mm. Dont put in a 50mm if your looking up 5D DoF scales and then change it to a 100mm for a 4/3rds camera.
 
Very good point. A 50mm is a 50mm is a 50mm!!!!!!!!!!!!!!!

True, that. BUT...Remember that when there's a wall behind us and can't back up, or we want the field of view behind the subject to be equivalent as it was with a full frame Letus or 5D sensor, we're gonna have to make calculations based on going with a wider lens, just to get back into the same ballpark of field of view. So if I want the look of that 50mm, I may need to figure what sort of 20-25mm lens is out there for me, and if it's fast enough to duplicate the look I had and liked with the full frame sensor.
 
If you guys want some more detial on the ligting setups, please visit my blog. The cinematography portion will be covered in boring detail there..... I will keep posting here, but i will keep it lighter as it gets boring when you start talking about 1/10ths of a stop..... :)
 
Phenomenal update to your blog, Timur. Thank you!

I've done a ton of interior work (I love bouncing/shaping natural light too) but no where to the degree that you've described. Reading your detailed description of the work you did with the HMI's with Sunlight in combination with flagging and bouncing was VERY educational. I haven't worked this deep in lighting, and would love to be able to do it so.

Great work, Timur. Your talent is obvious. Thanks again for sharing.

Dillon

If you guys want some more detial on the ligting setups, please visit my blog. The cinematography portion will be covered in boring detail there..... I will keep posting here, but i will keep it lighter as it gets boring when you start talking about 1/10ths of a stop..... :)
 
Last edited:
By request..... :)

An verbatim except form my blog covering the lighting details...


This pastweek i have been fortunate enough to be among the first people in the world to use the AF100 under a professional environment, shooting director Stephen Mick's period short film, "A Verse Before Dying".

Panasonic USA lent us 2 AG-AF100 bodies. I had one setup for tripod, and dolley use, and the other was set up for Stedicam/Jib use.

Our list of equipment panned out as follows:
Camera Department:
2x AF100 camera bodies.
1 full set of Zeiss Compact Primes Series 1, 18mm T3.5, 21mm T2.8, 25mm T2.1, 28mm T2.1, 35mm T2.0, 50mm T1.5, 85mm T1.5
1 set of Duclos modified Zeiss ZF lenses. 21mm, 28mm, 35mm, 50mm, 85mm
Nikon 50-300 F4.5 AIS
Lumix 14-140 OIS
Lumix 20mm F1.7
Voightlander 85mm F1.1

Camera Support:
Stedicam Archer system
Kessler CineSlider
KesslerCrane
Kessler Kpod and Herculese Head 2.0
Sachtler V20 and Sachtler sticks.
Bartek Wireless Follow Focus
Shoot35 Cinefocus Follow Focus
Chroziel MB450-01 mattebox
Redrock Mattebox


Monitoring/Recording:
Small HD dp6 monitor.
Panasonic BTLH80 7" Monitor.
NanoFlash Recorder

Lighting:
3ton Grip truck
4k HMI
several 1.2k HMI's
and a simple tungsten package
600 AMP generator.

_MG_3613.JPG

The AF100 with CP1's, Shoot35 Cinefocus , NanoFlash Recorder and Zacuto System. Photo by Matt Gettermeir

There was no shortage of equipment, lenses, lights, crew or camera support. Essentially we removed every obstacle that can get in the way of a camera system performing to its maximum, to see what the camera is actually like. The truth is, the camera system was never an obstacle. The AF100, is so seem less a camera system that it simply steps out of your way. You never "Feel" the camera. IE, you don't find yourself making adjustments to the shot to make up for the short comings of what was until now, a series of hacks, and makeshift work arounds to get the desired image. I was able to spend all my time and energy on the shot, the lights and the camera movement. I remember working with the 5D mkII, or the HVX200 and 35mm adpater systems, there was always an obstacle. Whether it was the constant back focus checking on the ground glass, or struggling to make sure the sot is in focus with a 5D, or the avoiding of moire inducing scenes, the low effective sensitivity of the adapter solutions, and the loss in resolution and image quality.

Lets start at the exposure and lighting dynamics:
The camera is a great performer @ ISO 400, or 0dB gain. You can easily go as high as 800 with no significant increase in noise or grain. Whats interesting was that i found that i rarely went above ISO 320. Even indoors, at night, i found that ISO 320 was far more than enough to get an excellent exposure. The camera retains, with careful massaging of the scene file, exceptional latitude. I did not have a rear lit chart to actually test for myself, but producer and Panasonic expert Barry Green, a friend of mine, tested it and assures me the AF100 holds 10.5 stops. Thats incredible, and it certainly felt like it.

Lets look into some of the lighting setups i built for "AVerse Before Dying" and explore how the camera stood up to the paces i put it through.

The theory behind the lighting was that in the mid nineteenth century there were hardly any man made sources of light, other than candles, and fire. This means that even daylight interiors are motivated by the sun. I designed a lighting plan that performed what i call "Sunlight +". This is not a real term, just some thing i made up. It means using the natural light available to you, and assisting it with HMI's and relfectors to do what you need.

Starting at the Saloon Scene, lets examine how Sunlight + lighting scheme was worked out.
saloon_lighting.jpg

Starting off, the sun was naturally pouring in through a majority of the set for most of the day. The doors and windows on the south side of the set, created a base fill light that gave the room a flat wash, that gave us an exposure @ ISO200 and a T2.8 on the CP1's. I wanted to shoot at a T4 to give me the option to have the depth of field look its most cinematic. The mattebox had a 1/4 Black Promist Filter, which cuts a quarter stop. Lets examine the lighting plan.


The first setup was for the "actor" at the round table facing the window. The equipment used was a double net, a mirror board, and a 1.2k HMI for this segment of the scene. I flagged off the sun with a double net, from the window, to make sure the light that hits the actor is what i want, not what the sun forced upon me. Now that i cut down the sun, i had to create my own sun. This is where the 1.2K HMI, and the mirror borad come in. I raised the mirror board up, and had the 1.2k HMI on the ground on a super stand, looking straight up, and the Mirror borad bounced the beam of light, softening it, back into the window of the saloon, and lighting the actor. Here is the corresponding frame grab to see the effects.
1.2kMIRROR.jpg

Photo by Barry Green

saloon_shot_a.jpg


Now lets examine the Next Setup, the Reversal on the bartender as pictured here:
saloon_shot_c.jpg


As you can see from the diagram, this is Sunlight+ as it is intended, as natural as possible. The lighting you see here is about 50% natural, and 50% assisted. The Sun is beaming a hard, bright patch of light on the floor of the bar near the door. Since the daylight look is what i'm going for i placed a white bead board reflector on the ground to catch that light and throw it up on to the actor. I then took the 4K HMI, and skinned it with a 1/2 Straw filter to mimic the ambient light reflecting in the doors and windows off of the huge amount of straw that was just out side the door. This 4k added some shape and definition to the wall and the actors face.
This is the view outside of the door of the saloon.
FIELDsaloon.jpg


It is important to keep in mind the color of reflected lights. The tint if the straw, needs to be compensated for when using pure color units in conjunction with the natural lighting. In addition i placed a 1.2k Unit pointed at the ceiling above the actor the add some fill light for the shadow side of his face.

The combination of these two lighting setups are visible here in the wide shot. They together create a natural, yet motivated lighting setup that we staged our actors in.

WIDE:
saloon_wide.jpg


Once the lighting has been set to the appropriate levels for exposure, the time comes for adjustments. Using the waveform on the AF100, i had the gaffer Marcel Rodriguez adjust the lighting setup to make sure we hit the IRE levels necessary to take advantage of all the AF100 could capture. I had him walking the lights, reflectors and netting elements of the set to the degree of 1/10ths of a stop to ensure that we used all 110IRE the camera could record. The image may have looked a bit flat, but its ready for the color grading session we had planned for it.

Camera Support:
Once we had the lighting setup, it came time to turn on the camera and get it telling the story. I used one of my favorite tools of all time, the Kessler CineSlider, Kpod and Hercules Head 2.0... I used it to add some subtle movement to many of the shots in this film. The beauty is that the AF100 fully loaded is still so light that there is no perceivable flex in the slider dolley setup at all. This makes for smooth repeatable moves that have that "expensive" rock solid look.


Cineslider.JPG


Photos Courtesy of Matt Gottshalk.

This is all for now... I will continue this break down once i get the other lighting breakdowns down on paper.

enjoy, feel free to ask as many questions as you like.
 
The af100 may not be the camera for you, if you are looking for razor thin full frame depth of field. Honestly, only the full frame 5d can deliver that everytime. The af100 however has a cinematic depth of field. Plain and simple.

True, that. BUT...Remember that when there's a wall behind us and can't back up, or we want the field of view behind the subject to be equivalent as it was with a full frame Letus or 5D sensor, we're gonna have to make calculations based on going with a wider lens, just to get back into the same ballpark of field of view. So if I want the look of that 50mm, I may need to figure what sort of 20-25mm lens is out there for me, and if it's fast enough to duplicate the look I had and liked with the full frame sensor.
 
True, that. BUT...Remember that when there's a wall behind us and can't back up, or we want the field of view behind the subject to be equivalent as it was with a full frame Letus or 5D sensor, we're gonna have to make calculations based on going with a wider lens, just to get back into the same ballpark of field of view. So if I want the look of that 50mm, I may need to figure what sort of 20-25mm lens is out there for me, and if it's fast enough to duplicate the look I had and liked with the full frame sensor.

The Voigtlander 25mm f0.95 will get you as shallow as you'd ever want to be on the AF-100. We used their 50mm f1.1 for a low-light interior scene, and it looks glorious. If you need speed, you have options on the AF-100, that's for sure.
 
Back
Top