DIY IndieSlider...

I just received my parts from Igus yesterday and plan on making my trip to home depot sometime today.

Here's my concern.... I plan on using the end stop solution that is posted in the first post. I'm pretty sure that you tap the end holes with the 3/8th tap. The same tap that i'm going to use on the center hole of my rail for the tripod. The thing is on my rail the 2 holes are of different size. The one in the center is much larger then the ones on the side. Did anyone have to drill the end holes out a bit before tapping?

I know it's kind of a dumb ? I just dont want to mess this up with money invested and all.

Steve

if you purchased the same size rail as in the first post, the 3/8 tap is perfect for the ends.
 
...sticky this son of a ***** already.

Who does a thread have to sleep with around here to get sticky?
(that sounds wrong on SO many levels)

Really! I've requested this a few times now. Please PM a mod and ask when you get a chance. Thanks!:D
 
if you purchased the same size rail as in the first post, the 3/8 tap is perfect for the ends.

I did that indeed... But the holes don't match up. I gave the lady the same part number listed and confirmed that with the shipping invoice. It looks like I'll have to drill the end holes out a little to fit the tap inside.


Thanks for the help... I'll make it work.

Steve
 
I did that indeed... But the holes don't match up. I gave the lady the same part number listed and confirmed that with the shipping invoice. It looks like I'll have to drill the end holes out a little to fit the tap inside.


Thanks for the help... I'll make it work.

Steve

You need a 5/16" hole for a 3/8" tap...you don't need to drill the end holes. The tap shouldn't just fit into the hole. If it did, it wouldn't have any metal to create the threads in.

The end hole on the rail at a perfect 5/16"....just tap them out.
 
Rock Solid Set Up with Bogen 351MVB2 Legs

Rock Solid Set Up with Bogen 351MVB2 Legs

A few thoughts after setting up my larger Igus.

I am using the Bogen 351MVB2 Legs. (I purchased a Bogen tripod 503HDV Head/351MVB2 legs with bag & spreader for $625)

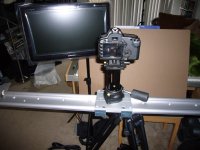
Even with the larger/heavier Igus system (20mm bearings) 6” Carriage and an extra long 1200mm rail this setup is rock solid. Zero movement – completely solid when using the 5DMKII. No other support needed - just one sandbag on the mid level spreader which I have low to the ground.

I like simplicity and quick setups so I purchased a second 75mm bowl (Bogen 520BALL $46) and screwed it onto the rail and also used the 3 set screws which keeps it from coming loose.

On the top side of the rail I have a Bogen ball leveler (and older one – the new model number is 438 $75) a FilmTools 4” Riser $26and another Bogen Quick Release Plate $50.

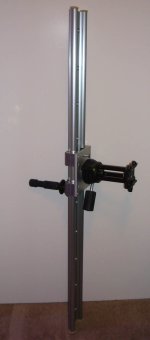
Also, I drilled a ½” hole near one end of the carriage and tapped another 3/8” hole a few inches from center on the rail and this allows me to simply screw in a 3/8” bolt to lock the carriage to the rail for easy transport.

I will carry the entire contraption together and when I’m ready to use it I only have to unscrew one handle to switch from my 503 head to the slider. Very fast.

The only thing I’m wondering is that I probably should have gotten the normal size slider because this thing is overkill for the 5DMKII. This unit could handle a 50lb rig or larger without flinching.

My%20Setup.jpg
 

Attachments

  • My Setup.jpg
    My Setup.jpg
    147.8 KB · Views: 0
  • Trasnport It Like This.jpg
    Trasnport It Like This.jpg
    46.8 KB · Views: 0
OFF TOPIC: By the way, the monitor in the photo is the Samsung P2370HD 23" full 1080P - probably the best monitor for studio work using the 5D Mk II for the price ($299).

It is attached to a light stand using the Matthews 861862 Monitor Bracket $250 (standard 75mm or 100mm VESA LCD/Plasma mounts). You have to buy four metric Allen screws 4M-10 at Home Depot.
 
Andy... The combination of Zaza and your info is extremely useful. I'm planning on having custom slider made in the next couple of weeks. I was always wondering about a stand mount for a bigger monitor. We want to use a splitter to share the output signal between the DP (8.9" monitor) and the Director (23" monitor). That Matthews Bracket is an excellent investment for the big monitor.
 
The only thing I still have to do with my larger slider is figure out a simple way to cap the ends. In the photo I just used some stickies. The holes on the ends of this slider are too big to tap for 3/8". I'd probably have to use 1/2" but Home Depot doesn't seem to carry a 1/2" tap.

However, I did tap the holes 2" in from the ends of the rail (from the factory they are a perfect size to tap 3/8" so I suppose I could make some end piece and attach it there.

This monitor will work well indoors, however. I'm not sure what solution works for running two monitors from the 5D HDMI since others have had problems using HDMI splitters because of HDCP (Digital Content Protection) perhaps.

I think I'm going to go ahead and order the normal size Igus carriage/rails also and compare them - performance vs difference in weight for portability.
 
Andy... The combination of Zaza and your info is extremely useful. I'm planning on having custom slider made in the next couple of weeks. I was always wondering about a stand mount for a bigger monitor. We want to use a splitter to share the output signal between the DP (8.9" monitor) and the Director (23" monitor). That Matthews Bracket is an excellent investment for the big monitor.


I bought a $15 Laptop shelf off ebay that screws on to the top of any heavy duty light stand. It has 2 velcro straps that hold the monitor securely in place. It works great and will save you a ton of money! $250 for a bracket? I can put that money in a better place.
 
No do not sticky this whale!

No do not sticky this whale!

...sticky this son of a ***** already.

No. It is W-A-Y too long to be useful anymore. Nobody coming here and looking for info about "indie slider" is going to slog through >>100 pages of messages, a great many of which are not "sticky-worthy".

For example, I gave up after 15 pages trying to discover why the vendor seems to have no way of just ordering something. You apparently have to wait to talk to a salesman to get a "quote".

What this topic needs is a good summary of learnings in a few (<5) posts. THAT would be "sticky-worthy".

ZaZa has been regularly updating the first post to help keep the important stuff up front. And I never needed to wait for a quote. I just called IGUS, told them what I needed, and gave them my credit card info. Three days later, I had my parts.
 
No. It is W-A-Y too long to be useful anymore. Nobody coming here and looking for info about "indie slider" is going to slog through >>100 pages of messages, a great many of which are not "sticky-worthy".

For example, I gave up after 15 pages trying to discover why the vendor seems to have no way of just ordering something. You apparently have to wait to talk to a salesman to get a "quote".

What this topic needs is a good summary of learnings in a few (<5) posts. THAT would be "sticky-worthy".

All the info you need is in the first post. Instructions, examples, part numbers, web address, phone number, end-stop solutions, risers, fluid heads, etc.

Just read the very first post. If there's something special you're looking for, just ask. I keep an eye on the thread pretty much everyday. I'd be more than glad to help.:happy:
 
Sorry for the silly question but to mount the carriage on the rail did you take the carriage apart and mount each of the 4 legs first then bolt the top to it? or did it just slide on?

Also when you talk about tapping holes, so you just mean drilling?
Sorry, Im new to this stuff.
 
Sorry for the silly question but to mount the carriage on the rail did you take the carriage apart and mount each of the 4 legs first then bolt the top to it? or did it just slide on?

Slide the whole thing on... don't disassemble it. IGUS should have included a slip of paper in the box with instructions for aligning the bearings. If not, ZaZa has included it in the very first post in this thread.

Also when you talk about tapping holes, so you just mean drilling?
Sorry, Im new to this stuff.

No, thread-tapping applies to a pre-existing hole. A thread tap will create threads within the hole that a bolt or screw will use to hold on.
 
Slide the whole thing on... don't disassemble it. IGUS should have included a slip of paper in the box with instructions for aligning the bearings. If not, ZaZa has included it in the very first post in this thread.

Thanks found the instructions. It didn't want to slide on out of the box. But it's on now. It's pretty stiff so I'll have to follow the calibration settings from zaza and igus.

No, thread-tapping applies to a pre-existing hole. A thread tap will create threads within the hole that a bolt or screw will use to hold on.

Doh. OK. See , I feel stupid. I'm going to hit the hardware store tonight. It's pretty slick looking.
 
Dumbfounded.

Now I feel really dumb.
Drove out and got the suggested accessories

3/8" Bolts, 3/8" Tap, Tap Hammer

Had to go 20 minutes away to get the tapper..

Get home, unscrew my tripod head and realize the screw is a much smaller diameter.

So few questions.
1) Do I not have a suitable tripod for this?
2) Even if I thread the real, the hole is too big to just screw on the rail...How should I attach it?

Wow. I feel dumb.

Someone is telling me it's actually a 1/4" and 20 thread per inch for smalller tripods.

I have a Velbon DV-7000
 
Last edited:
Someone is telling me it's actually a 1/4" and 20 thread per inch for smalller tripods.

I have a Velbon DV-7000

Hate to tell you this, but your tripod may not be enough. The Velbon DV-7000 has a max capacity of a little over 9 pounds, so add the slider and your camera and you're likely to be pushing the limits. That, and I have never found Velbon tripods to be that sturdy to begin with... so I wouldn't trust it to hold up to the side-to-side weight of the slider.

It may be time to upgrade your tripod and head.

I just got my tripod.

It doesnt feel that heavy. Maybe I'm wrong. I was planning on using this with my hf200.

But what do I know., Obviously not too much.
 
Last edited:
Well, you might get away with it in that case. Your other option is to drill your own secondary holes, and you'll need to get a titanuim drill bit and another thread tap to do that.
 
Back
Top