Share Your Lighting

Your brother has been hired as cinematographer for a film adaptation of one of James Joyce's books (or some such artistic drama with its sights on an Oscar). Problem is, he's always only been a gaffer. So he knows the names of all the types of lights and other things, but he doesn't know how to really put it together. He starts tomorrow. No time for a book. All you can do is write your top tips on a three-by-five notecard that he can bring with him everyday. What three to ten practical tips, tricks, principles, advice, etc., would you put? What things do you do every day, maybe even unconsciously, that make the difference between a good film and a bad one in terms of lighting?
 
Last edited:
The gaffer should be pretty knowledgeable (perhaps even more than the DP) in terms of how to "put it together."
Always be conscious of time of day and the weather. If you play things right, natural light can make your job a lot easier. But if you don't keep it in mind, it can really screw you.
If you're in a small location, don't bring in too much heat. Less can be more. A single soft source through a window and some fill is often enough. If you're in a large location, go with powerful sources placed far away. Remember the inverse square law, if your source is far away the distance acts as a buffer that allows it to light a large area evenly.
Be careful with your fill. I'll often fill from the same side of the camera as the key is placed, I find it can look quite a bit more natural. But if you do it the conventional way, from the other side, make sure it's a large source that can wrap around your subject and not be identifiable as a light.
 
The gaffer should be pretty knowledgeable

Sorry, bad imaginary scenario. The "gaffer," as you may have guessed, is me -- and I'm not even that. Lots of schoolin', little practical knowledge. Your reply, though, is just what I was hoping for. Thank you!
 
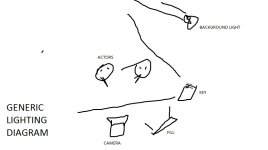
4 point lighting is a step by step process. One step and a time, you cant go wrong:

1. pick the key (softness and what direction-- soft light at some side angle from the camera (45 maybe) is the default. dont be a motivation nazi, if the light is soft the viewer will assume theres a light in the room .

2. decide on low key ( dramatic) or high key (less so) and set amount of fill (soft light) accordingly, as mentioned, putting the fill on same side of key (inbetween key and camera) is better than the opposite side usualy recommended.


3. decide of you want backlight, if so hook it up! I havent used backlight yet in any of my projects and would have little idea where the hell to put that light.


4. light the background with one or more lights to create a pattern of light and breakup the backgrpound and create a sense of environment. I dont understand why noone ever mentions the bg light, its a hella useful tool!


the fun part:


all lights are optional!


skip the fill for a very low key effect, skip the backlight (I do but only cause I don't know really how to apply it well yet)...


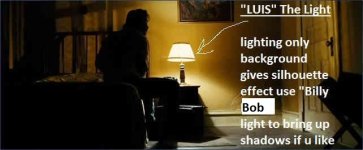
get this- light only the background and take out the key and leave a lil fill (or not) and you get a silhouette effect!


'"there are no rules only tools"
 

Attachments

  • GLD.jpg
    GLD.jpg
    40.3 KB · Views: 0
Last edited:
- If you can't see it with your own eyes, then the camera will never see it. ( "it" being the quality or look of the lighting you are after )

- Always fill with a light that's as soft or softer than your key ( which usually translates to a light that is larger than your key )

- Auto-Poles with Wall Mount Boom Arms attached to the top via SuperClamps are a great way to work in small spaces without having stands in the way. You can stick them flat up against a wall or in a corner and still mount a light 7 feet out from the pole with almost 180 degrees of movement. ( 160° Vertical and 180° horizontal rotation ) A few of these rigs make lighting changes very quick. ( be aware of the weight capacity of the wall boom when selecting your light: 10lbs max weight at full extension )

Manfrotto 432-3.7B Deluxe Autopoles : 7 - 12 foot height range

Manfrotto 098B Wall Mounting Boom Arm : 4 - 7 foot arm range

Impact Super Clamp with T-Handle : T-Handles Don't Get In the Way
 
Last edited:
Man y'all are the best. Thank you so much!

I never tried putting the fill on the same side as the key. That may help with the problem I've had with the classic three-point lighting scheme (or four-point if you include the background, as nycineaste reminds us), which is that it looks nice but sometimes a bit overly formal, unnatural.
 
My advice to someone with no real knowledge of lighting would be to Not light. A lot of times what really stands out as bad lighting is bad lighting done where none is needed. I've seen clips from plenty of young "cinematographers" that can't light s*%t, but what they can do is tell when the existing light Is good and use that. A studio shoot where all lighting is done from scratch is a different scenario all together though. I guess my advice there would be Space lights. Space lights and lots of them. And this is all just in an effort not to get the person fired within the first day. Won't be no talks of an Oscar there, that's for sure.
 
My advice to someone with no real knowledge of lighting would be to Not light.

Well, you have to start somewhere. As threadstarter, let me clarify. I am not about to walk into a paying gig and get fired.

I've had school and some experience. I could go on a set and make the lighting adequate. But my knowledge is mechanical and technical. I know key, fill, backlight, fresnel, HMI, umbrella, flag, C-stand, reflector, light meter, and so on. But it's never clicked. If I were to go onto a set, I would fall into three-point set-ups. I don't have the confidence to break the rules and try different things, not the free-flowing assuredness I have, say, about angles or editing.

I watch movies and can tell good lighting from bad or even mediocre, but I don't know if I can tell exactly how they did it, what lights the cinematographer hung and where.

This thread was more about how to take the lighting to that next level, from novice to intermediate.
 
Last edited:
hate to break the news to you, but theory and technique can only take you from neo-phyte to someone who-kinda-knows-what-hes-doing.


in order to go from intermediate to master etc, you have to study films (use the 4 pt systemc to understand whats being done), and practice practie to learn subtleties and learn from your mistakes.


you can only become a master learning "on the job" so to speak, so youre good to go!!!

study (of pro work) and practice ...


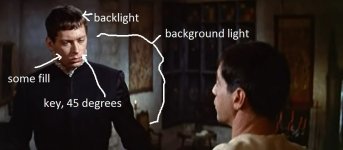
this is a random frame from a movie I was watching right now: ( pit and the pendulum)


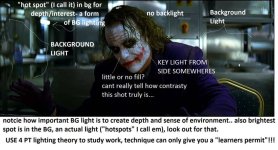
edit: did another one from a newer flick
 

Attachments

  • analyze.jpg
    analyze.jpg
    68.3 KB · Views: 0
  • the-dark-knight-the-joker.jpg
    the-dark-knight-the-joker.jpg
    62.1 KB · Views: 0
Last edited:
Thanks! Brilliant. And you're probably right. I may have hit a wall with book-learning. What I need now is practice, practice, practice.
 
for your own sake, stop thinking about 3-point lighting, or 4-point lighting, or whatever-point lighting, and stop thinking in terms of key and fill.

just knock that right off. you will never fully comprehend the job or how to light with that kind of mentality. just like you said-- you had never considered putting the "fill light" on the same side as the "key light" because that's not where the fill light goes.

That's exactly the thing-- there is no "key" light, there is no "fill" light, there's just what needs to be illuminated and by how much. Key and fill can be useful terms of communication once you get more experienced but you should NOT be thinking of lighting in these terms. If you need light somewhere, go put light there, don't think about whether it's a key or fill or side light, and don't think about where you should put your key or fill or side. Just put light where you need it, in the amount you need it.

God, I can't repeat this enough around here...
 
for your own sake, stop thinking about 3-point lighting, or 4-point lighting, or whatever-point lighting, and stop thinking in terms of key and fill.

just knock that right off. you will never fully comprehend the job or how to light with that kind of mentality. just like you said-- you had never considered putting the "fill light" on the same side as the "key light" because that's not where the fill light goes.

That's exactly the thing-- there is no "key" light, there is no "fill" light, there's just what needs to be illuminated and by how much. Key and fill can be useful terms of communication once you get more experienced but you should NOT be thinking of lighting in these terms. If you need light somewhere, go put light there, don't think about whether it's a key or fill or side light, and don't think about where you should put your key or fill or side. Just put light where you need it, in the amount you need it.

You know, it's funny, but this is a perfect example of how theory can get in the way of just "seeing". It's like why some teacher or guru or professor knows all about some art or another in mind-numbing detail, but can't produce it at all. It's a fine balance between knowing rules, and being able to just SEE.

This is good general advice: use your senses. Use your *eyes to see* what the scene demands lightwise, and only then use your 'book' knowledge of how to place lights to achieve that effect. Same with everything: use your ears to listen to music and compose using skills you've learned. Read and feel, and only then write. And so on.
 
Probably the best advice for ANYONE interested in naturalistic lighting: go to Roger Deakins' forum. Read every post. Ask him a question, he even answers from sets with his phone.

He's a master, and a saint for sharing ALL of his tricks.
 
Yes, you can, if you don't find the concept useful, ignore "4 pt lighting" and just light the scene.


Here are some things you're likely gonna want to do or at least consider:


set up your main/primary light, decide its direction and quality
you may want to add a light to bring up shadow areas for-- your desired level of contrast
you may want to seperate/edge lighting something, likely the main subject of the shot
you'll likely want to light the background with one or more lights


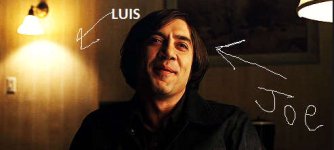
Lets call these lights:

Joe
Billy Bob
Sandra
Luis
 

Attachments

  • New Bitmap Image.jpg
    New Bitmap Image.jpg
    13.7 KB · Views: 0
Last edited:
best advise I can say about lighting is it's not about the light you add but what you take away.
 
best advise I can say about lighting is it's not about the light you add but what you take away.


Definitely . Ultimately the purpose of putting up lights is to create shadows.
 

Attachments

  • frustration_environment_1b.jpg
    frustration_environment_1b.jpg
    40.7 KB · Views: 0
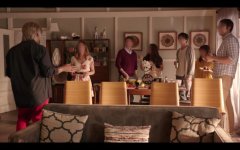
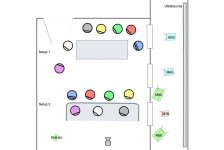
Thought I would put up an example of a setup I shot last week that is intended to mimic a natural light setup and has no defined key light. This material wouldn't be released for a while so I had to blur out the actor's faces. Hopefully you can still get enough of an idea of the results with what remains. Below are some frame grabs from the master and a lighting diagram.

This scene is set in late afternoon, and I had intended from the beginning to push hard light low through the windows to create floor skips. The idea was to take advantage of available ambient light through the windows since they faced north and wouldn't receive any direct sun in the afternoon, and augment with three HMI heads for the floor skips. However, our shooting call pushed two hours and I realized we would likely run out of daylight before the scene was finished. There was a six foot deep balcony outside this second story room and there were rigging points available from the floor above, so the grips flew a long piece of speedrail and tented out the balcony with a 20x10 ultrabounce. I then recreated the daylight feel with two M90's at raking angles pushing back into the ultrabounce, which returned the ambience to the room, then set two M40's through the two rear windows, tilted down hard onto the floor but also glowing the window sheers. I opened the sheers on the windows closest to camera and pushed an M18 at a similar angle across the actors on the sofa. The only instrument inside the room was a PAR 64 gelled half blue bounced off the ceiling opposite the windows to give a touch of fill.

With this lighting scheme we were able to shoot in both directions of coverage as well as with the windows behind us without any relight other than removing the PAR on the turnaround. I used some bounce cards on certain shots, picking up the heat on the floor and re-directing it as needed, but never needed to add more lights or adjust the ones on the balcony.

This was an efficient setup in that we could shoot continuously without worrying about running out of light, clouds rolling in it etc. It provided 270 degrees of shooting angles.

Obviously this setup required a significant size crew and equipment package. However, it could be recreated with much less under given circumstances. 28,000 watts of HMI here provided around a T5.6 at EI 800, but if one was to shoot with a high sensitivity camera at EI 3200, or high speed lenses, a similar result could likely be achieved with 1K open faces off three circuits of house power. In the instance of using tungsten units, building a tent that actually seals out the daylight would be a challenge for a small crew so it would be easier to shoot at night, substituting bedsheets for the ultrabounce if that is all that is available.

Hopefully this helps illustrate some of the good advice given earlier in this thread about taking cues from existing natural light and figuring out how to recreate it.

tablestillblur.jpgsofastillblur.jpglightingplotoscars.jpg
 
Last edited:
Back
Top