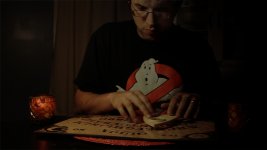
Learning to light cinematic.

Yep, thats exactly it.. its like flying blind. I sort of just have to put it where I think it should go, and hope its in the right spot. I'm gonna try something else tonight before I go to bed, but next time I give this a go I'm gonna see if either my wife or a friend will be my subject so I can move the lights around and see what effect they are having on her as well as the room.
 
Still couldn't get an actor.. so trying this again solo. Attempt #3. This one is the simplest of everything I've tried.. Still can't seem to get a "rim" light. I think the room is just too small to do that. If I put any light on that side of my face it lights up my whole face, and not just the hair line.

rhomma.jpg
 
so much better bravo. all u need now is a camera move like sliding up to that frame so u can put some motion into that scene.
 
Believe it or not, thats ONE 75w incandescent bulb in a "desk lamp". BTW, what did you do to it to make it look like that?
 
just adjust the curves in post, u could also add some film grain to it and maybe a really light diffuse in like MBL or something.

jtbejr.png
 
Last edited:
Believe it or not, thats ONE 75w incandescent bulb in a "desk lamp". BTW, what did you do to it to make it look like that?

Of course I believe it. I'm a DP/Gaffer! :)

As for what I did to change the look, well that's about 8 layers of work in MBLooks. I've been working as an amateur colorist for 5 years now. :) I'm on my laptop so I know the colors are wrong. I just don't have a color calibrated screen here.

Most people use WAY too much light. With the sensitive cameras of today, I do 80% of my lighting with practicals, and may add a 1k just to get ambient light levels above the noise floor of the sensor. Most of my interviews are done with about 100w worth of Fluorescent and a bounce. I lit an entire short film this past summer with all practicals, and a single softbox with 75w of CFL in it.

Take my advice. Before you light any scene, turn ALL the lights off. Then turn on your practicals and shape the scene with them. Chances are, unless you are playing in a very large space, you won't need much in the way of movie lighting.
 
Last edited:
Of course I believe it. I'm a DP/Gaffer! :)

As for what I did to change the look, well that's about 8 layers of work in MBLooks. I've been working as an amateur colorist for 5 years now. :) I'm on my laptop so I know the colors are wrong. I just don't have a color calibrated screen here.

isnt this interesting. everyone working on his one frame. i wonder if we could crowdsource a movie like this.
 
I use fresnel lights, which gives you the ability to control and paint key areas with light while using a more diffused light such as a kino flo or some sort of diffused light close to the subject which gives a nice illumination on them while the light falls off gradually, allowing your subject to stick out. flags/barn doors help out tremendously with light spill, And always light motivational, so having those props like candles and lamps helps the scene look natural instead of artificial lighting in which you are trying to avoid.

There are just so many variables that goes into any given lighting set up that as some one else stated. It may at times be unorthodox, but as long as you get the look you want it dosen't really matter much.
 
If it were me i'd add more ambient light in the background. Maybe turn on that lamp and dim it down to add some interest, open up that window and throw some slashes of hot "streetlight" around back there for some layers.
 
If it were me i'd add more ambient light in the background. Maybe turn on that lamp and dim it down to add some interest, open up that window and throw some slashes of hot "streetlight" around back there for some layers.

no no no, the window blows open from the spirit he contacted. duh :)
 
lol, The "scene" will be shot in a completely different location. This is for a short I wrote for thrillfest that I never got around to making. Since I wrote the script I wanted to make it anyway.

This particular scene, there'd be 4 people sitting around the table, and all have the same "look" as this last one did. I'd shoot from the same perspective as they use for the pot smoking scenes in that 70s show, and then a wide shot of all of them on a curved Dolly. I think the main problem with getting the look is the small room. I'm literally only a foot or two from the wall, so there isn't alot of space for the light to go. The desklamp sort of has a "snoot" on it, so its pretty directional.
 
The only way you are going to get what you REALLY want, is to get close in camera, and then re-light in post. I spend a lot of time doing that on these small films because we just don't have the money or the sets to do what we really want. It's not ideal, but it is what it is. And if Hollywood can do it without guilt, why should I worry?!

But really, this last one looks a TON better than your first efforts. I hope you agree.

I also don't know what camera you were using, but if you have a very wide camera available, I'd actually put the camera a bit lower, put on the widest lens I had, and shoot this again from the a similar angle. It's really a crab type of shot where the camera is moving 90 degrees or in a semi-circle around the talent. very subtle motion, just enough to give some life to the frame.
 
Yes, I definitely agree. I actually would be content with that look if thats as good as it gets. I am using a Canon T2i. Of course I was using the kit lens. I think a faster lens would have made it easier as well.
 
I dig the progression of images. I'd like to use them as a reference to show others as to why it's important to do camera tests. Imagine the tragedy that your film would have been if you had shot it like the first attempt...
 
I dig the progression of images. I'd like to use them as a reference to show others as to why it's important to do camera tests. Imagine the tragedy that your film would have been if you had shot it like the first attempt...

Couldn't agree more. I would urge anyone who is new to this understand that you can't just buy a camera and expect magic to happen. I've been on a feature film set for the past year, watching scenes be lit, and helping out a bit with it.. and I was still not "ready" to do it on my own without assistance from people who know their stuff. The cool thing is, with these newer cameras.. you have the means to practice over and over if you need to!
 
I think you are on the right track. The only thing I'd add (everyone has their own opinion BTW...) is a subtle bit of back light for separation. And don't forget to check the histogram with each setup. Make sure it's nice and full. The screen on the the t2i/7d/5d has a way of making the image look brighter than it is. I can't tell you how many student films I've seen that "looked great" on location, but in post were scoped out at just 20% of where they should have been. Even if you want a "darker" image it is better to get a nice full image in camera and then have the room to adjust in post. Best of luck on your shoot.

Please post a screen grab when you shoot it for real.

-J
 
Last edited:
the big picture

the big picture

alot of awesome advice, but for the sake of throughness, ultimately you decide what cinematic is.

Here's a chart:

Naturalism---------------Realism---------Expressionism
Nestor Almendros------Hollywood------John Alton

Take ideas from all three.

I think a big mistake alot of zero-budgeters make is try too hard to do a hollywood style with no hollywood money.
 
Reading through 5 pages, you progress a lot.
Just a small suggestion... If location allow, get the actor away from the background a little bit, so background will be out of focus.
Add some depth. Creating layers with distances.
It will help you to let audiences focus on the actor more.
Good Luck
 
Back
Top