General Hit me up with some tips for a college project.

Blakie222

New member
Hello community,
I'm a student from Portugal and me and some colleagues are going to do a movie on olive oil for a final, 3rd year high-school project. We made a smaller project on olive oil as well with a single T2i and no particular film-making material. We made a couple of boom mics out of Singstar microphones, wrapped them around a paint roller, but it on the paint roll extensible pole, and voila, the mics were born and they were pretty nice, they did the job. But now it's a bigger project, I recently acquired a T2i and we now 3 SLRs, 2 T2is which we intended to use as primary cameras and a Sony Alpha A350, which we intend to use as a secondary, or for the "making of". I would like to know if there is any equipment, in little to no budget (maybe some do it yourself ideas), on some equipment we could use to make it look more professional, or at least give us that "man, we're making a film here" feel. For editing, we use Sony Vegas Pro 11, and Adobe After Effects.

Any tips will be appreciated.
Thanks in advance.
 
or at least give us that "man, we're making a film here" feel.

I think the main things for the "feel" are your eye and your creativity. Can the director shoot compelling shots, and edit them into a narrative where people will think "I never knew olives were so fascinating". If you're not seeing that in your final product, look at documentaries you love and see what's missing. People focus on shots and composition, but really good docs seem to have a "purpose" to every shot, to emphasize a point of view, etc. A great musical score helps. Watch "Note by Note", a film that takes you through the making of a 9' Steinway piano, from selecting the wood to the final sale. My wife couldn't believe she was in tears at the end, in total suspense over whether "our" piano would be considered "special" by an artist.

On the tech side - a good audio recorder vs. the in-camera audio from the T2i; decent lighting, stable shots where called for. But that's all pretty standard. The main thing is - can you make people feel something from the work? Be intrigued enough to watch the whole thing, be interested, informed and maybe emotionally moved? That's a career-long question. Good luck!
 
Well, we achieved that in the first movie, and it's not like a movie just about olives, it's a movie with interviews and stuff, it's not like a pro film with only olive oil and olives. Thanks for the insight, but I really wanted to know some actual products I can buy.
 
How much you wanna spend?

As I said earlier, little to none. DIY, or at most, like 30$ per piece of equipment (shoulder rig, mic, whatever, matte box, teleprompter (we already ours set up with a tablet and a one way mirror), etc.).
 
A nice avenue for DIY is sound. I thought of this since you mention your singstar / paint roller experiment.

There is a nice capsule I have worked with a lot which can give some great results, depending on how far you want to take things. It's the famous wm-61a by Panasonic and in the UK, it's £1.30, so you buy them in 10's.

First off, you can easily butcher some unwanted ear buds for the cable and solder a couple of these in place of the buds. Result - instant upgrade to the built in mic for a few quid / bucks. The plug-in power supplied by the Canons is a great match for these caps, and they have great sensitivity, very flat frequency response and pretty low self noise for electrets.

You could also create a quick and dirty binaural recording effect with these (quite a good way of producing an immersive sound field), by simply mounting these inside the old ear bud cases (facing outwards, of course) and wearing them in your ears.

Of course, many film making applications call for a highly directional microphone pick up pattern, thus the common usage of shotgun mics. If you want this effect with an omni capsule like the wm-61a, you can always make a parabola out of household materials - but you will look more like a star trek nerd than the next Quentin Tarantino. Probably better to find some equivalent capsules with a shotgun pattern.

If like me you're super keen and super nerdy it is possible to get completely professional sound out of these - by modding the capsule and building a pre-amp to do justice to the extra headroom the mod gives. You would then need a better recording medium to reap the benefits, so maybe this is not for you, but I'll put it out there. Saying that, Zoom H1's are cheap and good.

Pre-amp: If you're super keen on awesome sound for peanuts, there's a chip called the INA217 which comes with a reference design for a microphone pre-amp which you can put together with a breadboard and a multimeter, plus a few other cheap components, and stuff it all in a battery box. The quality of the results you can get with this chip have been described as "giant-killing" by some.

Modding the capsules: look out for the Linkwitz mod (google it).

Since you admit part of this is looking the part, the old thorny subject of matte boxes. I have never understood why something to blocks the light is worthy of spending hundreds of pounds or dollars on, but then I am not a professional.

Some hate them, some love them, but for the DIY / cheap guys, the are great because we also tend to have a collection of cheap fast primes, so it solves the problem of needing tons of hoods and filters for our cheap lens - plus it looks good.

Fortunately, the market is now saturated with film making accessories which are as cheap as they possibly can be - especially matte boxes. There are some on ebay for 30 quid or so now.

I discovered Ted Ramasola before these were available, so I made my own. Try googling 'Ted Ramasola DIY Matte box', and check out some of his other projects.

I made a shoulder mount, and I'm happy with it, and I think it looks good too. If you want to know where I got the parts / how I did it, or you want pictures, let me know.

For a rails mount / quick release system, you can buy 15mm tubes and 60mm spaced rod clamps plus a cheap quick release plate on ebay these days - again, I made my own, but only because cheap wasn't available then, and it was hard work (but fun).
 
You should also get one of these cheap loupes that seem to be recommended by all who buy them - including me. Branded as Hoodeye, GGS and other names, they are the ones with a diopter and a flip up design.

Mine lost its glue and came off. If this happens, double sided sticky tape works very well cut into shapes to cover the base of the mounting frame.

I took the screen protector bit out of the mounting plate too - another bit of crap in the way that served no purpose to me. Finally, these are strictly not for the 3:2 screen, because despite claiming compatibility with the t2i, they block off 1mm either side of the screen. This can easily be solved by shaving some plastic from the inside of the frame on either side so you can see the whole lcd. You paid for every pixel, so it's good to use it!
 
Last edited:
Another opportunity for the cheapos - 800 x 480 in-car panels of reasonable quality are super cheap now. There is a company called Chinavasion which sells them for about 30 quid. In the last few months, Magic Lantern has evolved to make features like magic zoom and focus peaking usable on an SD display via the USB/AV out. It won't be the same as using a liliput via the HDMI output, but bear in mind, the camera only puts out 480 lines during recording anyway.

You'll need to couple these with a power source - I recommend li-ion batteries from ebay. A 6800Mah 12v is very compact, comes with a charger, and will cost you 20 quid. This will give you 3 hours use on a charge at the monitor's 25w.

They can be re-cabled very neatly to have a short connection to the camera. They do have a metal mounting plate on the base, but it's m6, not standard 1/4", so you'll need a thread adapter or a different type of mount to the usual. Thorlabs do a suitable thread adapter for 2 quid delivered.

Next you can think about making your own monitor shade.

If your shot means you can just look down a loupe - all good, just do that, it's better. But having a monitor opens up some more interesting possibilities.
 
Remote control! DSLR Remote for Android ROCKS and is in your price range. You need a phone or tablet with USB Host support, of which there are not many. Samsung Galaxy S II, and Tab are two.

But there is hope for SGS I owners (me). Just this morning a chap called sztupy put together a release of USB Host support for our phones. No one has verified that it works with DSLR remote yet, but in theory it should.

Great if you're into crane shots, and you need to frame remotely.
 
Well James, thanks for the huge post, and for the awesome tips. But we were going to use the Tablet as a Field Monitor and we realized we have a portable DVD player that will do the job, so the tablet will go for teleprompting. I would, however, like to know what you used to do that shoulder rig. Thanks a bunch!
 
Well James, thanks for the huge post, and for the awesome tips. But we were going to use the Tablet as a Field Monitor and we realized we have a portable DVD player that will do the job, so the tablet will go for teleprompting. I would, however, like to know what you used to do that shoulder rig. Thanks a bunch!

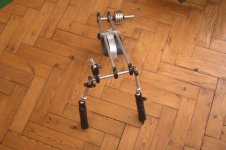
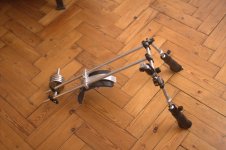
I found a supplier of half-inch aluminium tube, so I went with that because there is a quite a competitive market for various post clamps designed for optical engineering.

The rig is assembled mostly with these:

http://www.thorlabs.de/thorProduct.cfm?partNumber=RA90

With one of these for the angle adjustable hand grip rod:

http://www.thorlabs.de/thorProduct.cfm?partNumber=SWC

The ball head assembly you see is one of these, of which I have quite a few because they're awesome things:

http://www.ebay.co.uk/itm/C-type-Fl...graphy_StudioEquipment_RL&hash=item518ff8a7ab

There are 3 of these in use, one on each grip, and one on the camera plate. To connect the grips to the end of the half inch rod, I tapped a 3/8 thread and just screwed in the ball head end.

The counter weights came from a set of ladies dumb bells. The grips are from a bicycle.

The shoulder mount is a section of a black plant pot glue-gunned to a curved strip of aluminium strip for rigidity, lined with a double layer of foam rubber for grip and comfort. It is attached to the shoulder bars with one of my home made 60mm spaced rod clamps.

The quick release plate is one of these:

http://www.ebay.co.uk/itm/Quick-Rel..._Photographic_Accessories&hash=item1e699b987d

It cost me roughly £60 in total, but I already had some of the tools and components.

Things I like are that it is balanced, and grips my shoulder so much that if I angle the right grip to sit on my chest, I don't need to use my hands to support it. This is achieved by adjusting the counter weight forward /back and left / right, or removing or adding rings. Secondly, obviously it's an offet rig, so the camera is in front of your face.


rig_front.jpg

rig_side.jpg
 
Well, it was not what I had in mind, but thanks. Me and my crew are already making one, with PVC. Will be posting pics later.
 
Back
Top