GH2 DIY DMW-DCC8 (DC adapter)

keylight

Veteran
Thanks to Tyampel for the great idea (see here). I basically did what he did and made my own DC adapter out of wood, although I made a couple of tweaks.

Easy to do and didn't take much time.....

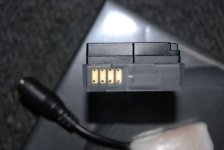
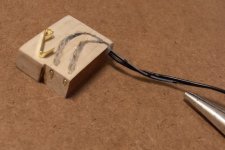
After cutting a piece of scrap wood to size, minus "a bit" on the thickness (more later why), I made 2 channels in the wood and small holes at the end. Did this with a Dremmel and some small bits. I used 2 brass picture hooks that had smooth bottoms - many have dimpled bottoms (I found them at Lowes. Home Depot's had dimples.)
GH2 DIY dc adapter (1 of 5).jpg

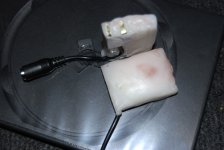
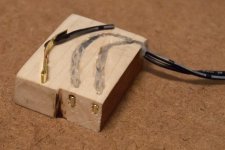
After soldering multi-stranded 24 AWG wire (taken from an old cell phone charger) to the modified hooks, I worked the ends into place. I then tested the block in the camera to make sure the contacts were out far enough. The camera turned on. Excellent. I used a hot glue gun to fill the channels with glue.
GH2 DIY dc adapter (2 of 5).jpg

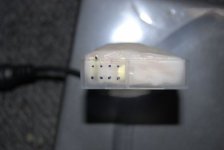
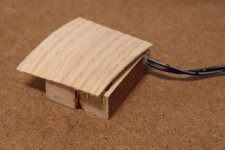
I then glued a strip of wood laminate (found at Lowes) on each side, covering the wires and bringing the thickness up to match the battery.
GH2 DIY dc adapter (3 of 5).jpg

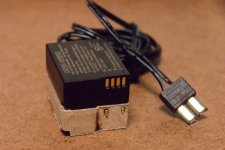
On the other end of the wire I soldered the right kind of plug for the battery I am using (basically doing what this guy did).
GH2 DIY dc adapter (4 of 5).jpg

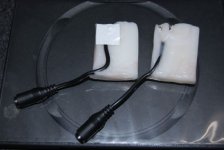
And that was it. Finished. Here's a photo showing it all together.
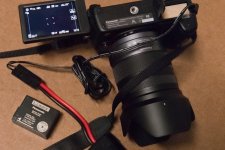
GH2 DIY dc adapter (5 of 5).jpg

It may not be pretty, but damn it - it works! And the picture hooks are rock solid. No worries that this thing will every come apart.

Finally, Bravo to Panasonic for an incredible camera. But they should be ASHAMED when it comes to the power situation. They could mass produce and ship thousands (hundreds of thousands) of the adapters in a matter of days if they wanted to. There only reason I can figure they don't have them available, is because they want to sell more batteries. Oh wait, those aren't available either.

Anyway, I hope this has been of some help.
 
Can someone smarter than me tell me how to check the voltage with a multimeter before I hook mine up? Just need to double check which wire is hot, and where it goes on the fake battery.
I don't want to short out the camera.
 
Can someone smarter than me tell me how to check the voltage with a multimeter before I hook mine up? Just need to double check which wire is hot, and where it goes on the fake battery.
I don't want to short out the camera.

The adapter (or the external battery) is providing DC voltage, so we are not talking about "hot" wires here.
Set up the voltmeter to measure DC voltage in the range of 15 or 25 volts. %0 will also do. Connect the black wire to the common/minus terminal and the red one to to the plus.
The meter should show the same polarity when measuring the battery as when measuring the adapter.

The plus terminal o the battery (and the adapter) is closer to the middle, the negative one is near the edge.
I hope this is helpful.
 
Experience with the external battery solution was not very positive, everything worked well in the beginning, Then came the first problem which was a strange sound coming from the 14-140 lens, it was so loud that you could not miss it, when i changed the lens to the 20mm 1.7 the sound was gone except the usual 20mm 1.7 sound. A further test with a Canon FD lens, no sound at all from the lens. Suddenly i get this error "This battery cannot be used" despite the fact that the battery is fully charged.
 
Experience with the external battery solution was not very positive, everything worked well in the beginning, Then came the first problem which was a strange sound coming from the 14-140 lens, it was so loud that you could not miss it, when i changed the lens to the 20mm 1.7 the sound was gone except the usual 20mm 1.7 sound. A further test with a Canon FD lens, no sound at all from the lens. Suddenly i get this error "This battery cannot be used" despite the fact that the battery is fully charged.

The message means that the battery's voltage is too low. Contrary to the popular beliefs the external voltage is supposed to be 9.3V not 8.4. I checked the adapter for the GH1 and it states that the charging (this one is also used for charging) voltage is 8.4 but the external voltage to the camera is 9.3. Most of the batteries rated at 8.4V actually deliver more so they seem to work.
Try feeding the camera with 8 NiMH cells or 6 alkaline cells and you will see the positive results.
I bought two 4-cell battery holders from Radio Shack, connected them serially to an "C" type Adaptaplug adapter and it works fine.

Good luck.
 
Nice work keylight. Here in the UK Panny don't even sell the coupler (or AC adapter) at all - can you believe it? So I might do the same, though I'll probably use Polymorph (a plastic that goes soft in hot water).
 
Last edited:
Well I tried to make one. No joy. I'm feeding it 9.3 volts....but I get the dreaded this battery can not be used. So after exhausting all possibilities I began to wonder about the 2 contacts in the middle of the battery....between the + and -. So I taped off the 2 middle contacts on the battery, put it in , and got this battery can not be used. Soooooooo, I'm thinkin Panny did something and the camera is looking for something across those 2 contacts. Interestingly....those 2 contacts seem to be negative polarity as they read 7.9 volts when measured across the + terminal.
Anyone want to tear their dc adapter open and see if there's anything wired to those 2 middle contacts??!!
Mark

BTW...my cam is new WE1CA001296
 
Well I tried to make one. No joy. I'm feeding it 9.3 volts....but I get the dreaded this battery can not be used.

(shot in the dark) Have you got the polarity the right way? Or are you accidentally making contact with the inner two pins inside the camera?

From everything I've read, the two pins are likely to be used for battery ID, but not for AC ID - ie. no correct ID = AC assumption (so must be 8.4V or higher).

I'm planning to put soft insulation tape over my DIY coupler's contacts before feeding it live juice, so I can see the impression of the camera's internal contacts & make sure they're hitting the right area.
 
Well I tried to make one. No joy. I'm feeding it 9.3 volts....but I get the dreaded this battery can not be used. So after exhausting all possibilities I began to wonder about the 2 contacts in the middle of the battery....between the + and -. So I taped off the 2 middle contacts on the battery, put it in , and got this battery can not be used. Soooooooo, I'm thinkin Panny did something and the camera is looking for something across those 2 contacts. Interestingly....those 2 contacts seem to be negative polarity as they read 7.9 volts when measured across the + terminal.
Anyone want to tear their dc adapter open and see if there's anything wired to those 2 middle contacts??!!

Mark

BTW...my cam is new WE1CA001296


If you have access to a meter, you might check the polarity and voltage of the battery.

The 2 center contacts should not be used, so make sure your alignment is right.

Let us know how it comes out.
 
Well I tried to make one. No joy. I'm feeding it 9.3 volts....but I get the dreaded this battery can not be used. So after exhausting all possibilities I began to wonder about the 2 contacts in the middle of the battery....between the + and -. So I taped off the 2 middle contacts on the battery, put it in , and got this battery can not be used. Soooooooo, I'm thinkin Panny did something and the camera is looking for something across those 2 contacts. Interestingly....those 2 contacts seem to be negative polarity as they read 7.9 volts when measured across the + terminal.
Anyone want to tear their dc adapter open and see if there's anything wired to those 2 middle contacts??!!
Mark

BTW...my cam is new WE1CA001296

FYI, posted a test (with video) earlier today showing 8 hours of time on the battery..... http://www.dvxuser.com/V6/showthread.php?245497-8.4v-Battery-test-results-(timelapse)
 
Don't use Polymorph directly on the battery. For some reason it reacted to it like glue! Maybe the plastic types are too similar.

Instead I took a mold of the inside of the plastic cover, that gets me the basic shape (just need to thicken the body a bit later).
 
Don't use Polymorph directly on the battery. For some reason it reacted to it like glue! Maybe the plastic types are too similar.

Instead I took a mold of the inside of the plastic cover, that gets me the basic shape (just need to thicken the body a bit later).

Looking forward to seeing the result. Hope you'll post pics.
 
Polymorph DIY DCC8 DC coupler.

Polymorph DIY DCC8 DC coupler.

Looking forward to seeing the result. Hope you'll post pics.

Just completed it:

Final1.jpg
Final1.jpgFinal2.jpg

The pics show the process (click for large version):


I used metal paper fasteners as contacts, they're a good size, easy to bend, and solder perfectly.

It took a few hours - just when I thought I was done, I was getting screwey results. My pins just weren't aligned properly. I have a great tip for that - use the batttery cover to mark the exact locations of each terminal:

mark1.jpg

Then you can insert your DIY'ed coupler, and check the contacts are in the right place: You can see my alignment was off here:

mark2.jpg

Another tip, if you use the battery holder as a mold as I did, cut a hole where the cable will come out.


I only had a non-regulated multi-volt adapter with 9V setting to test (read as 9.3V on my meter), and it worked fine - but I will feed it the lowest regulated voltage it works with, when I get my 12V battery & DC converter circuit.

The adapter that didn't work at first caused the camera to start up for a fraction of a second, then instantly shut down - kinda worrying. I'm not sure exactly what the problem was, but it was pin related (maybe the ground wasn't making contact). After aligning them all carefully with the holder, and tweaking their body sizes so they exactly fit, they both now work perfectly.

Good thing about Polymorph, you just heat it up in the area you want to rework. Takes a bit of skill & patience though. Note how I didn't make the battery completely square - it doesn't need to be, as long as the bump on one side is the right height, it stays in secure. That means you can use the battery cover as a mold, and not worry about the top until later (just leave a bump, then heat & reshape 'till it fits).

Considering my only option was getting them from Japan via Ebay at super-inflated prices, it was worth it :).
 
Last edited:
Very nice. How hot do you have to get it to reshape? Any proven or concern with it loosing its shape on a hot day inside the camera?

I eyeballed the contacts but your approach to use the battery cover makes a lot of sense.
 
I only starts going soft around 60 degC, so in normal temperatures it's totally rigid, like hard plastic. Normally you just place the granules in near-boiling water, and then knead it in your hands until smooth. For reworking locally you can reheat it several ways, I have a hot-air gun, but a hair dryer would work too. Or just throw the whole thing back in hot water and start again (you can do that forever).

The trickiest part with my approach is getting the contacts in there. I first molded the cover without the contacts in, as I couldn't figure a way to embed them precisely. So then I reheated just one side & edges and pushed the contacts & cables in there. I then had to correct them quite a few times. I think with practice I could get it right on the first attempt, but I've only worked with Polymorph once before.

EDIT: apparently the stuff is called "Friendly Plastic" in the US.
 
Last edited:
Thanks keylight and gl....all your suggestions check out. I think the problem may be the power supplies current is too low. Will test with a new supply in a few days. And on another note....I noticed in Home Depot today a Makita 9.6 volt battery pack that looks just like the RC car one. They also had a charger as well. IIRC the total price was around $65.

Mark
 
This all looks great. I just got my GH2 (after a 2-month wait), and I will definitely need more/longer power. I need to scrounge around for a block of wood....

A question: Does anyone know what a "safe" range is for volts and amps? I'm reading here and in other threads that, with the adapter, 7.2v is not enough, 8.4v will work, 9.6 v is OK....and what about amps (particularly with AC adapters)? The reason I ask is that I have a couple of AC adapters that might work, but I don't want to mess anything up or fry something if they are unsuitable. They are:

- An adapter for a portable DVD player, output 9v 1a
- The adapter for my old Pan GS180 camcorder, 7.9v 1.4 a -- which may not be enough

It sounds like people are experimenting with different configurations without doing any damage, but I don't know enough to know what's safe or stupid to try. Any thoughts?

Thanks,
Jon
 
Back
Top