DIY IndieSlider...

Hi AmazeStudios,

Thanks very much for all the information. Good to know. I just played back the video on Vimeo ( your video ) and can kind of see that bolt in place in the pre-drilled hole in the rail.

Maybe some time you could just shoot a quick pic of that hole with the carriage over to one side to show the bolt coming up. Ah well, nothing magic there, but it's nice to see just to reassure me and others who are just starting out.

As for the tripod head, good to know, It's a good way to go if you have a heavy camera, with grip, and heavy lens, that's something I wasn't thinking about.

Thanks again for your time,

Dave


Very nice setup.
Was there a reason you went with an expensive tripod head like that ? is it because you wanted the longer handle ? , now I'm thinking of buying the one you have there in the video.
Hi Dave, I chose the 701HDV because it supports the 5D MKII w Grip and lens very well.

I'm looking closely at your pieces and I see the bottom of the FilmTools 4" riser is threaded.... did you have the guy drill a simple hole into the carriage ( but he did NOT thread that hole ) ? ... so a bolt just slides up into the hole of the carriage, and then that bolt threads into the 4" riser ? ... I also see a rounded nut on that bolt coming up through the carriage... so it is basically double bolted.... ( ? ) I'm not quite seeing how your neighbor did it.
I put a 5/8 Hex through the threaded carriage. Since that was super tight, I was able to screw on the Filmtools riser (which comes threaded). I didn't like the small part of threads sticking out the top, so I just topped it off (It's mostly for aesthetics)

- am I correct about this ? ... I'm trying to stay away from any threading, and that part there doesn't look like I it would need to be.


The other question I have is how you have the Igus rail attached to the tripod. Did you thread this part ? or is this also a nut and bolt ?
I threaded the middle hole, but I would recommend drilling a new hole since it would have more surface area. It feels pretty secure though and I haven't had any issues yet.

I'd really appreciate it if you could snap a few pics of that area, to give me an idea. I really want to stay away from threading the rail.
I basically followed the setup from the 1st page. I should have taken a picture of the rail attached to the tripod. I was thinking an extra precaution would to bolt the top of the tripod where the rail connects, I just have to buy a nut at Lowes.

Thanks for your time

Dave.
 
Hi AmazeStudios,


Maybe some time you could just shoot a quick pic of that hole with the carriage over to one side to show the bolt coming up. Ah well, nothing magic there, but it's nice to see just to reassure me and others who are just starting out.

Dave

Hi Dave, Mine looks just like Zaza's from the front page:
1220111589.jpg


I'm thinking of getting a quick release plate so I don't have to constantly bolt it on and off.
Manfrotto 577 Rapid Connect Adapter with Sliding Mounting Plate (501PL)

Zaza, would you mind posting my video on the front page of this thread?

Thanks,

Gary
 
Thanks Gary,

I am thinking of buying that plate also, seems the way to go. Zaza ( Joe ) had suggested this one to me a few days ago. Seems like the logical way to do it, unscrewing the rail from the tripod is not something I would want to do every day. Quick release will give more support to the rail too. - A lot more support I'm thinking.

Dave.


Hi Dave, Mine looks just like Zaza's from the front page:


I'm thinking of getting a quick release plate so I don't have to constantly bolt it on and off.
Manfrotto 577 Rapid Connect Adapter with Sliding Mounting Plate (501PL)


Gary
 
I also see you have threaded a new hole ( not an existing hole that came on the Igus rail )

I got my rail the other day, and I can't believe anyone would even try to thread one of the pre-made holes with so little material to actually thread. I would never trust a $700 camcorder or a $200 DSLR with a $2000 lens on that,, no thanks.

I still use my original slider built 2 years ago now and have never had a problem. It holds my DVX100b w/Redrock M2, nikon lens, follow focus & matte box no problem. It's also been on & off more times than I can count.


The hex screws - where did you buy these ? and did you thread the ends yourself ? ( I don't know if I could do this myself with a hand drill ) would need to take it to a machine shop I think.
You need to go back and read the first post...I list the parts & part numbers for the hex thumb screws.

To clarify, you had holes at the ENDS ? of your rail ?, I just checked mine and there are no holes. I'm talking about the ends... not on the top of the rail.....
Sounds like you went with the lighter rail 10-40mm? That doesn't have hollow rail...it's solid. You would have to drill it out and tap it 1/4"-20... and it would have to be directly in the middle.

picture.php


picture.php


picture.php


Be sure to checkout the Photo album: http://www.dvxuser.com/V6/album.php?albumid=214
 
I will go back and check the list of parts, thanks for the reminder.

I ordered the exact pieces you have in the original post, but the rail I have it
solid. It is very heavy too, well it's not light I mean, it's darn heavy. very well built I might add.

Hmm, so everyone who ordered the rail in the first post, got a hollow rail ?

I am confused. I am glad though that my rail is solid, I think it makes for a much more sturdy product ( I think ? )

Edit: this seems to be the parts, so the white plastic pieces, and those little hex bolts:
Here are the part numbers of the stuff I got at Home Depot:
(4) Cap Screw Socket 3/8" x 1" UPC# 30699 72208 - $2.98 each
(4) Spacer 3/8" long/nylon UPC# 30699 87368 - $.58 each

Total $16.55

Dave


You need to go back and read the first post...I list the parts & part numbers for the hex thumb screws.

Sounds like you went with the lighter rail 10-40mm? That doesn't have hollow rail...it's solid. You would have to drill it out and tap it 1/4"-20... and it would have to be directly in the middle.
 
Last edited:
Humm... you got 16-60mm rail and it is solid, not hollow rail? Very strange...I've never seen a solid rail 16-60mm W rail and have ordered plenty of them? please post the part number off your reciept.
 
Joe,

you are going to make fun of it.

For some reason I was 10000% sure my rail was solid. I just went and checked, thinking ok I'll go snap a picture.

DOH ! ..... the rail has holds in it.... at the end... the rail is NOT SOLID.... ok I"m a dummy, my memory and my recollection is really failing me.

oops ! and a big one at that . Sorry ! :-(

Dave.

No problem... that's a GOOD thing. All you have to do is buy a T-wrench and a 3/8"-16 tap and tap the ends! Buy the hex screws and spacers...and you're in business. Then you can get a pair of the ZazaSlider Feet and you have it all!

picture.php
 
doh, I should have said, you are going to make fun of "me" not "it" somehow I type it instead of "me" oh well, but you got the point.

Thanks very much for the help Joe. I'll go to the store tomorrow ( Home Depot ) and see if I can get an inexpensive tap.

I love those feet you have designed and are selling, but I just can't justify $225 for feet when the rail and carriage cost me about 1/2 of that :crybaby:

maybe in future you will be bringing out a thinner model for those of us who don't have that kind of money. Perhaps something a lot lighter
( less aluminum ) so you can sell them for $89 a pair or something.

Call them ZaZa Lite or something like that. Oh well, who knows what the future holds, you may already be thinking of something like that.

Dave.
 
I love those feet you have designed and are selling, but I just can't justify $225 for feet when the rail and carriage cost me about 1/2 of that :crybaby:

Still cheaper than others on the market that aren't as flexible.

Lets see, $225.00 for a pair of feet and $160.00 for the rail and carriage... $385.00 total for a slider that gives you
low shots from 1" off the ground, levels on uneven surfaces, vertical slides, tripod mount, allows for mounting an
external monitor, audio recorder, etc. and acts as a shoulder mount too.:thumbsup:

Having sliding shots, dolly shots, shoulder mount and even crane simulation shots (vertical slide) in one portable unit can't be a bad thing.
 
For me, I want to keep the price as low as possible. I am currently using 2 light stands which were just over $20 each, which work extremely well, they slide up to any height, I can put any slant to the rail so it works for me. I honestly don't want to spend any more on it, as it does exactly what I wanted it to do. I'll add those little white end pieces to it but that's about it.

I still can't justify putting $225 on a pair of feet, the reason I bought the rail and carriage from Igus was to save some major money.


Lets see, $225.00 for a pair of feet and $160.00 for the rail and carriage... $385.00 total for a slider
 
wow, that's totally wicked ! ... watch the video directly on Vimeo, it's much larger.

I've never seen a motorized rail before, so this was quite nice to watch.


Thank you for this inspirational thread.

Here's my motorized version of the "Zaza" slider:
http://canon-hf100.blogspot.com/2009/07/diy-camera-motion-control_09.html

I'm afraid my small stepping motor will not move the huge video heads and cameras shown here but it works fine with my Canon HF100.

Update: it seems I was a bit too cautious. I just successfully moved 6 kg (3 lb)!
 
So i got my slider last week and man... am i thrilled that i got it! It'll take me about 2 weeks to complete though as my school shop is closed for the next two weeks due to the Olympics.

Anyways, I opened my package yesterday and this morning, i got a product update from igus. they have released new bearings for the Drylin rails.

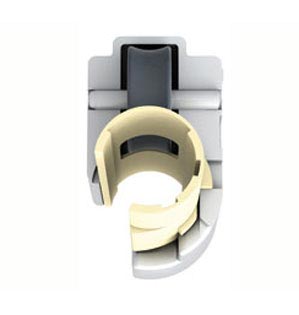
they released the DryLin® WJRM - Roll and slide - they have placed a wheel within the bearing to help reduce friction and make glides easier.

N09_5_12.jpg


An additional DryLin® W solution is the combined rolling and sliding carriage.
Because of the defined load direction the required drive force is reduced by the maintenance free roller bearing. This system represents a good solution for movements up to 50 kg.

I wonder when it'll be available. It'll be exciting to see if it'll help with camera movements.

I'm about to order some part and give it a try but i want with the bearing above when can i get this and what part do i need to make one working Thank you this is sweet
 
Hi guys,
So I'm going to Home Depot today,

I'll get the following:

3/8" - 16 thread tap and handle set
5/16 metal drill
3/8" hex head bolt


- I'm hoping that I can drill a straight hole into the carriage. Not sure how many of you had great results using a hand drill.

Ok so with the tapping of that hole, what are the chances the thread will be on a slant ? .... is it suggested to do this by hand ?

I'll get that handle to go with the tap, but how do you guys do it ? slowly, slowly turn it into the hole, back it out, turn it in back it out, and just hope that the thread is somewhat straight ?

I'm guessing a drillpress is the ONLY way to do this 100% accurately though.

How many of you have had good success tapping the hole by hand ?
 
hey, nice find, and a guy in Germany to boot. I am liking his way of doing this, just a hand drill, and not even a tap needed. How simple is that. I've actually questioned the need for the tap, as I always thought as long as screw goes into the tripod head and is tight, then why the need to tap the hole in the carriage. Many quick release plates are made that have a loose screw, and the tightening happens when the camera is attached to the plate. Manfrotto's quick release plates work this way. ( The screws in the release plate are loose, you can turn them, and the added camera to them is what acts as the securing method )

so, what's the advantage to tapping anything I'm wondering now.

It's the least expensive way to go that's for sure.

yes, tapping is cool, looks great, but is it really needed ? I'm thinking not.

Thanks for posting that video link natxbrotha


For those of you scared to make your own slider, here is a great tutorial that goes through all the steps: http://www.friedhelm-fischer.de/com...slider-tutorial-how-you-build-up-a-cam-slider
 
I'm about to order some part and give it a try but i want with the bearing above when can i get this and what part do i need to make one working Thank you this is sweet

Sweet, that roller bearing looks real nice.

To recap previous posts, I'll be meeting with the igus rep tomorrow morning and will get a sample of the new bearing...but I wouldn't get your hopes up. It was really designed for heavy sliding loads that hang vertically. You'll notive the wheel rides along the side of the rail. (which would be the top if a sliding door were attached)
picture.php


I'll let you all know... although I've never had a problem with my sliders as is.


I have one bearing now...waiting for the other 3 to come & will test then. :thumbsup:
 
some people really need to lighten up.
even if people from igus saw that pic, how offended do you think they'd be? He didn't "deface" anything, he photoshopped it.
 
Back
Top