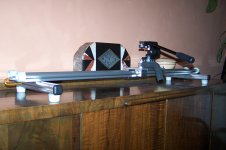
DIY IndieSlider...

hey I'm wondering whether its possible to connect multiple tracks? The reason I am asiing is I am looking to setup a pretty long track, but would prefer not to carry around a huge track... it would be nice if I could buy 4 or 5 1 meter tracks and then just put them together. Any ideas?'

cheers!

I have thought of the same thing but was scared of any kind of snagging with the bearings... but I was also thinking you might be able to do it if you grind/sand the end of the track enough to where the bearings could smoothly transition and lock the track together like the Matthews track is locked together...
 
That would be really cool. I ordered a 3ft track, and will pry get another for my other tripod. If I could lock the two together, I would have a 6ft glide! Wow!!!
 
There has been talk of joining track earlier in the thread...but I don't think anyone has tried anything as of yet. This track comes cut so clean, I don't see any reason why you couldn't use a little pieces of 5/16" wooden dowl in the ends of the track (if you ordered the WS-16, the ends of the rail are hollow and just about a perfect 5/16"), join them and then use a piece of metal strapping or something that is attached using the last hole on each rail.

Should make a strong, seamless joint...

I'd also use some sort of support at the connection.
 
I would think Igus would have an adapter, as video is just part of their market. If not, I would imagine blocks and clamps would do the trick.

Anyone mounting light shoes as end stops or using a fishing reel for consistent pull? I would think for video w/o live audio, the optional fishing reel clicks would help establish a consistent speed.
 
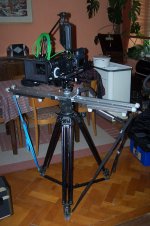
Here comes Frank´s Lo-Raidr - based on the famous ZaZa Slider. :happy:

Pic 1 shows the whole shebang. No extra supports, just 3 straps.
Rock solid and no extra monopods to carry - I wonder if anyone ever came up with this simple idea? (did not read all the posts here in that thread).

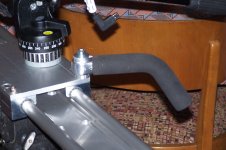
Pic 2 is the nifty handle - actually out of a bike shop.

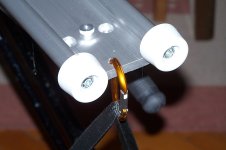
Pic 3 shows the stoppers (actually door stoppers)

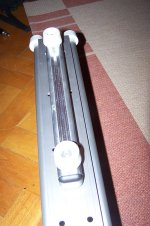
Pic 4 shows the "landing gear" in parking position. Twist a thump screw and it slides out to it´s full glory. Again rubber door stoppers here.

Pic 5 shows the "landing gear" in action.

Frank
 

Attachments

  • 1.jpg
    1.jpg
    192.1 KB · Views: 0
  • 2.jpg
    2.jpg
    163.4 KB · Views: 0
  • 3.jpg
    3.jpg
    109 KB · Views: 0
  • 4.jpg
    4.jpg
    214.7 KB · Views: 0
  • 5.jpg
    5.jpg
    150.7 KB · Views: 0
Last edited:
Thanks Zaza.

I´m so glad I bought the biggest combo they offer.
My rig feels quite comfortable and safe on it.

Frank
 
Thanks Zaza.

I´m so glad I bought the biggest combo they offer.
My rig feels quite comfortable and safe on it.

Frank

Yeah... that rail you bought is BEEFY stuff. I bet you could just about stand on it and it wouldn't flex a bit!:happy:
 
I used a threaded conduit pipe from Home Depot with a few homemade spacers and it works great. The trick is to find something that will raise the camera height just enough so you don't see the rail.

Did you have to do some extra drilling into the spacers you made or were you able to find something that had 3/8" holes?
 
I think it's smart to put the stoppers at the very end. That gives you more real estate in which to slide.
 
my 1250mm rail proved to be too long to mount on a single heavy tripod as my rig tips over
im trying to decide between two monopods or another smaller tripod to add as extra support
can anyone tell me if having two monopods is just as sturdy as having another tripod?
 
There is no need for extra Monopods. I use 3 nylon straps to secure the whole thing.

Even if my 25 lbs camera is on the outer edge of the
1200 mm rail it needs no extra support, the whole rig is quasi "self stabilizing".

I also would like to recommend some sort of handle to everyone, it really helps to get smooth rides - also the ole bungee trick makes pretty smooth start and stops.

I made a little Vimeo clip - sorry for the bad quality, but you get the idea.

Frank

 
Last edited:
Thank you Frank. Very creative handle idea! I might want to go with a smaller handle for portability.

The bungee cord pull makes a lot of sense. It's like a shock absorber so you don't have to edit out a sudden start.
 
Last edited:
have you run into any problems with your tripod head/camera mounted off-center on the carriage?

mine is mounted right on the center, equidistant between the 2 rails and i run into sticky friction trouble when tilting the camera down.

i also agree that you don't need a monopod if you have the carriage adjusted properly. a good tripod will be stable enough and connecting a monopod makes the whole thing very awkward to move around.....defeating the purpose of being able to quickly setup short dolly shots.
 
have you run into any problems with your tripod head/camera mounted off-center on the carriage?

mine is mounted right on the center, equidistant between the 2 rails and i run into sticky friction trouble when tilting the camera down.

Keep in mind that Frank went with the heavier, wider track and a longer carriage. I believe he mounted it to one side to account for the 35mm adapter, etc. on his rig... so it was properly balanced.

Depending on your rig, if you tilt down too much, you will get drag, as you are shifting weight to one side of the carriage. The best way to fix this would be to adjust the camera back a bit when tilting down...to rebalance it. The idea is to keep the weight centered on the carriage.:happy:
 
I just bought the two parts from Igus - they are back ordered on the carriage until November 20th.
I ordered my rail and carriage about 3 weeks ago, they didnt tell me the carriage was on backorder got the rails was confused why i did get the carriage so i called them the New Jersey Igus location said yes its on backorder will come in today actually to New Jersey and theyll ship it to me right away so hopefully at the end of the week which is Oct 23rd. hope its not nov 20!
 
Back
Top