Been Messsing About...

Random inspiration

Classroom:

Classroom.jpg


Notes:

Interior scenes can grow in polygon size, this leads to longer render times, this render has some noise issues in the darker regions, although some post work may be able to remove this, my Photoshop skills are nil at the moment.

I wanted to add a few more props but the render times put me off mood.
 
Great stuff.

I'm just getting started and my stuff is terrible compared to yours. I am using Blender though, and I hear the learning curve is pretty steep.
 
hey thanks guys, I should have some more stuff coming soon.

/bballplay, just keep at it, I've found that doing tutorials goes a long way.

Cheers!
 
That's what I've found helps. I can do the tutorials that are step-by-step clicking, but the ones with modeling where there aren't exact instructions are proving to be very difficult.
 
don't worry, in time you will find that as your confidence and level increases, you will start to skip past the step by step, eventually it will become just a rough guide.
 
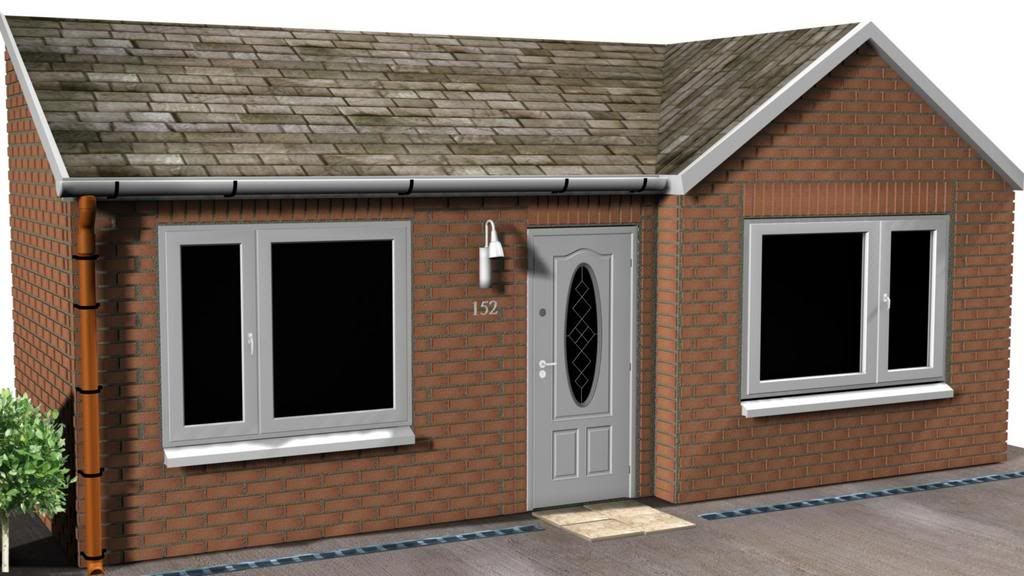
Our Real life house extension proposal. After receiving approval from the Local Council, I was requested to produce architectural pre-visualisation along with a 2d plan for our builder. After three days work this is the result, it was printed on A4 sized photo paper and thankfully everyone was extremly pleased with the final result, the idea was understood by everyone.

Planned House Extension:

Extension.jpg


2d Plan:

Front_extenstion.jpg


Notes:

At first, I used a brick texture, this however looked fake, so instead I decided as I've done in the past to model a brick and make copies and hand place them (virtual brick laying) and the result now is even when the camera zooms all the way in you get to see each individual brick.

Also a mistake was spotted, the windows have the handles on the wrong side (they should be inside)

lastly, a camera mathed movie with the extension composited was made, however sliding errors meant that it had to be dropped, I do however plan on making a working version later.
 
Good work Anhar. How long did "virtual brick laying" take? Was there any specific process you did to to speed it up or to make sure the pattern stayed the same?
 
Well, I lined up by eye, then copyied up, then deleted some, rotated copyied,, nudged etc. All in all about 1 and half hours, ,

As for using textures, yes thats how most people do it, but textures breakdown as soon as you get close ups, also textures does not allow you to place individual bricks in the right pattern you want, look at the window frame topside. Lastly its great for realism because it has actual geometery rather than bump mapping.

Once I get around to doing a video (camera tracked), you will see the advantages of using "virtual bricks" over texture mapping.
 
yes that is true. workflow depends on the requested quality.

Well, I lined up by eye, then copyied up, then deleted some, rotated copyied,, nudged etc. All in all about 1 and half hours, ,

As for using textures, yes thats how most people do it, but textures breakdown as soon as you get close ups, also textures does not allow you to place individual bricks in the right pattern you want, look at the window frame topside. Lastly its great for realism because it has actual geometery rather than bump mapping.

Once I get around to doing a video (camera tracked), you will see the advantages of using "virtual bricks" over texture mapping.
 
Its been a while, a client wanting something pretty simple, made to correct dimensions.

Bespoke Stainless Steel Catering Table:

stainless_table.jpg


Note:

Basic workflow, completed very quickly
 
Every time I see your work, I see improvements not just in modeling, but in lighting and texturing too. But do us geeks a favor and include a wireframe with the main pics.

My only crit about the house render is the texturing from the main roof to the part that angles up. A definite texture change, the shingles from the main roof dont blend with the shingles of the angled part. UV texturing of the roof, with that portion of the geometry inclusive would help.

You are getting very good. Keep up the work.
 
Last edited:
Hey thanks matt, yes I'll include wires again, I just assumed no one was interested!

Your right about the texturing, I was going to actually model each roof tile, but since the bricks was modelled, the whole thing was starting to get really slow.
 
Back
Top