Why I think Knee and Slope settings are the Devil

mraaron895

Well-known member
So I think we all know by now that the FS100 isin't the best at holding highlight information, as it has been discussed quite frequently on this forum. I've compared it against the Canon XF305 and it's just silly how much hilight detail the Canon can retain compared to the FS100.

Recently I have been quite unhappy with how certain picture profiles have dealt with hilights. They often come off murkey and flat looking rather than bright and vibrant. After much research i've narrowed it down to the knee and slope settings. So often I think I've relied on lower knee and slope settings to bring back blown out details in my scenes. But I'm always unhappy with how the camera renders these hilight details, especially when it comes to overexposed skintones and hair.

What has been failed to mention is what exactly adjusting these settings do. I think the general thought on Knee and slope settings is that the lower your slope and knee percentage the more amount of information your able to bring back in your hilights. This is only partly true. When you alter your knee and slope settings to a lower number your telling your camera to digitally COMPRESS your hilights. This is what leads to the flat murkey looking skin tones on a bright sunny day.

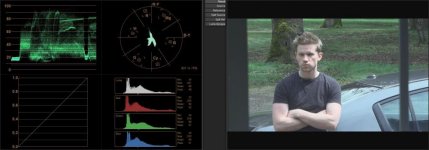
I've attached two screen grabs illustrating an example of a low knee and slope setting against the highest knee and slope setting. When you look at the histogram on the low knee and slope settings you can see all the compressed hilight details which is all automatically lost when you compare it to the nicely graduated high knee and slope settings.

For me personally this is what works best for me. I'd rather have actual blown out hilights that flat murkey looking hilights.

Image 1: Knee: 105% Slope: +5
Image 2: Knee: 80% Slope: -2

Capture2.jpg


Capture-1.jpg
 

Attachments

  • Capture.jpg
    Capture.jpg
    47.2 KB · Views: 0
  • Capture2.jpg
    Capture2.jpg
    44.5 KB · Views: 0
Last edited:
Only took a year for someone to agree with me!

That WFM from the second image illustrates it perfectly - putting a load of stuff at 80

S
 
So I think we all know by now that the FS100 isin't the best at holding highlight information, as it has been discussed quite frequently on this forum. I've compared it against the Canon XF305 and it's just silly how much hilight detail the Canon can retain compared to the FS100.

Recently I have been quite unhappy with how certain picture profiles have dealt with hilights. They often come off murkey and flat looking rather than bright and vibrant. After much research i've narrowed it down to the knee and slope settings. So often I think I've relied on lower knee and slope settings to bring back blown out details in my scenes. But I'm always unhappy with how the camera renders these hilight details, especially when it comes to overexposed skintones and hair.

What has been failed to mention is what exactly adjusting these settings do. I think the general thought on Knee and slope settings is that the lower your slope and knee percentage the more amount of information your able to bring back in your hilights. This is only partly true. When you alter your knee and slope settings to a lower number your telling your camera to digitally COMPRESS your hilights. This is what leads to the flat murkey looking skin tones on a bright sunny day.

I've attached two screen grabs illustrating an example of a low knee and slope setting against the highest knee and slope setting. When you look at the histogram on the low knee and slope settings you can see all the compressed hilight details which is all automatically lost when you compare it to the nicely graduated high knee and slope settings.

For me personally this is what works best for me. I'd rather have actual blown out hilights that flat murkey looking hilights.

Image 1: Knee: 105% Slope: +5
Image 2: Knee: 80% Slope: -2

Capture2.jpg


Capture-1.jpg

You could very well be right, but don't you think that you've only done half of the experiment? What about colour grading? Which image colour grades the best?

And what about an even more challenging scene where a lot more of the image would be blown out at 105 and +5, say inside a car, shooting the driver, but wanting to preserve some of the image out the window? Wouldn't 80 (or 95) and -4 help save a little bit of that very bright exterior?
 
Which one grades the best? The 1st image with the knee set to 105% & slope +5. If you look at the histogram from image 1 and compare it to image 2 you will see the hilights have a much smoother transition from the brightest value to darkest value.

For the scene you are describing in a car where you would want the same exposure on a drivers face as the outside I would never rely on in-camera compression to achieve that shot. I would have to light the interior of the car to properly get that shot, or rent a RED EPIC and shoot HDRX. Otherwise if I did change my knee and slope settings to a value such as 80% -4 the hilights on the outside of the car would be very compressed, plasticy, and unappealing. You can see this right away if you compare the two images I posted and look specifically at my face and arms. Look what happens to the hilights.
 
I've been experimenting and will try to 105%knee next time. Curious to see it on my own monitor.
 
Since we are talking about highlights, let me ask you this. I set my knee slope settings to expand the highlights for one reason, I really HATE what my FS100 does to the image just before it clips on all channels. If a single color is dominating (or secondary color) the image color shifts to red,cyan,yellow,magenta very harshly and then very harsly goes to white. There is no gradient between those edges and with the 4:2:0 color space that gets output, those harsh transitions end up having darker contaminated color between the regions that make it VERY difficult to fix in post.

What I did to test this is pointed my camera at a very bright blue LED and compared it to something I like the HL handling better on, the 7D. What I noticed was that on the 7D, as the blue began approaching clip, the LUT of the 7D ramps up the other channels so that they all hit white at the same time. What this does is create a nice gradient that is actually the shifted color, but since that gradient is to white, it is very pleasant.

What I noticed on the FS100 is that, in that zone of color shift, there is detail that you do not see on the 7D, but, given that extra detail is so monochromatic, it just doesn't look good to me, at all.

I know the perfect solution is to not ever overexpose the camera, but I just don't accept this. There are some AMAZING shots I've gotten on the 7D that I love that are over exposed. I see overexposed shots on Epic and Alexa material all the time as I can see the color shifts as well, just handled better.

For now, with a lower knee (85%) I have reduced that effect, and I've set the color level at -2, but, I think as you are getting at here, the 105% looks better after grading in my opinion, if blow outs are not a concerns.

I think what I *really* wish is that Sony would let us create our own LUT tables. I would totally redo the top end to give me something more like the 7D rolloff at a sacrifice of some detail myself.
 
Since we are talking about highlights, let me ask you this. I set my knee slope settings to expand the highlights for one reason, I really HATE what my FS100 does to the image just before it clips on all channels. If a single color is dominating (or secondary color) the image color shifts to red,cyan,yellow,magenta very harshly and then very harsly goes to white. There is no gradient between those edges and with the 4:2:0 color space that gets output, those harsh transitions end up having darker contaminated color between the regions that make it VERY difficult to fix in post.

What I did to test this is pointed my camera at a very bright blue LED and compared it to something I like the HL handling better on, the 7D. What I noticed was that on the 7D, as the blue began approaching clip, the LUT of the 7D ramps up the other channels so that they all hit white at the same time. What this does is create a nice gradient that is actually the shifted color, but since that gradient is to white, it is very pleasant.

What I noticed on the FS100 is that, in that zone of color shift, there is detail that you do not see on the 7D, but, given that extra detail is so monochromatic, it just doesn't look good to me, at all.

I know the perfect solution is to not ever overexpose the camera, but I just don't accept this. There are some AMAZING shots I've gotten on the 7D that I love that are over exposed. I see overexposed shots on Epic and Alexa material all the time as I can see the color shifts as well, just handled better.

For now, with a lower knee (85%) I have reduced that effect, and I've set the color level at -2, but, I think as you are getting at here, the 105% looks better after grading in my opinion, if blow outs are not a concerns.

I think what I *really* wish is that Sony would let us create our own LUT tables. I would totally redo the top end to give me something more like the 7D rolloff at a sacrifice of some detail myself.

I can see where your coming from, and certainly agree that the hilights do tend to blow out to a color other than white on the FS100. But for me personally my eyes are drawn more towards skin tone reproduction than the colored edges of hilights, in most circumstances. And since I use my FS100 in more controled lighting situations I can do more to ensure my image is clean.
 
I can see where your coming from, and certainly agree that the hilights do tend to blow out to a color other than white on the FS100. But for me personally my eyes are drawn more towards skin tone reproduction than the colored edges of hilights, in most circumstances. And since I use my FS100 in more controled lighting situations I can do more to ensure my image is clean.

Just wanted to make sure I wasn't the only one who noticed this. I notice it in scenes were something small is blowing out, like a streetlight that tends to go to one color, or LEDs, or car lamps, or fire. The problem I tend to have is when the difference between the content and the blow out is too much. I also do music videos and where this is a HUGE problem is effect lights at a club. In these circumstances, where I don't have control of the lighting since it is a show, the par cans look horrible color shifted and really take away from the shots.

Now, with a bunch of work, it can be fixed in post. I use a lot of blooming techniques on the highlights and such, but it's definitely not very easy and completely source dependent.

In situations like hair highlights, or lower contrast blow-outs, I am okay with those. And in controlled circumstances, they aren't as bad, but, at least with the situations I am in, I don't always have that control.

In any case, thanks for your comments!
 
All these observations are very valid. My IMHO take on this is:

If you're going to apply a low knee and therefore compress your highlights the first thing you'd need to do in you NLE is to uncompress them, yet that is very difficult to do. The obvious example is that if you were to shoot a scene in log, you would need to convert log to linear before you started grading. When messing with these profiles you can very easily get yourself into a situation where the image needs some form of 'unwrapping' back to linear space. If you don't then you'll be plastic.

However as i mentioned that is pretty difficult to do, you need a kind of reverse LUT for whatever profile you create which can be quite arbitrary. Plus you may find that you've compressed the highlights too much and when unwrapping you don't actually have enough information to work with.

Therefore in a lot of cases it is easier to do what Sam has been championing and keep as much of the curve linearish (well ideally loggish) as possible right up to the very top.

I've pondered on whether a plug in could be written to handle this LUT conversion from the profiles to something more pleasing. It would be a tough one, you'd kind of have to shoot a greyscale chart beforehand to give the plug in data on how your profile is affecting the image which it would have to reverse engineer for all the colours.

As for the highlights, Rick sees the 7D handling them much better but actually it's dropping detail in order to do that. The FS is trying to keep detail in some of the channels. If you are in a post situation then that detail in the other channels can be used to reconstruct the missing detail and fix the colour shifts whilst retaining a little information. This isn't ideal though and in reality that should be the operators choice whether they choose to do that or not.

I really don't understand why camera manufacturers make it so bloody painful to work with profiles. Canon have the right idea: 8 bit log. Done. Move on and actually shoot stuff...

cheers
Paul
 
As I see it you cant 'uncompress' information recorded in the 8bit space

If
grey minus a little bit
grey
grey plus a little bit

is recorded as
grey
grey
grey

no software will ever be able to undo that because it just does not have the information

Tell me - which grey was supposed to be grey minus a bit - there is just no way to know - any grade that alters grey will alter all of grey


S
 
Last edited:
By the same token then it wouldn't be possible to take a log recording and 'unwrap' it to linear space, which obviously isn't true.

If we just firstly confirm what we're trying to do - we're taking an arbitrary curve and linearising it for grading and post work.

Any act of grading on an image with a picture profile is a form of unwrapping, whether it's pulling the highlights up and shadows down. What i meant was a one click LUT style solution to pulling the image into linear space. It could be that the conversion would also interpolate missing values or fill in the graduations as it pulled the highlights into super brights. That's why the way the FS retains detail in the highlights could be useful.

I think perhaps you're specifically referring to how would you tell the process what to do, and I, off the top of my head, mentioned shooting a grey scale gradient. If you showed the software where black was supposed to be, then where white is supposed to be it could break the greys into their RGB components, spot colour imbalances through the greyscale and also spot where channels clipped prematurely. I think you'd need a graduation to do this. I also didn't say it would be easy but i *think* that would give enough for a base line conversion. The difficulty would be a reflective chart vs an emission chart (off an iPad or something).

The beauty of Log is that it's a fairly simple known mathematical curve. We don't have that. We have knees and slopes and black gammas that don't generate simple log curves.

Or, you dial the same PP settings into the plug in that would have a rough idea about what those setting did to reconstruct without shooting charts and whatnot.

Does that make any more sense? I'm thinking off the top of my head here so could entirely have missed a point somewhere!

cheers
Paul
 
Grading is unwrapping .. getting some pixels and mapping them to somewhere else .. indeed.. but it creates that map by grabbing pixels of a certain RGB value and performing a transform on them - putting them somewhere else

To 'grab' pixel A and not pixel B they must have different RGB values ..

Im not expert on 'Raw' or how a digital image is made.

Ill talk greyscale for simplicity

Now I guess if you look closely at a file is is in 'steps'

A 10bit file has many steps more than an 8 bit file so viewing on screen there are steps you cannot see - those steps are used in pullling the contrast out of a log file without degrading the image

there is 'secret information' in the file

Now with an 8 bit there is no secret stuff

But you have to agree with my funamental point that once two pixels are rendered the same colour (value) any 'transforms' applied to a grade will transfrom those pixels the same (unless you are using a mask of some form)

Grading is.. (simply)

"Hey guys grab all the pixels that are 50% grey and put them to 40% "

When there is no differenciation between pixels the computer will always grab them all

And knee is rendering groups of pixels the same colour - you cant un do it..

its like blowing a sky.. all the pixels are 255 255 255 - the computer cant make up fluffy clouds from that information.. it just cant

IMO

S
 
Last edited:
Sam,

Of course you're right, if we stick to greyscale/luminance, then if two pixels are the same value they would be mapped to the same destination.

The effect of a lower knee is to compress highlights into a smaller container using a curve. So that's not natural at all and plastic like if you don't do anything to the image. Say 80% to 100% occupies values 225 to 255. If things were linear, that 80% to 100% should be 200 to 255 but you're using below 225 for your mid tones now. Bringing them up and compressing the highlights with a custom curve.

Why do we want this? We want the greatest range of light possible, from the tip most brightness to the darkest shadow.

But if you take that curve and unwarp it so that the brightest point goes to 1024 in 10bit (or whatever brightness to want to set). Then all the pixels with lower luminance values will be unwrapped to different positions below that point right to the base of the knee. If you directly translated that brightness into 10bit using the same curve as you shot in then that 80% would be at 900ish. However you want to linearise it so that the value would actually be at 820ish. The way your 30 steps of source values translate into the new 200 odd steps is a factor of how the curve is set up. There would be big gaps between the values but those gaps would allow for grading - add a touch of noise then any banding would be reduced a little.

Grossly oversimplifying it but i hope it makes some sense. And of course this totally depends on what your intent is when shooting.

Now when you take the RGB values into account you get more data to play with. So the translation become more complicated because each of your RGB channels might clip differently and so each RGB channel may map differently and within the highlight areas it would be possible to infer values that have clipped in the red channel for example by looking at those in the blue and green. That's kind of what i was alluding to by interpolating values.

It would be possible for a camera manufacturer to actually use this to their advantage because they could expose each RGB channel slightly differently so that the red channel has more data in the shadows, where as blue keeps highlights better and greens provide the mid tones. Then after the interpolation you could squeeze a little extra range out of the thing. Now that is really just off the top of my head and it isn't possible to easily test whether than can be done because the code doesn't exist. You kind of get that indoors with tungsten lighting - the red is perhaps more detailed than the blue in shadows and vice versa.

I think i've had too much coffee, so apologies for the waffle.

At the end of the day, Sam, you're right. The knee is evil if you're just shooting the camera and want to get stuff out of it. But in certain controlled scenarios you can probably eek a bit more out of the camera by using the profiles if you can find a way to translate them afterwards.

We all want to work in linear space for vfx work, grading, comp etc,. Our aim is to best translate the mangled images coming in to a true representation of the light they actually represent so we can manipulate them.

cheers
Paul
 
its like blowing a sky.. all the pixels are 255 255 255 - the computer cant make up fluffy clouds from that information.. it just cant

That's a good example, you often find skies go cyan before clip, because the blue has clipped. It is possible to pull them back into range using the other unclipped channels.

And for overall exposure the aim is to put your brightest point at those clouds but you don't want to waste too much highlight information, just enough to work with them. You want to save most of your 8 bit container for the faces. So you want to have a knee at a point for that screen and roll off those highlights so they don't clip, but have a few steps of information to work with. If the highlights of the faces enter that compressed range then fine, so long as you can unwrap the compression in linear to work on them a bit.

You can't make the camera have more range than it has, but you can squeeze the range into the container a bit better

cheers
Paul
 
Everything you say makes sense.

The question is does knee block pixels together or does it remap them in a useful manner

The intent is to remap them and on that basis its a good idea in theory (probably developed for a camera with a chunkier bandwidth)

But real life observations is that it is not creating a remappable set of data because it is getting blocked together

Or not remappable within the set of post tools that I have..

Going back to the OPs image portions of his arm and face have turned to single colour blobs - not remappable..

Coffee? - Im avoiding post !

S
 
Well there's the good question - in theory vs practise. Without seeing the full sized frame of the OP it's difficult to say how much info there is within that flat looking area and as you rightly point out perhaps not enough in this case. What i would say is where is bottom 10-15%? It looks like the blacks are way too high, 15% of the 8 bit container doesn't seem to be really used. If the whole thing was shifted down then you'd have a much better image to work with. That flat arm region would perhaps even be out of the knee.

The FS100 is great in the shadows, the AVCHD is pretty good there too.

We should also be talking not about just the highlights but how to compress the shadows so we can free more room for the highlights.

This really shows one really tough area - on a real shoot, how do you monitor for exposure like this? You need a great sodding RGB histogram or parade to see which we don't really have.

And when using knee and black gamma i don't believe applying a simple S curve afterwards is always enough, that's really the point that i'm making here. If you are going to use a knee then you'd better have a solution for dealing with that afterwards.

>Coffee? - Im avoiding post !

Me too.

cheers
Paul
 
Metering - I use the onboard histo

I have analobue monitor with WFM but analogue OP stwitech off with the HDMI engaged

My opinion of the on board histo is that we need a massive one (see my comments in the firmware thread)

Bascially if you comapare it to the histo in a post package you see the tiny one can miss some spikes

Therefore one may consider 'spot metering with the histo'

Bottom line - under expose a little and use that bottom end of the histo (as our OP failed to do)

Exposing left does not sit happy with me as Im an ETTR nut.. http://www.luminous-landscape.com/tutorials/expose-right.shtml but there we go

As for aprofile that digs into the blacks.. thats the next mission!

edit .. along with the reds..

S
 
Now Ive hear the use of the description 'over sensitivity to reds' - IMO another myth

Faces go blotchy people look like drunks

It seems to me that this is an insensitivy to red

ie the face has a small portion that is darker than the rest,

So the input into the camera is a little less red on the blotch .. but the camera renders it as a lot less less red .. a dark blotch.. highlighting the imperfection

That would seem to be an insensitivity ??

In B+W photography (where I started) it is a well known trick to smooth faces with an oragne filter and get the 'old man look' with a blue filter..

S
 
Back
Top