Other: Sony FX6 Master Class and review

I'm going to Broome in Western Australia in a weeks time, and I'm thinking what would would work well to take a time lapse of the sun setting over the ocean / beach. Taking Doug's advice, I did some testing on Time Lapse and here is a combined 3 x 20sec clips.

The first and 2nd clip look pretty similar, though the first one used S&Q mode, and the 2nd Interval Recording. Both have lots of motion blur that works really well for this style of shot with fast moving cars. The 3rd is janky, with nowhere enough blur for the cars. All 3 look fine for the movement of the clouds in the background, so it may work well for slow moving items like a sunset as it "should??" be sharper??? I'll try a sunset here in Sydney.

Thanks
Nathan

PS - on the 2nd clip I had to use 32f as at 64f the ND filters were maxed out and the entire image was clipped even in low base and with the iris set at 20f
 
I used to shoot a fair amount with S&Q and played around with shutter speeds/angles and often came up with some reasonable results. Also a fair bit of stills shooting timelapse. But could never get away from the fact that I was locking myself in to set sequences that I couldn't alter afterward. For video timelapse, not stills, I now just roll pure video footage and do all my timelapse adjustments in post. I can then experiment. I can pull one frame a second or one frame every two and a half seconds or from whatever time span I like that suits the sequence required. Once I have settled on an extraction time sequence, let's say one frame a second at 25p this whole collection of extracted stills then go onto the timeline as a still sequence. I then use Revision's RSMB (Real Smart Motion Blur) where I can work out just how much motion blur and sensitivity I need depending on the subject matter and its movement. Doing it this way I find it gives me a massive amount of freedom of choice when it comes to timelapse rate, shutter speed/frame motion blur.

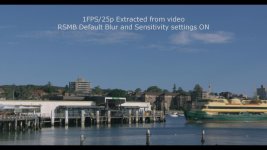
Have a look at these two stills and you can see the intraframe motion blur using RSMB's default settings. Also, check out their online demo, specifically clips two and three on the following page, #2 gives you a better idea of the flexibility RSMB can offer you in post and #3 gives you a real-world movie clip where it was used. For me, it beats trying to nail motion blur in-camera. Also the flexibility of converting any of your video footage to a 'cinematic' timelapse is appealing.

Chris Young

https://revisionfx.com/products/rsmb/

Straight 1 over 25p extract from a video clip with NO RSMB. Check out the ferry movement between the two shots.

NO RSMB.jpg

This is with RSMB on at its default settings. The default settings seem to cover most movement but the motion blur is highly configurable if you wish to experiment with the amount of motion blur and movement sensitivity

RSMB ON.jpg
 
Hi Chris. I'm surprised you needed to add motion blur at all.... I've always found that everything was blurry getting of the Manly Ferry anyway! On a more serious note, that added blur works.

I posted this clip in the FX6 Owners thread, and it too was shot S&Q @ 1fps / 360 degree (and the middle section was speed up in post to keep it short). As little is actually moving you really don't see any blur but boy do you have plenty of light with 1 sec exposure. I'm going to try a time lapse star shot (clouds permitting) and see how that goes.
 
Hi Chris. I'm surprised you needed to add motion blur at all.... I've always found that everything was blurry getting of the Manly Ferry anyway! On a more serious note, that added blur works.

He! He! I know what you mean, usually on a Sat night. As I said I've had good results out of camera but now do all my video timelapse, not stills in post because of the flexibility offered. 6 or 8k stills still offer the best but a lot more stuffing around. Don't seem to have the patience anymore, especially if it's all going to end up on video on the web. Interested to hear how you go!

Chris Young
 
Have a look at these two stills and you can see the intraframe motion blur using RSMB's default settings. Also, check out their online demo, specifically clips two and three on the following page, #2 gives you a better idea of the flexibility RSMB can offer you in post and #3 gives you a real-world movie clip where it was used. For me, it beats trying to nail motion blur in-camera. Also the flexibility of converting any of your video footage to a 'cinematic' timelapse is appealing.

Chris, thanks for the suggestion of RSMB. I'd never heard of it but I think I have something it would be ideal for.
 
Doug, I'm a slow learner.... but, you have me convinced to learn how to shoot and grade in Slog3 for HDR output over just using HLG. I just got a DJI Air2 that I thought would be a good match for the FX6 but found the noise in HLG was very very pronounced in darker areas (leaves in the trees, solid colours). Posted the comment on Bloom's review and he came straight back saying it is indeed terrible and to use LOG. So much for the dream of WYSIWYG HDR across platforms.

I'll be looking at your Resolve class this weekend (with some luck), but I do have an issue regarding what HW will be needed. I posted this on the Resolve Forum but the only answer so far does not seem to make sense, anyway here is a cross post of the question if anyone has a suggestion:

I'd like some advice on what extra equipment I would need to start with HDR grading (UHD 50fps), but this is for my own (and not commercial use) so it only has to be "good enough". I already have:
- Davinci Resolve Studio on Windows 64-Bit, 3090 GPU
- VESA-certified Display HDR 1000 (Philips 436M6VBPAB)
- No free 4/8/16x PCI Slots left (taken by 10Gb Nic, RAID Controller, 3090) ...but free 1x PCI Slots and USB 3.1 Gen 2 (10Gb) connectors

Am I correct in that,
- Resolve's Preview Window can not output HDR over the 3090's HDMI output; so
- I'd need a Decklink Card (Mini Monitor 4K) - but I'm out of PCI Slots, or
- UltraStudio (4K Mini) - but it is relatively expensive and will it even work over USB 3.1 Gen 2 (10Gb), or
- Some other way?

Thanks
Nathan
 
Hi Nathan, I can't offer much help with your hardware setup for resolve because I edit/grade on MacBook Pros so I don't have to deal with those kinds of technical details. I do go into detail during my Resolve training video about my setup, but I don't mind giving a quick overview of what I use with my Macs -- maybe that will help you with your PC.

1) Fast hard drives or SSDs are more important than the raw horsepower of your computer. I use fast SSD OWC ThunderBays connected by Thunderbolt. With those drives, even my 2014 MacBook Pros can handle anything in Resolve just fine and I get real time playback performance from RAW, ProRes, and all XAVC-I codecs. Rendering is super fast too.

2) You need at least three monitors. One for the Resolve interface. A second one for Resolves scopes. And a third one for Resolve's program output. This third one should not be a "computer" monitor. You are grading video so you need to view the video on a video monitor. If you can put your mouse cursor over the image, then you are in a computer environment and not outputting real video. You do not need a 4K monitor to grade 4K. A high quality HD monitor, preferably 10-bit, is good enough for our level of work.

3) To get a true video signal out of your compter you need a Blackmagic UltraStudio box or perhaps a video card if you work on a tower. I work on laptops so I use external boxes. There are several models to suit your needs and budget. The cheapest one is only $115 and it will output HDMI and SDI simultaneously. There are other models that cost more and have other features and specifications but the $115 version will do the trick on a Mac. I have no idea if it works with PC. You will need to do some investigating to find the correct solution for a PC. But you do need something. That I guarantee.

4) A bonus is that the UltraStudio boxes also work with Premiere and Catalyst Browse so I am always monitoring my program output on a real video monitor no matter what software I'm using.

5) I actually have a 5 monitor setup. 1: MacBook Pro screen for the Resolve interface. 2) 24" HP computer monitor for Resolve's scopes. 3) 17" Sony OLED monitor via SDI. 4) 40" Sony Bravia consumer monitor via HDMI. 5) Leader LV-5330 waveform/vectorscope via SDI that gives me better scopes than Resolve's built-in scopes. I already own the $7K Leader for other reasons so it makes sense to use it, but it's not something I'd encourage someone else to go out and buy just for grading.

A bonus of using an UltraStudio and real video monitor is that you don't have to worry about calibration. You just setup the video monitor to color bars like you would any other video monitor and you are ready to roll. I find it it a royal pain in the ass to keep computer monitors calibrated, so that one thing alone is worth its weight in gold.

I hope that helps.
 
Last edited:
Doug- I found the course extremely helpful and very well done - just got the FX6 and the manual which is OK - can be a but time consuming to keep referring to it for certain functions. The Sony FX 6 master class saved me a lot of time getting up to speed on some the menu functions new to me. For the most I mostly operated cameras in the Manual Position and never paid much attention to auto focus and the such. Thank you for a well done class.
Larry
 
Doug- I found the course extremely helpful and very well done - just got the FX6 and the manual which is OK - can be a but time consuming to keep referring to it for certain functions. The Sony FX 6 master class saved me a lot of time getting up to speed on some the menu functions new to me. For the most I mostly operated cameras in the Manual Position and never paid much attention to auto focus and the such. Thank you for a well done class.
Larry

Thanks Larry. I'm pleased to hear the series has been helpful to you and I thank you for taking the time to let me know. That's what it is all about.
 
Hi Doug, You are right (again). It's too hard / not possible to try in HDR grade without one of the Blackmagic HW devices. I ended up getting the Blackmagic 4K Mini and a 2nd 43" 1000HDR Monitor (one for the DR UI, and the other for the Output in HDR). As a result, I've also stopped recording in HLG as I can now grade SLOG3 and have followed your tips in the Masterclass about bumping up the Auto Exposure Index Level by +2.0 (as it was underexposing) and I'm now hitting 70% Zebras (bumped it up from your suggest 68%) pretty easily. I'm also not using any MLUTS. This combination seems to be working well for me so far. One area I'd like to confirm, is that the L/M/H EI Switch does not do anything when the FX6 is set as above?

Thanks again,
Nathan
 
Hi Doug, You are right (again). It's too hard / not possible to try in HDR grade without one of the Blackmagic HW devices. I ended up getting the Blackmagic 4K Mini and a 2nd 43" 1000HDR Monitor (one for the DR UI, and the other for the Output in HDR). As a result, I've also stopped recording in HLG as I can now grade SLOG3 and have followed your tips in the Masterclass about bumping up the Auto Exposure Index Level by +2.0 (as it was underexposing) and I'm now hitting 70% Zebras (bumped it up from your suggest 68%) pretty easily. I'm also not using any MLUTS. This combination seems to be working well for me so far. One area I'd like to confirm, is that the L/M/H EI Switch does not do anything when the FX6 is set as above?

Thanks again,
Nathan

Nathan, I'm always glad to hear when my advice has proven to be useful. That sounds like a nice monitoring setup you've got. 70% exposure should be just fine, you could even go higher than that if you wanted to, but I wouldn't go below 68%.

Yes, I can confirm that the L/M/H switch has no effect on the recorded video in the EI mode. It is merely a smoke and mirrors device for changing the brightness of an MLUT on the monitor . . . if someone is using an MLUT. I prefer not to use an MLUT, but if you do use one, then you must also change your Zebra target level because zebras will be affected by the MLUT. The EI switch also adds some EI metadata to the video file, but the last time I checked Resolve still couldn't read it. Either way, the recorded iamge is the same anyway.
 
Thanks for the confirmation Doug. I'm not using a MLUT (prefer to look at the footage as it is being recorded). Now I need to learn how to correctly grade for HDR in Resolve (both technical and creative).
 
Thanks for the confirmation Doug. I'm not using a MLUT (prefer to look at the footage as it is being recorded). Now I need to learn how to correctly grade for HDR in Resolve (both technical and creative).

I hope you enjoy grading as much as I do. It is the modern equivalent of my old B&W darkroom and it is fun to see the footage come alive and see how far you can push it.
 
Thanks Doug, I am certainly enjoying the creative part of the grading now I'm on SLOG (HLG just falls apart if you try to push it around). I especially like using Resolves Managed Colour Space as it takes a lot of the technical grading out to produce both a HDR and SDR versions. Here is a 1min Video of the Red Moon Eclipse we had the other night shot using SLOG3 using S&Q Mode at 1fps / 360 shutter / Highbase on a 50fps timeline (first and last section are 2x speed up, the centre section was punched in 2x). It looks much better in my UHD HDR 80mbs 10Bit (the SDR version I've linked is 8Bit 709 at 20mbs) but it works (both have no audio tracks).
- SDR Version (will play in a web browser pending upload speed from my server) - https://behome.dyndns.info/index.php/s/rQP8ZWikBZKsxSL
- HDR Version (you will need to download and play on an HDR Setup) - https://behome.dyndns.info/index.php/s/6jQ9CjZXSEQrHqy
 
Cool stuff. I wish we'd been able to see the eclipse from the east coast. It is amazing how well the stars are captured without going into the slow shutter mode. And I like the bluish sky rather than going full black. It looks like you are having fun with the camera.
BTW, I only watched the SDR version because I don't have an HDR setup.
 
Yup, having a lot of fun (and a steep learning curve both with shooting and editing). I really like the S&Q 1fps mode @ 360 degrees on High Base. You get lots of light. I need to try it on people at night and see how it comes out.

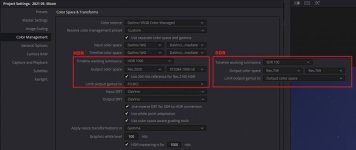
On the editing side, I found this clip very informative esp the explanation given by Daria Fissoun regarding the Color Management In DaVinci Resolve 17 , she literally wrote the book on this for Black Magic on their Colour Mgt. It was good on how it all works but was silent on what settings should be used for rendering to HDR, SDR etc. I've reuploaded my HDR sample as I had to "Limit output gamut to P3-DCI" given the capability of todays display devices. My settings are below FWIW and the HDR output is now the same as that used by the production houses creating UHD Blu Ray disks. Using Davinci Colour Mgt makes it easy to make one edit/grade on the "DaVinci Wide Gamet" in your timeline/monitor then you change the output color space when you want a SDR or HDR version and Resolve does the mapping between the colour spaces. Nice and straight forward.

DR-CM-HDR.jpg
 
Yup, having a lot of fun (and a steep learning curve both with shooting and editing). I really like the S&Q 1fps mode @ 360 degrees on High Base. You get lots of light. I need to try it on people at night and see how it comes out.

On the editing side, I found this clip very informative esp the explanation given by Daria Fissoun regarding the Color Management In DaVinci Resolve 17 , she literally wrote the book on this for Black Magic on their Colour Mgt.

Thanks for the link to Daria's interview, she obviously knows her stuff. I took the opportunity upgrade to Resolve 17.2 to follow along with their demonstration and then I've spent the last couple of hours re-grading my George Floyd project to see the difference. I can see how the color managed workflow would be very useful if someone was gathering footage from many different sources and/or needed to be flexible on the deliverable output. But that's not my situation and so I'm not entirely sold on changing my methods yet. The workflow is different but I can't say that it is faster, easier, or produces better results than my current method. But never say never and I'm going to have to experiment with it more. Either way, it is still good info to have.
 
Yup, if it 'aint broke.....

That said, it is pretty exciting to see where this is all heading. I'm sure that individually grading for each particular colour space you need to produce is likely to produce the best results, but the concept of having a very very wide and non-destructive intermediate colour space to work in / grade then just changing the output colour space as required for delivery is (I think) a pretty big change. It also means that all those "technical" LUTs floating around to go from one space to another become a thing of the past (I guess they will exist for creative reasons). Also in a x years when screens can handle a wider gamut, I could just open up my old projects, remove the P3-DCI gamut limit (or change to some yet to be announced wider gamut) and simply render a new version.

From a practical POV, this "new" colour managed workflow really helped me on some small projects where I can have a mix of UHD 50fps FX6 in SLOG, HLG, DJI DLOG, GoPro, and a 3rd party highlight real in 25fps 1080p 709 clip (which I think was a combo of an unknown drone and go pro footage). The hardest part was trying to work out the best input colour space for that 3rd party clip as they did not do a great job with their own colour space mgt switching between the drone and the go pro parts in that one clip. The other big limitation with the 709 clip (and the GoPro for that matter), was that it just looks poor in comparison to the FX6 footage. It is what it is however. The other practical "today" benefit of this method, is I can now simply render out both a 80mbs UHD HDR10 and 20mbs FHD SDR version from the same project (eg that Red Moon clip).

It's an existing time to be alive!
 
Back
Top