
Navigation
Install the app
How to install the app on iOS
Follow along with the video below to see how to install our site as a web app on your home screen.
Note: This feature may not be available in some browsers.
More options
You are using an out of date browser. It may not display this or other websites correctly.
You should upgrade or use an alternative browser.
You should upgrade or use an alternative browser.
New Blackmagic Camera July 16th?
- Thread starter Teddy_Dem
- Start date

G
Guest
Guest

Joshua Cadmium
Well-known member
Ah, a wild Yedlin sighting - also known as the Abominable Resolutiondude.
"♫ Do you wanna build an image? You don't need many K's ♫"
Joshua Cadmium
Well-known member
Here is an actual tl;dr for what I was saying:
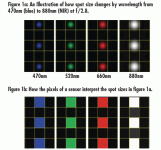
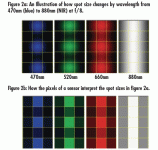
These are from this lovely article here: https://www.edmundoptics.com/knowle...sensor-limitations-on-collecting-information/
These are from this lovely article here: https://www.edmundoptics.com/knowle...sensor-limitations-on-collecting-information/
G
Guest
Guest
Here is an actual tl;dr for what I was saying:
These are from this lovely article here: https://www.edmundoptics.com/knowle...sensor-limitations-on-collecting-information/
Yes, I think that is a big part of what you were saying earlier. You weren't talking about diffraction in the visible to the naked eye sort of way that old times photographers talk about it, but you were talk about diffraction between microscopic photo sites that are at the sub pixel level, since it may only effect one or two colours at a time. Even with lens projectors blowing up a chart pattern into a 2meter area, that kind of diffraction will still read as "sharp" to the eye, but perhaps be just enough diffraction to reduce moiré.
Also, all of the moiré cases I have seen are in the center of the frame. As chances are that at F1.4, or f2, the lens will not perform well enough to allow moiré in the corners or edges of the lens. those that shoot 2.40 or 17.9 and use rule of thirds and maybe even push the edges of composition towards the left or right may never see moiré at F2.8.
Reason I found the your comments fascinating, is that I never realized that a good lens at F2, in the center might resolve sharper than F5.6 in the center, if that is what you are getting at.
JB has been pretty public about liking lenses with a more vintage feel, and they may have just enough diffraction inherently as to not cause him grief with moiré, whereas a Canon Cine Prime at ~f2 in the center might just do it.
I'd rather read your comments here and feel some sense of "ooooooooh, gotcha.' than scratching my head and going, "....I sweaR, THAT NEEEEVER happens."
Last edited:
Joshua Cadmium
Well-known member
Yes, I think that is a big part of what you were saying earlier. You weren't talking about diffraction in the visible to the naked eye sort of way that old times photographers talk about it, but you were talk about diffraction between microscopic photo sites that are at the sub pixel level, since it may only effect one or two colours at a time. Even with lens projectors, blowing up a chart pattern into a 2meter area, that kind of diffraction will still read as "sharp" to the eye, but perhaps be just enough diffraction to reduce moiré.
You nailed it! Yes, my whole point in studying this was to determine where there could be a difference in moire and if a mild diffraction could explain that difference. I knew JB was using sharp, modern, well corrected lenses (Zeiss Supreme Primes) that might be sharper than what the Youtube testers were using, so where was the difference? I figured that the testers might be using the lens more wide open, which you might be able to get away with in interviews, but JB was using deeper DOF, since f4-5.6 seems to be more common in narrative work. I was wondering if diffraction might play a role and then looked at the math about where diffraction was, and I was like, ooohhhh, that makes a whole ton of sense.
Also, the photosite level is the pixel level when it comes to diffraction, since they are the same size (I am using the term photosite instead of sensor pixel, since it is more technically correct. Instead of photosite you could also say undemosaiced pixel.) Even though the final pixel may be made from a composite of multiple photosites blended together, all of those photosites will experience the same ratio of diffraction.
And while the photosite on the 12K is small at 2.2um - it's not microscopic when you punch in - you're going to see blurriness at a per pixel level if you are in serious diffraction. For instance, you could very realistically throw away 3/4 of the resolution of the 12K sensor by stopping down to a small f stop - like f16 (or around there - I'm just guessing f16, which is similar to shooting f32 on the A7RII.) That's still 6K worth of resolution - even on a 4K monitor that's still going to look good with maybe some light sharpening added. If you punched into an HD crop, though, that's going to be a different story. You might be shocked to see blurry, DVD quality resolution.
Even the images I just listed don't tell the whole story - it's another simplification. Line pairs (like the black pixels in between the colors in the images) are used to determine resolution because it is very easy to see and measure - a loss of resolution is the same as a loss of contrast because the black and white lines are blurring together to make gray. However, black is the absence of light, which is not always a good representation of the real world. Because of that, it might be better to imagine that you have colors of light right next to one another that are blurring each other into wrong colors. For instance, if you put red and blue lines right next to one another and added diffraction, BOTH pixels would start to turn purple from opposite ends of the spectrum. Or you could have one skintone color right next to another skintone color, with diffraction causing both to blur into a single block of the same color or close to it. You are going to lose both fine detail and color information from diffraction.
Reason I found the your comments fascinating, is that I never realized that a good lens at F2, a lens might resolve sharper than F5.6, if that is what you are getting at.
Yes, I had no idea this was a thing - that points of light get bigger as you stop down. It seems so counter-intuitive, but it makes so much sense about why diffraction happens. So, yes, on small pixels, f2 may be sharper than f5.6. But, again, what really matters? f5.6 may serve the image or the story better than the more resolutionally maximizing options.
Last edited:
G
Guest
Guest
Zeiss supremes (not the same as Arri Signature, which have nothing to do with Zeiss) are nice, but they aren’t perfect. They have some visible chromatic aberation, even more so than sigma or canon possibly.
Last edited:
Joshua Cadmium
Well-known member
Zeiss supremes (not the same as Arri Signature, which have nothing to do with Zeiss) are nice, but they aren’t perfect. They have some visible chromatic aberation, even more so than sigma or canon likely.
Oops! Yes, I know the difference, I just misspoke.
@ Josh and John Brawley I understand the connection between the limits in size of the Airy disk and photosite size, an am aware of the 2.5 constant for calculations. But why does the physics decide on a 2.5 constant? What does it mean, where does it come from?
One more thing I wanted to mention about using 2.5x pixel width for diffraction. The calculators online and what I have been using is based on light being at green (usually 550nm) since that is right in the middle of the spectrum. But just using green doesn't tell the whole picture.
Violet light (just at the edge of UV) is around 400nm, which means it actually creates a smaller Airy Disk at every f stop. So, using that 2.5x number on the 12K (a width of 5.5um) but with 400nm light, we get violet light diffraction right at f5.6. That's a much deeper f stop than the f4.1 you get when running the math at 550nm. [The math, once again, is 5.5um = 2.44 * 400nm * f stop. OR f stop = 5.5um / 2.44 / .4um]
Far red light is around 700nm, which means it creates a larger Airy Disk at every f stop. The 2.5x math puts far red light diffraction at f3.2.
Warmer tones are going to experience diffraction before cooler tones do. That's just the physics of light.
For comparison at 2.5x width:
400nm = f5.64
550nm = f4.10
700nm = f3.22
For comparison at 1.5x width:
400nm = f3.38
550nm = f2.46
700nm = f1.93
For comparison at 1x width:
400nm = f2.25
550nm = f1.64
700nm = f1.29
Is this helpful? Maybe not to everyone, but I certainly find it absolutely fascinating. It also again shows why that 2.5x defacto standard for diffraction is just a simplistic number like any other rule.
G
Guest
Guest
Oops! Yes, I know the difference, I just misspoke.
I also probably exaggerated the flaws in the Supremes anyway. They are plenty sharp, and gorgeous. At a first glance they seem sterile and all the negative "Zeiss-y" connotations, but they really are wonderfully done. They are a bit on the contrasty side, but even within the shadows, they still have a lot of subtle detail. The CP.2 and CP.3 are similar, but more inky black in the shadows. The colours seems to read more true on the Supremes than the CP's. Somehow the even-ness and balance in image characteristics that the Supremes have really work well, and I might even dare say they verge on unique in this sea of lenses, while maintaining all the positive "Zeiss-y" attributes, as well. Paradoxes can be nice. Or nice things are often paradoxes? Is that true? I suppose it is if you look at anything too closely.
.....ah well, not a busy Sunday.
John Brawley
Well-known member
@ Josh and John Brawley I understand the connection between the limits in size of the Airy disk and photosite size, an am aware of the 2.5 constant for calculations. But why does the physics decide on a 2.5 constant? What does it mean, where does it come from?
I’m reluctant to continue post here on this topic. My responses are being voted as not helpful.
There’s a lot of things that affect the real world usefulness of these calculations.
No one for example has brought up how fill factor affects these calculations. This is the active size of a pixel Vs it’s physical size.
Things like microlens arrays can factor here too.
Lens performance as well. An airy desk in a physics model is a perfect circle, but most lenses have some kind of aberrations that means it’s rarely uniform across the airy disk diameter interns of field flatness. (It’s darker often in the middle or the edges depending on the lens)
It’s getting into some very esoteric ideas. And once you actually go out and shoot enough tests you can get a feel for how much in reality it will affect you in the way you shoot with the cameras you have.
The general accepted consensus is 2.5x is a good compromise for all these factors.
JB
Last edited:

ahalpert
Major Contributor
I’m reluctant to continue post here on this topic. My responses are being voted as not helpful.
I could be wrong, but I think that some people (not me) downvoted your post where you mentioned that worrying too much maximum resolution would lead to sharp but boring looking movies. Of course you're right, but I'm not sure that Josh Cadmium or anyone else is necessarily advocating for achieving maximum resolution at the expense of other considerations. At any rate, I appreciation your contributions to the discussion
Film Scientist
Active member
John, I appreciate your posts and contributions to the discussion. The info you share is helping us discover vast gap that can exist between theory, experience, and the real world ...there are many layers to the nuance. I can get lost in technical rabbit holes like many others. Locking down on ‘one’ aspect can make us miss the forest. I have to remind myself to step back to consider that beautiful footage isn’t created in laboratories. Art and science need each other to move forward. Between you and Joshua, I’m learning a lot. Thanks!
Joshua Cadmium
Well-known member
I’m reluctant to continue post here on this topic. My responses are being voted as not helpful.
John, I wanted to say that I had not downvoted that previous post and I do (as I've said before) highly appreciate your insight and your observations. You are a huge asset to this community. Just because I disagree in some (literally very small) places does not mean that I don't appreciate you.
It’s getting into some very esoteric ideas. And once you actually go out and shoot enough tests you can get a feel for how much in reality it will affect you in the way you shoot with the cameras you have.
I did want to say that it is one thing to say that what I am posting is esoteric and one thing to imply that I what I am posting is not helpful or perhaps wrong. It might not be helpful to how you shoot (heck, it's probably not going to make much of a difference to how I shoot) but diffraction on this camera is going to have some real world, practical implications, especially when cropping in. At a 2K crop of the sensor you will not be able to use high f stops and still get nearly as sharp of an image. That is not esoteric. It's also testable and agrees with all I've seen so far. If I had the camera in my hands I would certainly test that right now, but I have to rely on physics and math, and what is observable on other sensors.
I think both of us want Blackmagic to succeed with this camera and one of the reasons why I am talking about this is because I don't want Blackmagic to be blamed for what is just physics. I can easily see some Youtuber say that you should avoid this camera if you want to crop in, or something to that effect, because of what he saw when he was stopped down too much on his lens.
There’s a lot of things that affect the real world usefulness of these calculations. No one for example has brought up how fill factor affects these calculations. This is the active size of a pixel Vs it’s physical size. Things like microlens arrays can factor here too.
If the active size of the pixel on the 12K is actually less than 2.2um, due to fill factor or the microlens not fully covering, that would have an impact, but it would make it so that diffraction would come more into play, not less. If the active pixel is 2.0mm, for instance, you would need to use an even larger f stop to capture the full resolution of the image.
Lens performance as well. An airy desk in a physics model is a perfect circle, but most lenses have some kind of aberrations that means it’s rarely uniform across the airy disk diameter interns of field flatness. (It’s darker often in the middle or the edges depending on the lens)
I did bring up aberrations multiple times. When you are dealing with aberrations in a lens, it just means that at some point, what you gain in resolution from stopping down outweighs the losses from diffraction. At another point, that reverses, and what you lose in diffraction, outweighs what you gain from stopping down. However, diffraction limited lenses will always lose resolution when you stop down.
For another real world example: the Olympus 12-100 f4 will not gain any resolution from stopping down, at every single focal length (as tested on a 16MP 3.7um sensor): https://www.opticallimits.com/m43/1006_olympus12100f4pro?start=1 . And this is a zoom lens - it's going to have more aberrations than a prime would.
The general accepted consensus is 2.5x is a good compromise for all these factors.
It's actually not a compromise for all those factors - it's based on the width of the central portion of the Airy Disk, which is 2.44. From there it is just rounded up to 2.5.
2.44 is a dimensionless number (AKA a ratio - an f stop is also a dimensionless number) and needs the f stop and nanometer of light in order to determine the actual width.
Take two Airy Disks and place them right next to one another. How far do you need to move one or both in order for them to overlap and then they cease being two Airy Disks? It's just the width of the Airy Disk or 2.44. (In fact, any two identical objects placed next to one another will overlap when moved towards each other 1x the width of the object).
There is a little more to it than just that (and I'll have a follow up post), but that is why 2.5 is used. It's basically a simple number that tells us where two Airy Disks will meet and overlap each other.
Joshua Cadmium
Well-known member
Here is a visual example of lens aberration vs. diffraction (the lines are a little wonky - but you get the idea):
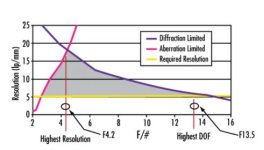
You can see that there is a point - a specific f stop - where resolution is maximized. Before that point, in this case f4.2, aberration is limiting the lens from delivering maximum resolution for the sensor. After that point, diffraction is steadily bringing the resolution down from that maximum point.
But, if you don't need all the resolution a lens and sensor combination can give, then it might not matter to you. In the illustration it shows a yellow required resolution line (for our case, let's say it's a 4K delivery). For the illustration purposes, you could go up to f13.5 and still get the required resolution you need.
If you move that yellow line up (let's say an 8K delivery or a 2k punch in) you are going to more quickly reach an f stop where you no longer have that much total resolution and things will start to look blurry at the viewing resolution.
Also, for the lens in the example, as the target resolution increases (as the yellow line moves up) you have to stop down more to reach it - the f stop window for the target resolution narrows. If you wanted to hit 15 lp/mm, for instance, you could only do so in between about f4 and f5.6.
This chart is just an example, though - don't get too caught up in the exact numbers. Different lens and sensor combinations are going to look different, but they will be similar to this.
[The chart came from here: https://www.edmundoptics.com/knowle...d-detection/choosing-the-correct-test-target/ . (The rest of the article is not that helpful for what we are talking about.)]
Last edited:
G
Guest
Guest
Here is a visual example of lens aberration vs. diffraction (the lines are a little wonky - but you get the idea):
View attachment 141015
You can see that there is a point - a specific f stop - where resolution is maximized. Before that point, in this case f4.2, aberration is limiting the lens from delivering maximum resolution for the sensor. After that point, diffraction is steadily bringing the resolution down.
But, if you don't need all the resolution a lens and sensor combination can give, then it might not matter to you. In the illustration it shows a yellow required resolution line (for our case, let's say it's a 4K delivery). For the illustration purposes, you could go up to f13.5 and still get the required resolution you need.
If you move that yellow line up (let's say an 8K delivery or a 2k punch in) you are going to more quickly reach an f stop where you no longer have that much total resolution and things will start to look blurry at the viewing resolution.
Also, for the lens in the example, as the target resolution increases (as the yellow line moves up) you have to stop down more to reach it - the f stop window for the target resolution narrows. If you wanted to hit 15 lp/mm, for instance, you could only do so in between about f4 and f5.6.
This chart is just an example, though - don't get too caught up in the exact numbers. Different lens and sensor combinations are going to look different, but they will be similar to this.
[The chart came from here: https://www.edmundoptics.com/knowle...d-detection/choosing-the-correct-test-target/ . (The rest of the article is not that helpful for what we are talking about.)]
Is that for 4K raw, or 4K final from a 6K raw supersample?
Joshua Cadmium
Well-known member
To summarize about diffraction, I'm just going to quote from here: https://www.edmundoptics.com/knowledge-center/application-notes/imaging/diffraction-limit/ (a great read, but the video is not that helpful).
"Every lens has an absolute upper performance limit dictated by the laws of physics. ... This limit is the point where two Airy patterns are no longer distinguishable from each other."
When looking at resolution and diffraction, it helps to consider them in line pairs per millimeter. Lp/mm helps to determine resolution because it is easy to see when a white line blurs into a black area. Look at the difference in contrast you would see when the Airy Disks start to overlap:
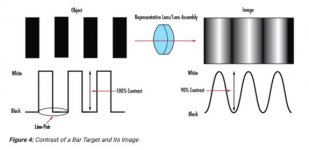
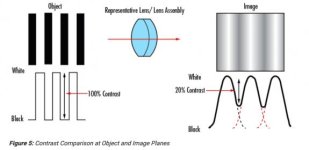
[Chart is from here: https://www.edmundoptics.com/knowle...introduction-to-modulation-transfer-function]
--------
With the Blackmagic 12K sensor, the LINES per millimeter is determined by: 1mm / 2.2um OR 1mm / .0022mm = 454.55 lines. To pair those lines up, just divide by two: 454.55 lines / 2 = 227.3 lp/mm
Now, at what f stop are those lines completely blurred away - what is the f stop where resolution is absolutely decreased no matter what? The top website link gives us the formula:

So, 227.3 lp/mm = 1000 / (f# * .550) OR f# = (1000/.550) / 227.3 = f8
That means that for the Blackmagic 12K sensor, f8 is the ABSOLUTE limit for hitting a full 12K worth of the sensor.
What does absolute limit mean? It means that at f8, contrast is ZERO for the 227.3 line pairs, which have completely blended into one another and formed a completely gray image at that resolution - there are no lines to be seen anymore.
--------
Note, though, that at that absolute limit, the white lines we are seeing blurring into one another are not right next to one another - they have one black line in between them. And, if we were absolutely maximizing resolution, one Airy Disk would equal one pixel. So at maximum resolution, the black areas would also be taken up by the width of one Airy Disk.
I said before that for one Airy Disk to overlap another, one or both need to move a combined total of 1x Airy Disk or 2.44. Now that we are dealing with line pairs, the white portions have to travel further to completely overlap with one another. How far do they have to travel? The width of 2x Airy Disks or 4.88.
How do I know this? Well, geometry - two equal objects 1x width between one another need to travel 2x width to overlap. Also, because what happens if we now say that 4.88x is the pixel width for diffraction? The math again would be 2.2um*4.88 pixels = 10.736um. To determine f number would be 10.736 / .550 / 2.44 = f8 . The math checks out (it's all related).
So, to reiterate this, if line pairs (2 pixel widths apart) overlap at 4.88 pixel widths apart, where do lines 1 pixel width apart overlap? Where would a blue line right next to a red line overlap? Divide by two and you would be at 2x less than that, or 2.44 pixel widths.
This might be hard to wrap your head around, but this was the long way to show why the math and physics get us to that 2.44 (or rounded 2.5x) diffraction number.
However, and once again, 2.44 is where two lines next to one another completely overlap, not where they start to overlap - not where resolution starts to take a hit.
"Every lens has an absolute upper performance limit dictated by the laws of physics. ... This limit is the point where two Airy patterns are no longer distinguishable from each other."
When looking at resolution and diffraction, it helps to consider them in line pairs per millimeter. Lp/mm helps to determine resolution because it is easy to see when a white line blurs into a black area. Look at the difference in contrast you would see when the Airy Disks start to overlap:
[Chart is from here: https://www.edmundoptics.com/knowle...introduction-to-modulation-transfer-function]
--------
With the Blackmagic 12K sensor, the LINES per millimeter is determined by: 1mm / 2.2um OR 1mm / .0022mm = 454.55 lines. To pair those lines up, just divide by two: 454.55 lines / 2 = 227.3 lp/mm
Now, at what f stop are those lines completely blurred away - what is the f stop where resolution is absolutely decreased no matter what? The top website link gives us the formula:
So, 227.3 lp/mm = 1000 / (f# * .550) OR f# = (1000/.550) / 227.3 = f8
That means that for the Blackmagic 12K sensor, f8 is the ABSOLUTE limit for hitting a full 12K worth of the sensor.
What does absolute limit mean? It means that at f8, contrast is ZERO for the 227.3 line pairs, which have completely blended into one another and formed a completely gray image at that resolution - there are no lines to be seen anymore.
--------
Note, though, that at that absolute limit, the white lines we are seeing blurring into one another are not right next to one another - they have one black line in between them. And, if we were absolutely maximizing resolution, one Airy Disk would equal one pixel. So at maximum resolution, the black areas would also be taken up by the width of one Airy Disk.
I said before that for one Airy Disk to overlap another, one or both need to move a combined total of 1x Airy Disk or 2.44. Now that we are dealing with line pairs, the white portions have to travel further to completely overlap with one another. How far do they have to travel? The width of 2x Airy Disks or 4.88.
How do I know this? Well, geometry - two equal objects 1x width between one another need to travel 2x width to overlap. Also, because what happens if we now say that 4.88x is the pixel width for diffraction? The math again would be 2.2um*4.88 pixels = 10.736um. To determine f number would be 10.736 / .550 / 2.44 = f8 . The math checks out (it's all related).
So, to reiterate this, if line pairs (2 pixel widths apart) overlap at 4.88 pixel widths apart, where do lines 1 pixel width apart overlap? Where would a blue line right next to a red line overlap? Divide by two and you would be at 2x less than that, or 2.44 pixel widths.
This might be hard to wrap your head around, but this was the long way to show why the math and physics get us to that 2.44 (or rounded 2.5x) diffraction number.
However, and once again, 2.44 is where two lines next to one another completely overlap, not where they start to overlap - not where resolution starts to take a hit.
Joshua Cadmium
Well-known member
As an addendum: is 2.44 actually the width of an Airy Disk? What actually happens when they overlap, especially on a pixel (photosite) level? That's where it starts to get a little harder and why I was initially bringing up ensquared energy vs. encircled energy.
Joshua Cadmium
Well-known member
Is that for 4K raw, or 4K final from a 6K raw supersample?
The chart is absolutely NOT for the 12K sensor - it's just an example of how a random lens performs on a random sensor. The numbers don't matter, just that there is always a point in the system where resolution is maximized and an f stop range where target resolution can be achieved.
You could technically make a chart like that for the 12K sensor, but you would have to make one for every lens you use on it and it would not tell you anything about what the lens is actually doing to the image, except regarding pure resolution.
In the words of Carl Sagan: "extraordinary claims require extraordinary evidence." Most of what I am posting is counter-intuitive, so I am trying to draw from whatever I can to prove my point.