
Navigation
Install the app
How to install the app on iOS
Follow along with the video below to see how to install our site as a web app on your home screen.
Note: This feature may not be available in some browsers.
More options
You are using an out of date browser. It may not display this or other websites correctly.
You should upgrade or use an alternative browser.
You should upgrade or use an alternative browser.
Learning to light cinematic.
- Thread starter Azmyth
- Start date


Just grab yourself a copy of this (FWIW Im not paid to recommend it - but I think it may really help you)
http://www.dvxuser.com/V6/showthread.php?225992-Lighting-for-Film-and-Television-3-DVD-Set-Now-In-DVXuser-Shop
http://www.dvxuser.com/V6/showthread.php?225992-Lighting-for-Film-and-Television-3-DVD-Set-Now-In-DVXuser-Shop

filmat11
Well-known member
Since you added that you will now be at a completely different location and add 3 other actors to your Ouija board set up, your lighting will change quite a bit.
Separation from the background will need to be addressed, cross lighting other actors faces, and the Ouija board itself.
Separation from the background will need to be addressed, cross lighting other actors faces, and the Ouija board itself.
Pietro Impagliazzo
Well-known member
Quite impressed with the progression, a newcomer with some willpower to learn not just a "HEY WHY MAH CAMERA IS NOT GIVING ME THE CINEMA LOOK? DO I NEED THE 24PS?" which is amusing sometimes, but quite tiresome! 
I think with the latter result all you'd need was work with on set lighting for mood, like lamps and candles, add art direction, add good actors, make a good horror movie.
I think with the latter result all you'd need was work with on set lighting for mood, like lamps and candles, add art direction, add good actors, make a good horror movie.

MikeShea
Member
Hey man, like the others said, you have made great progress in a few attempts and I admire your persistence for good composition (the foundation of good cinematography)
If I could give any constructive criticism, it would be this:
1. You should take into account the rule of thirds - when I first see your still frame my eyes start to wander, unsure of where the main focus is. I immediately take notice of your ghostbusters shirt. It stands out the most and distracts me. It then leans to the left candle then drifts to your hands and up to your face. It's chaotic and I dont understand what your main focus is. The ouija board? The actor playing with board? His Face? The Candle?
2. Off center and no symmetry - two big no-nos. If you're going for the unsettling-crooked look you should be more extreme with the angles (see my example below). If youre looking for a more balanced composition...center it.
Eyes love to catch symmetry and having the candle on the right side closer than the one left just ruins it.
3. Colour Scheme. I see blue, red and yellow. No need for blue. Film loves split-toning, so give a dominant red warmth from the candles but sustain the face with a natural skin tone. (yellow-esque)
4. Having the curtains behind the actor is a great idea and can create a haunting outline from the black tee shirt. White curtains are boring. Change it red to fit the mood or backlight it with a red filter.
5. Mood. Whats the mood here? Scary? Curious and unknowing? Your low lit scene makes me assume you want it to be dark and intense but it doesnt really come off that way.
Crush the blacks - it intensifies the scene and creates dramatic contrast.
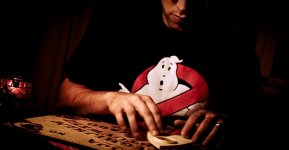
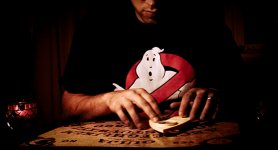
I've altered and cropped your photo (like the rest have - although I found their colour edits to be poor and underexposed) to give you a better idea of how it could be framed. And even though the altered photo still makes your eyes wander, they tend to realize the focus is on the board and hands more so.
crooked
balanced
If I could give any constructive criticism, it would be this:
1. You should take into account the rule of thirds - when I first see your still frame my eyes start to wander, unsure of where the main focus is. I immediately take notice of your ghostbusters shirt. It stands out the most and distracts me. It then leans to the left candle then drifts to your hands and up to your face. It's chaotic and I dont understand what your main focus is. The ouija board? The actor playing with board? His Face? The Candle?
2. Off center and no symmetry - two big no-nos. If you're going for the unsettling-crooked look you should be more extreme with the angles (see my example below). If youre looking for a more balanced composition...center it.
Eyes love to catch symmetry and having the candle on the right side closer than the one left just ruins it.
3. Colour Scheme. I see blue, red and yellow. No need for blue. Film loves split-toning, so give a dominant red warmth from the candles but sustain the face with a natural skin tone. (yellow-esque)
4. Having the curtains behind the actor is a great idea and can create a haunting outline from the black tee shirt. White curtains are boring. Change it red to fit the mood or backlight it with a red filter.
5. Mood. Whats the mood here? Scary? Curious and unknowing? Your low lit scene makes me assume you want it to be dark and intense but it doesnt really come off that way.
Crush the blacks - it intensifies the scene and creates dramatic contrast.
I've altered and cropped your photo (like the rest have - although I found their colour edits to be poor and underexposed) to give you a better idea of how it could be framed. And even though the altered photo still makes your eyes wander, they tend to realize the focus is on the board and hands more so.
crooked
balanced
Last edited:

Finnegan
Well-known member
John C. Hora ASC (my mentor) told me that when you can light a subject from the upstage, you should do so. He pointed out to me that like 95% of the coverage in film and television is upstage lighting, unless the DP specifically avoids it for a particular effect. Essentially, lighting a subject from the upstage means that the light which keys your subject is on the opposite side of the established 180-degree line as the camera. It sounds weird, so here's a picture.

Nathan Fillion is looking camera left, establishing a line on the left side of camera. On the other side of that line is his key light. The reason a lot of DPs like to light from the upstage is because it establishes a aesthetically pleasing alternation of light and dark when utilized in combination with a kicker (or fill) and background lighting. Look again at that image - from right to left starting with the kicker, it goes light, dark, light, dark. It's also a technique that is used heavily in classical painting, which is probably where it originated.
But take a closer look next time you're watching television - like 95% of TV is shot this way.

maranfilms
Veteran
That thiRd attempt looks great, It looks like it should, assuming you want it to look like the candle is lighting his face, which it does. LOOKS GOOD!!!!
This was a very useful lesson for me.
I've always assumed that a darker scene such as this, if shot with a digital camera, was lit brighter and then toned down in post so that the noise level is better controlled. Is this the case or no? I'm not talking about day-for-night. Just scenes like this where it seems the noise level would benefit from a brigher set.
I've always assumed that a darker scene such as this, if shot with a digital camera, was lit brighter and then toned down in post so that the noise level is better controlled. Is this the case or no? I'm not talking about day-for-night. Just scenes like this where it seems the noise level would benefit from a brigher set.

PerroneFord
Deals in Lead
This was a very useful lesson for me.
I've always assumed that a darker scene such as this, if shot with a digital camera, was lit brighter and then toned down in post so that the noise level is better controlled. Is this the case or no? I'm not talking about day-for-night. Just scenes like this where it seems the noise level would benefit from a brigher set.
It's an issue of ratio. "Black" is essentially the darkest lighting that the camera can shoot without noise. And then "white" needs to be quite a lot brighter than that. If you light your blacks too low, you'll just get noise. This can be pushed around in post, but you still need to get it mostly correct in camera.
alot of awesome advice, but for the sake of throughness, ultimately you decide what cinematic is.
Here's a chart:
Naturalism---------------Realism---------Expressionism
Nestor Almendros------Hollywood------John Alton
Take ideas from all three.
I think a big mistake alot of zero-budgeters make is try too hard to do a hollywood style with no hollywood money.
Ah, Nestor Almendros, my hero. If you want a visual treat watch Days of Heaven and you will know, among other things, what is magic about magic hour. (And, okay, give big credit to that brilliant prima donna Haskel Wexler for finishing the last half of the photography in Almendros' style and never getting due recognition.)
How did you get the background to look like that? Also could you describe the process of lighting that particular background with different temp?I would light background with different temp so its not mono/orange so much after color correction *You need to reframe this, too much table is visible, then maybe add rim light on dark side of your head, fix some light high behind you and experiment a lot

jambredz
Veteran
Add a soft diffused light source (flagged appropriately off the foreground) of cooler colour temperature (either by gels or kelvin controls in camera along with type of bulbs used.).Also could you describe the process of lighting that particular background with different temp?
I really like this thread. the only thing that i've been internally screaming for as i read through it all is a window in the background with "moonlight" streaming in to justify a nice bluish rim light. And if we were getting really fancy you can add a hazer machine to the mix. So with that and the warmer "candle light", and possible a couple more candles in the background, it would make for a more interesting look. However as a previous poster said...adding 4 people to that scene can drastically change lighting and blocking that scene.
edit: also you notice your simplest setup was the best. Sometimes people think you need all kinds of complicated lighting...when a simple thing is just so right. However how to APPLY knowledge of the simple set up (or any set up is the key). its also noteworthy in this example how powerful and important set dressing/set design/location is.
Last edited:
I'm trying to learn here. What approximate Kelvin value woud you set in camera to get this color asuming he's using tungsten lights?Wouldn't the whole scene to blue and not just the background?If it was to be done using gels, which gel would you use?Add a soft diffused light source (flagged appropriately off the foreground) of cooler colour temperature (either by gels or kelvin controls in camera along with type of bulbs used.).
About 3k difference between keylight and background and good knowledge about color correction.I did it in CMYK profile.
Sorry for not being specifit but i would like to left you something and to experiment, not give out everything cause it isnt always good.
***You light your subject first, thats one temperature, then you light background separately with blue light, which doesnt have to be blue, if you have for example keylight with 3000K and your background is lit by natural light from window then your background will be blue if you white balance for 3000k keylight and color correct carefully bumping up blue a bit without touching skintones.
Last edited:
jambredz
Veteran
@ kurt1111. If he were using tungsten lighting in the foreground and set the camera to tungsten balance (3200k) then used daylight balanced bulbs in the background then the background alone would be cool (no gel needed). The tungsten on his face would be white (or neutral). However if you wanted to simulate a more warmer light from the candle then you can gel the tungsten with a 1/4 CTO to warm it up a bit but add the gel AFTER you have White Balanced the camera to Tungsten.
if you were using tungsten alone.... for foreground and background. WB the cam for tungsten then add 1/4 CTO to the foreground light and a 1/2 CTB to the background light. I'm just approximating the gels because if the lighting is not enough the gels will cut alot of the light causing the image to be underexposed.
if you were using tungsten alone.... for foreground and background. WB the cam for tungsten then add 1/4 CTO to the foreground light and a 1/2 CTB to the background light. I'm just approximating the gels because if the lighting is not enough the gels will cut alot of the light causing the image to be underexposed.
Last edited: