F3: "Hulkanizing" with 3ality Body Armor...

Tata Steva

Well-known member
Hi,
since I made a decision on passing the "newest and the greatest" from Sony, my PMW-F3 will stay as my primary camera at least for few more years.
So, in order to spice it up a bit and to make it more "user friendly" I decided on a slight makeover of the camera body.
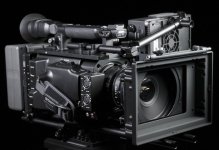
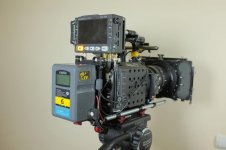
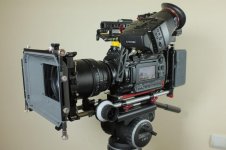
Enter 3ality technica and their superb body armor V2 for Sony PMW-F3: just came in today directly from California via FedEx. What a great kit! Exactly what was needed for this camera to become "stealth" and far more adaptable for everyday use.
Main features: 2 piece body plates resulting of loosing OEM top handle and (useless) eye finder together with all buttons on the handle. On the dumm side of the body, zoom rocker and hollow plastic handle are gone as well together with all buttons on that part of the body.
All lost buttons can be reprogrammed and relocated except the plug for headset. That is gone for good and the sound monitoring can be done via two outputs on the side, bellow xlrs. No biggie. If you ate using external recorder, this is non issue to begin with.
Both top and side plate have variety of 1/4 and 3/8 holes for mounting variety of attachments and accessories. The whole kit is topped by so called "manhandle", with multy purpose mounting options.

All together, this kit is actually how camera should have looked right out of the box. Since I was already using excellent Solid Camera evf mount for my SmallHD DP4, I ordered a few extra pieces from 3ality and AbelCine to bridge connect evf mount with body armor in most possible elegant way (without being cluttered).

Tomorrow I am on the shoot, but in next few days camera will be Hulkanized and I will update this post with some pictures.... Stay tuned...
 
Hey Rich it's Jake. It does add significant weight, but boy it sure is solid. I bet you'd like it. Really gives the cam a sense of ruggedness that was always a little lacking. Nice color suite by the way!
 
I'm really keen to get the top plate myself, I just need a low-rise version of the manhandle to make the setup work for me (to keep the camera compact, and because the 15mm rod mounts on the manhandle are essential to how I'd mount my PIX240 to the camera).
 
I have the Body Armor on mine and it's very nice--brilliantly made. It does require quite a bit of stripping your camera down, so warranty-worriers beware!
Didn't weigh the camera before and after, but I'd imagine it adds a pound or two. I'm not sure I'd do it in the camera is on my shoulder all the time, but otherwise it removes Sony's junk on the camera and gives you a ton of mounting points. (and looks very cool and more "pro").

Grug, yes that rod mount on the handle is most awesome. How do you plan to mount your Pix to it? I was scratching my head to figure out a good way, but didn't find one yet. I've been using a Zacuto arm for now.
 
Grug, yes that rod mount on the handle is most awesome. How do you plan to mount your Pix to it? I was scratching my head to figure out a good way, but didn't find one yet. I've been using a Zacuto arm for now.

I'd simply use the current solution I've created with Berkey System parts (see below), and mount it in the front hole of the manhandle (not the sideways facing hole). It will be an extremely elegant solution IMO.

It's an extremely simple solution really, but it allows adjustment and secure locking on four separate axes: up and down, left and right, forwards and backward, with the ability to rotate the PIX's screen up or down to adjust the viewing angle.

PIX mount.jpg

All you need for it (if using it with the manhandle) is two 6" Adjustable Handle Mounting Rods, and the PIX240 mounting rod (all of which you can get from the wonderful Brian Berkey at Berkey Sytems.
 
I heard that you are meant to send the camera to Sony to mount the armour for you, but it sounds like its down to you. Is this correct and is it complicated? Also how much is it please, would have to ship to the uk. Sparky
 
I'd simply use the current solution I've created with Berkey System parts (see below), and mount it in the front hole of the manhandle (not the sideways facing hole). It will be an extremely elegant solution IMO.
It's an extremely simple solution really, but it allows adjustment and secure locking on four separate axes: up and down, left and right, forwards and backward, with the ability to rotate the PIX's screen up or down to adjust the viewing angle.

View attachment 68647
All you need for it (if using it with the manhandle) is two 6" Adjustable Handle Mounting Rods, and the PIX240 mounting rod (all of which you can get from the wonderful Brian Berkey at Berkey Sytems.


That's very nicely done Grug.....
 
I heard that you are meant to send the camera to Sony to mount the armour for you, but it sounds like its down to you. Is this correct and is it complicated? Also how much is it please, would have to ship to the uk. Sparky

You can send the camera into Sony for the modification to be done, it would probably cost extra though. There's also the 'Sony' branded version of the modification, which was announced with very little fanfare a while ago, I believe the Sony top-plate/armour was developed with Element Technica for 3D rigs, so it's basically the predecessor (design-wise) to the current ET body armour. The Sony version looks a bit more utilitarian, but the mounting holes (for the top plate at least) are in the same places, and it's cheaper than the ET version.

However the Sony version doesn't appear to have air vents built into the top plate (which the ET version does), I'm not sure how much of a difference that makes for camera ventilation though.

I'll just be getting a top plate for mine because I use handstrap on my F3 to tuck all of my DTAP and SDI cabling into.
 
That's very nicely done Grug.....

Thanks Peter, it took me a while to stumble across it, but once I did it kinda solved all of my mounting issues with the PIX - which is tricky to mount simply because it's such a heavy beast.

The only issue with the current solution is that the rod that attaches to the camera is a tad low - so clearance from the mattebox and lens can be a bit fiddly at times. Mounted into the front of the ET Manhandle, it would be raised high enough that you just slip the rods in and out in seconds without any obstruction, which I think will simplify things even further.

ET just need to get on that low-rise version of the manhandle!
 
Yeah, this is RPP lens.

p.s. I didn't have a chance to send my F3 to install armour, so instead they sent me instructions video and i made it myself. Not that hard, actually if you do everything wisely step by step.
 
(I prefer simultaneous sound recording as a back up rather than ADR.) Did you lose our head phone jack? What are you doing to monitor sound, if anything?

Too bad the side plate can't work with a Berkey top plate. It's the right grip and rocker that's totally useless and looks like a consumer handy cam.
 
Last edited:
Duke,
I am monitoring via my recorder (Pix or KiPro). Another option, which I haven't tried, is to use the RCA audio outs under the XLR...which isn't my favorite option.

I'm going to start recording audio to my mixer as well for a safety. I've gotten to the point where I always have multiple recordings of everything--just in case. On my F35, I've actually run two recorders--Pix and Samurai.
 
I'm a firm believer of simultaneous recordings of both audio and video whenever possible. It's save a lot of work on several occasions. If you don't need them, reformat the media and move on. I don't usually monitor through the samurai though because of the slight lag.
 
Back
Top