F35/F65 Fan noise

Buy
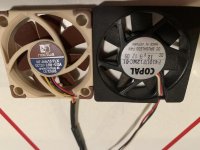
3 of these making sure you get 12V not 5V version:
unnamed-15.jpg
unnamed-14.jpg
unnamed-13.jpg

Remove Fans

Top:
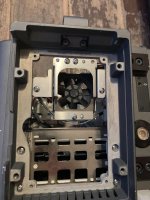
First Remove the Top Dock to get the top Fan Module Out. The top dock comes off with 4 Allen screws hold down the locking mechanism. Then 4 normal screws holding down the dock connector. You should be able to set it off to the side without disconnecting the dock connector. Now you have complete access to top fan.


0.jpg

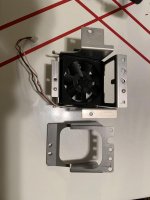
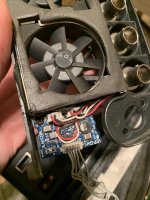
The fan module comes out the top once you unscrew the 3 screws, take all 5 out is fine you need them out to complete the task. carefully remove the cable going to the fan board before pulling it too far but you should be able to lift module and then remove the cable. Two screws will get the thin metal cover over the fan off and then it just slides out. Friction is the only thing holding in the fans because if they were hard mounted, they would cause vibration.

unnamed-10.jpg
unnamed-6.jpg

Side:

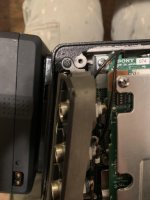
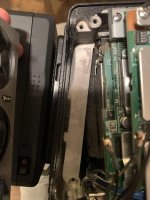
Remove the "Fat" side of the camera by unscrewing the Lemo Power ring and then unscrewing the 4 screws in the corners. This side comes straight off but the rubber from the SDI connectors usually get's caught at the back.

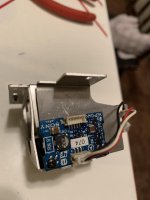
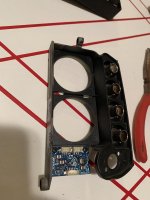
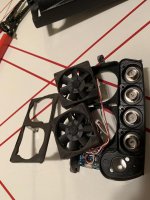
You need to pop the SDI cables off the back of the ports. Disconnect the remote cable at bottom also. Then there are 2 screws at the top and bottom of the fan module which hold it in place. The bottom one is a bit buried to find. Once the 2 screws are off the whole fan module will slide straight up. Disconnect the fan board before you pull it too far away.

unnamed-4.jpg
unnamed-3.jpg
unnamed-2.jpg
unnamed-1.jpg

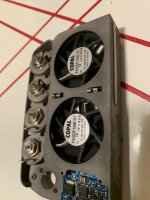
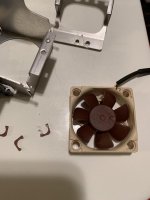
Then the fans come out by squeezing the little tabs on the backside of the fan module. Once you squeeze them with pliers, the fans should fall out.

unnamed-1.jpg
unnamed-16.jpg
unnamed.jpg

Swap Fan Connector onto New Fan

Things you need: solder iron, wire stripper, heat shrink tube or electrical tape.

I really suck at soldering and attaching two cables is doable for me. If this is out of the question, find a friend who can do it.

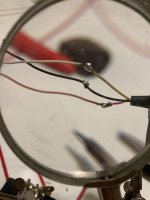
I ordered some really thin heat shrink tubing I think 1/64 inch was smallest I could find, haven't gotten it yet so I just wrapped it with electrical tape after I soldered the three wires. You need to isolate the 3 solder points from coming in contact with each other or any metal in the case.

Wire the fans
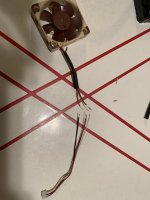
yellow = white. Red=Red. Black=Black.

easiest I think to cut the two cables in the middle so you have extra wire to work with. The actual Sony cables are pretty short.

unnamed-12.jpg
unnamed-11.jpg


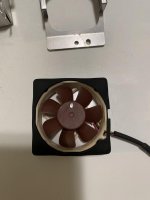
Pull the rubber bumpers off the Nocuta fans to fit better in the Sony bumper. The new fans are a little bigger so they will be snug but fit.

unnamed-8.jpg

unnamed-9.jpg

Everything should fit back together the same with new fans, tuck excess cable away in safe place.


The new fans should start right up, if you really want to hear the difference turn them to MAX. There is a "Low Noise" adapter included with the fan which drops the speed even more at standard power however it isn't needed. The real luxury is how quiet these fans can stay at the high setting, I think they move more air. The low setting is plenty quiet don't need to risk dropping fans too low.

The back fan module is basically holding the fans by squeezing them in with the wires running along side them. If there is rubbing or tapping, make sure these back wires aren't interfering.
 

Attachments

  • unnamed-5.jpg
    unnamed-5.jpg
    57.9 KB · Views: 1
Last edited:
Thanks yachacha, this is perfect! No doubt once I get the fat side panel off the camera I'm gonna find some nastiness inside. Would you go with compressed air or something else to clean it up a bit?
 
I use new soft paintbrush to clean most of the camera, obviously don’t brush circuit boards. Air works fine for the camera. If you need to clean the sensor filter use brand new q-tips and lightly wipe any loose dust off, changing for new q-tip every wipe. Then you can go in circles on any stuck smudges. Use alcohol if really bad, never push hard and keep using new q tips. Lens tissue isn’t great for sensor clean.
 
Turns out I'm terrible at soldering but it all worked out. Also found a couple loose screws just floating around inside the camera which explains why it always rattled.
 
Side:

Remove the "Fat" side of the camera by unscrewing the Lemo Power ring and then unscrewing the 4 screws in the corners. This side comes straight off but the rubber from the SDI connectors usually get's caught at the back.

You need to pop the SDI cables off the back of the ports. Disconnect the remote cable at bottom also. Then there are 2 screws at the top and bottom of the fan module which hold it in place. The bottom one is a bit buried to find. Once the 2 screws are off the whole fan module will slide straight up. Disconnect the fan board before you pull it too far away.

View attachment 142149
View attachment 142150
View attachment 142151
View attachment 142152

Then the fans come out by squeezing the little tabs on the backside of the fan module. Once you squeeze them with pliers, the fans should fall out.

View attachment 142152
View attachment 142158
View attachment 142159
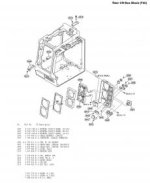
I noticed your side fans were mounted opposite of mine, sucking in air vs shooting it out....

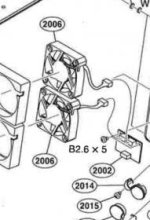
I am not sure what is correct there, and since I know you've taken apart more cameras I would think you know this best. But the spare parts manual shows them the opposite of how you mounted it.

Skärmavbild 2021-02-02 kl. 9.19.13 em.jpg Skärmavbild 2021-02-02 kl. 9.20.58 em.jpg

This is confusing.

C
 
Last edited:
What's crazy is I have seen both fans setup in either way. It seems like camera houses and maybe Panavision (the ones I found reversed) took it upon themselves to decide how the air should flow.

Thanks for showing photo, that is the way Sony designed it. I prefer both sets of fans to be blowing cool air in from the outside and not being used to exhaust air from the camera.
 
What's crazy is I have seen both fans setup in either way. It seems like camera houses and maybe Panavision (the ones I found reversed) took it upon themselves to decide how the air should flow.

Thanks for showing photo, that is the way Sony designed it. I prefer both sets of fans to be blowing cool air in from the outside and not being used to exhaust air from the camera.

Yeah that is very interesting.

The way you have mounted the top fan though is shooting air out of the camera, the label side is where it sucks it's air in. Just FYI :)

C
 
So in a stock camera body would you guys say pull air in with the side fans or use it as an exhaust? top fan I assume would work better pushing air down?
 
"the label side is where it sucks it's air in. Just FYI"

Nope. PC fans sucks in the top out the bottom, the bottom is the label. Your fans are wired backwards....
 
Last edited:
Yeah that is very interesting.

The way you have mounted the top fan though is shooting air out of the camera, the label side is where it sucks it's air in. Just FYI :)

C

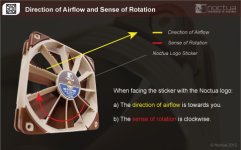
I read the pins layout of Noctua off their literature and the Sony fans had the + - lines labeled. You are going to want to swap the + and - lines if your fans are sucking air in the label side. The fan blades are designed to work best one way.

faqs_airflow_rotation.jpg
 
Last edited:
So in a stock camera body would you guys say pull air in with the side fans or use it as an exhaust? top fan I assume would work better pushing air down?

The Sony Diagrams confirm:
Top sucks air down into the CCD.
Back exhaust out of the back.
 
I read the pins layout of Noctua off their literature and the Sony fans had the + - lines labeled. You are going to want to swap the + and - lines if your fans are sucking air in the label side. The fan blades are designed to work best one way.

View attachment 142193

Really?

Then the official Sony manual is saying to shoot out air on the side, and drag it in from top (according to the diagramme).

Looking at it from a computer standpoint it sort of makes sense to have it that way as well, keep the sensor coolest, then draggin out the excess air.

C
 
And then the third, probably really hard to replace fan on the bottom of the camera exhausts the air too?
 
What a great thread.
Thanks for the instructionals!

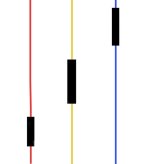
I might add a tidbit for anyone thinking of undertaking this and doing their own soldering.
It's always a good idea to cut and make your joins at separate parts of the wires instead of cutting them all at one point and having all the solder joints sitting close together.
Especially if you'll tie or heatshrink all the wires all together at the end.
If they rub over time and there's a sharp bit of solder sticking out (or something like that) it may pierce through the heatshrink and contact one of the other wires. Unlikely but always a good idea to avoid.
Last thing you want is a short.

Wires.jpg

And always aim for a physical join (such as twisting) with the conductors so that if the solder weakens over time they'll still be connected together.
Use flux for a good solid long lasting join.
 
The Sony Diagrams confirm:
Top sucks air down into the CCD.
Back exhaust out of the back.
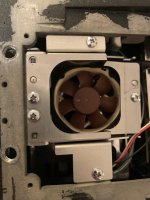
I was just an idiot not noticing how it was working.

I had it mounted the proper Sony way. Part of me is wondering if it is more or less powerful with aftermarket though...

I used to feel the wind blowing out a bit more. However I rarely hear the fans at all now. And I would imagine the software is basing their speed on temperature rather than RPM?

C
 
Back
Top