
Navigation
Install the app
How to install the app on iOS
Follow along with the video below to see how to install our site as a web app on your home screen.
Note: This feature may not be available in some browsers.
More options
You are using an out of date browser. It may not display this or other websites correctly.
You should upgrade or use an alternative browser.
You should upgrade or use an alternative browser.
C300: Exposing when using Canon log
- Thread starter eco_bach
- Start date
Yes in general, but it depends on the situationDoes the rule expose to the right still apply?


AndreeOnline
Veteran
Let me rephrase this
When using custom flat profiles, normally you expose as far to the right without clipping.
Should you do the same with Clog?
That is what you do with raw data, not Log profiles.
With raw data you want to maximize signal strength against the noise floor of the sensor, that is why a saturated sensor is better. In Log, your data gets mapped/baked into 8 bit with Canon Log. Other Log profiles might be 10 bit and offer more options closer to raw.
If you expose right with a Log profile you will compress the top of your signal (that is normally reserved for highlight rolloff). This means that you might have a scene with reflected light where you might end up losing tonality unnecessarily.
My best tip for Canon Log is to expose as low as possible without having to lift your mid tones in post. Canon themselves say that 18% IRE is 33% in Canon log (looks under exposed). They didn't just throw that out there.

marvinhello
Well-known member
Use View Assist and expose to the right.
AndreeOnline
Veteran
Use View Assist and expose to the right.
It's a solid tip for a histogram that fits inside the boundaries, but I wouldn't recommend it for scenes when you are clipping highlights and/or shadows.
I personally prefer to not use View Assist in order to see what I'm actually shooting. I also think it's a better option for the long run to learn to "see" the Log histogram. You'll know what to look for in no time at all and then it's easy to correctly expose even problematic scenes without any additional tools except looking at the rear LCD.

MattRobertson
Well-known member
http://provideocoalition.com/aadams...for_film-style_production--the_dsc_oneshot/P3
Would exposing 18% grey at 40ire as stated in this article using this art adams color card still be the same?
Would exposing 18% grey at 40ire as stated in this article using this art adams color card still be the same?
AndreeOnline
Veteran
Would exposing 18% grey at 40ire as stated in this article using this art adams color card still be the same?
Same as what?
alphaville
Active member
We expose at -1 stop with C-log. Exposing to the right is not a smart thing here. The -1 stop gives 99.7% usable results after grading. Could be our C300 but the highlights go hot very, very quickly when exposing correctly thru waveform...
Last edited:
We expose at -1 stop with C-log. Exposing to the right is not a smart thing here. The -1 stop gives 99.7% usable results after grading. Could be our C300 but the highlights go hot very, very quickly when exposing correctly thru waveform...
-1 stops down from what? Very hot highlights can be recovered pretty well. Clipped highlights are the only problem

***WARNING*** IMAGE HEAVY POST
This issue is when exposing period is that everything is relative to what you're shooting. For example the rule of thumb on skin is 35-45 ire, but this is only relative to a "standard shot" and very little else i.e. that may be fine for an interview head and shoulders, but narrative turns everything on its head when good exposure is relative to how you have set up your contrast ratios through lighting based on how the scene is to look. It also depends on you and your style to a great extent as a shooter.
In addition to that there may be a single scene where they are in light - with a standard exposure ratio and then a character moves into a darkened area - you dont want to be saying well his /her skin tone is is too low there as its only relative to what else we are seeing and sometimes what we arent seeing.
In addition to that not all shots are appropriate to throw through the Canon log LUT. The reason why LUTS have been created for various shooting scenarios in the past for log based cameras. As the shooter you have to know what your shooting for and how that should be looking. LUT based outputs in my opinion are for producers, directors and clients. As the person controlling light and camera you should be setting the appropriate exposure for the shot - a reason I never understood why when shooting RAW people suppose this is a caveat to go ahead and change exposure as well.
Ill see how I go presenting a couple of scenarios here based on my personal experience and how I like to shoot. This is all shot in Canon log of course and doing simple grades in FCPX so they arent as accurate as I'd like but the idea remains the same.
PLEASE NOTE: ALL IMAGES COMPRESSED JPEGS DO NOT PIXEL PEEP THESE - THEY LOOK GREAT ON A 65" SCREEN - I PROMISE
Early morning scene the characters arrive home after an all nighter at a club. Their happy and laughing and maybe too many Red Bull and Vodka. Mostly dappled morning sun breaking through. (All scenes lit).
SHOT 1 - Ungraded. - ignore the motion blur of them moving. His skin tone is as low as 20 ire, hers up around 35 in this frame as they move that changes as they move through the different light sources. You'll notice highlights and on the RGB waveform you'll notice 0 over exposure / highlight compression.
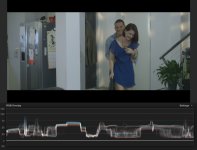
SHOT 1 - Graded - THe darkest darks in this scene at the bottom right corner are now slightly below 0 IRE, however not compressed. Also notice that the overall exposure of the shot hasnt changed really and generally exposure is as shot. If you look at the white pole you'll notice the RGB split has moved closer together, but again the exposure remains similar. THe colour alterations in post are extremely minor in actual fact as the adjustments play on whats there and not what isnt.
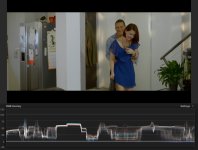
Moving to sample 2 you'll see a marked difference in the overall ire from the shot exposure on skin.
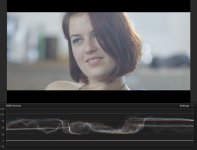
SHOT 2 - Ungraded - NOTHING here below around 20 ire at all and skin tones around 65 ire? "What they told me I should have skin tones between 35-45 ire! You don't know how to expose". Again that depends on your scene, your style, what the contrast ratio and many other factors.
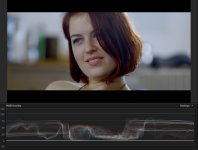
SHOT 2 - Graded - Again very little change in exposure - where the top end was it still relatively is. You'll note the end skin tones are now around 55 ire - probably right for this very pale subject, more importantly right for the scene as I wanted it.
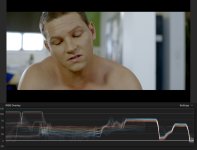
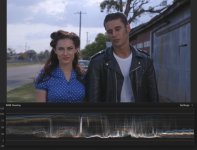
SHOT 3 - Ungraded - (Wont go into detail as to why he's left of frame here). Now we have a window in shot with diffusion applied. It's meant to blow out. The key to blown out areas is to have control of them. You'll notice in the first sample theres significant colour separation on this area and so we have feathered window edges that are more blue. The feathered edge is what we wanted and its simple to get that colour under control as you'll see in the graded version where its a bluey grey - actually the colour of the frame.
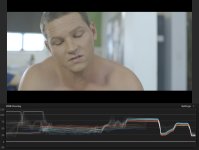
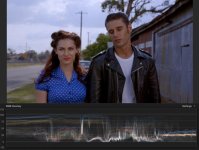
SHOT 3 - Graded. - Skin tones now where I want them and window under control. There's always going to be shots like this where you need to juggle components. But using controls and solid exposure is the key. For these scenes on last two angles, Im using key and fill / controlled windows (natural light), colour timed practicals x 3(not seen in these last two frames - but there in the wides), background lighting plus kicker / rim (the window is not the kicker here - the light you see on her hair and across his hair / face / shoulder are introduced).
To point, Im not sure if Im explaining this utterly clearly at all as I have a habit of drifting of point during explanation of typed words. They keys to good exposure are Control / what suits the theme and mood / your tastes and from there getting it right.
This issue is when exposing period is that everything is relative to what you're shooting. For example the rule of thumb on skin is 35-45 ire, but this is only relative to a "standard shot" and very little else i.e. that may be fine for an interview head and shoulders, but narrative turns everything on its head when good exposure is relative to how you have set up your contrast ratios through lighting based on how the scene is to look. It also depends on you and your style to a great extent as a shooter.
In addition to that there may be a single scene where they are in light - with a standard exposure ratio and then a character moves into a darkened area - you dont want to be saying well his /her skin tone is is too low there as its only relative to what else we are seeing and sometimes what we arent seeing.
In addition to that not all shots are appropriate to throw through the Canon log LUT. The reason why LUTS have been created for various shooting scenarios in the past for log based cameras. As the shooter you have to know what your shooting for and how that should be looking. LUT based outputs in my opinion are for producers, directors and clients. As the person controlling light and camera you should be setting the appropriate exposure for the shot - a reason I never understood why when shooting RAW people suppose this is a caveat to go ahead and change exposure as well.
Ill see how I go presenting a couple of scenarios here based on my personal experience and how I like to shoot. This is all shot in Canon log of course and doing simple grades in FCPX so they arent as accurate as I'd like but the idea remains the same.
PLEASE NOTE: ALL IMAGES COMPRESSED JPEGS DO NOT PIXEL PEEP THESE - THEY LOOK GREAT ON A 65" SCREEN - I PROMISE
Early morning scene the characters arrive home after an all nighter at a club. Their happy and laughing and maybe too many Red Bull and Vodka. Mostly dappled morning sun breaking through. (All scenes lit).
SHOT 1 - Ungraded. - ignore the motion blur of them moving. His skin tone is as low as 20 ire, hers up around 35 in this frame as they move that changes as they move through the different light sources. You'll notice highlights and on the RGB waveform you'll notice 0 over exposure / highlight compression.
SHOT 1 - Graded - THe darkest darks in this scene at the bottom right corner are now slightly below 0 IRE, however not compressed. Also notice that the overall exposure of the shot hasnt changed really and generally exposure is as shot. If you look at the white pole you'll notice the RGB split has moved closer together, but again the exposure remains similar. THe colour alterations in post are extremely minor in actual fact as the adjustments play on whats there and not what isnt.
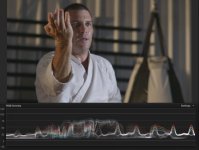
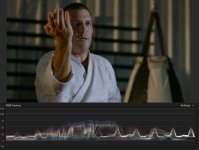
Moving to sample 2 you'll see a marked difference in the overall ire from the shot exposure on skin.
SHOT 2 - Ungraded - NOTHING here below around 20 ire at all and skin tones around 65 ire? "What they told me I should have skin tones between 35-45 ire! You don't know how to expose". Again that depends on your scene, your style, what the contrast ratio and many other factors.
SHOT 2 - Graded - Again very little change in exposure - where the top end was it still relatively is. You'll note the end skin tones are now around 55 ire - probably right for this very pale subject, more importantly right for the scene as I wanted it.
SHOT 3 - Ungraded - (Wont go into detail as to why he's left of frame here). Now we have a window in shot with diffusion applied. It's meant to blow out. The key to blown out areas is to have control of them. You'll notice in the first sample theres significant colour separation on this area and so we have feathered window edges that are more blue. The feathered edge is what we wanted and its simple to get that colour under control as you'll see in the graded version where its a bluey grey - actually the colour of the frame.
SHOT 3 - Graded. - Skin tones now where I want them and window under control. There's always going to be shots like this where you need to juggle components. But using controls and solid exposure is the key. For these scenes on last two angles, Im using key and fill / controlled windows (natural light), colour timed practicals x 3(not seen in these last two frames - but there in the wides), background lighting plus kicker / rim (the window is not the kicker here - the light you see on her hair and across his hair / face / shoulder are introduced).
To point, Im not sure if Im explaining this utterly clearly at all as I have a habit of drifting of point during explanation of typed words. They keys to good exposure are Control / what suits the theme and mood / your tastes and from there getting it right.
Attachments
-
 4 GRADE.jpg344.3 KB · Views: 0
 -
 4 NO GRADE.jpg314.5 KB · Views: 0
 -
 5 NO GRADE.jpg52.3 KB · Views: 0
 -
 5 GRADE.jpg385.3 KB · Views: 0
 -
 6 GRADE.jpg317.9 KB · Views: 0
 -
 6 NO GRADE.jpg287.2 KB · Views: 0
 -
 7 NO GRADE.jpg58.1 KB · Views: 0
 -
 7 GRADE.jpg62.6 KB · Views: 0
 -
 8 GRADE.jpg57.5 KB · Views: 0
 -
 8 NO GRADE.jpg353.3 KB · Views: 0

Tim Nitsch
Well-known member
Noel thank you so much! I could read posts where people talking about where exposures should fall on the WFM till I go blind and it would never click for me because I'm such a visual learner, but if I can see the before and after with the different scenes as well as the waveforms and how those scenes fall on the WFM, before and after grading, it's a massive help and now it makes a lot more sense.
For some reason I was always worried that I absolutely had to get my highlights close to 100 (but never over) and my shadows close to 0 (but never below) for every scene and that If I couldn't do that than I did something wrong, but looking at your examples I can see that's not necessarily true.
I would imagine that these ideas and practices would translate across to the C100 as well?
For some reason I was always worried that I absolutely had to get my highlights close to 100 (but never over) and my shadows close to 0 (but never below) for every scene and that If I couldn't do that than I did something wrong, but looking at your examples I can see that's not necessarily true.
I would imagine that these ideas and practices would translate across to the C100 as well?
Last edited:
I would imagine that these ideas and practices would translate across to the C100 as well?
Absolutely would if shot in log as all my samples are.
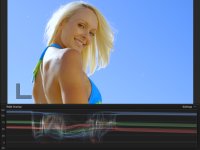
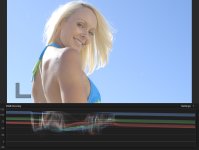
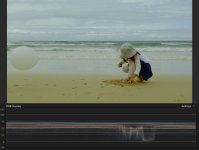
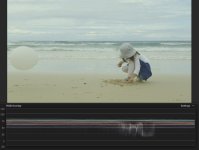
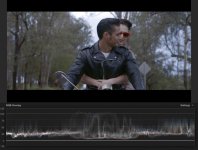
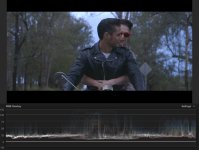
Note: The beach shot and motorcycle shot are the wrong way around - the graded is showing first.

There is noise in a C300?In theory middle gray should be 32%IRE, but I generally lift it a little from there to avoid noise in the shadows.