DIY DSLR RIG -parts from Lowe's, Home Depot & Walmart

Ted Ramasola

Veteran
Some time ago I posted a DIY baseplate and rail block but the difficulty of several DIYers getting the parts spot welded discouraged them. Since I'm now in the U.S. I experienced the same difficulty so I modified the designs for my DIY projects.
Now I have sourced all my parts and tools from Lowe's, Home Depot and even one item from Walmart. This design will no longer require welding.
Essential tools needed are; a metal hack saw, a drill, preferably a drill press, a way to hold the pieces while cutting, either clamps or preferably a vise and a rivet tool. Now U.S. based diyer's can acquire their parts easily.

Take note that the industry standard for rail rods are 15mm, the "rods" chueaply available at lowe's and home depot are 13mm (12.7mm) aluminum or steel tubes so for those starting from scratch and dare to have their own "standard" like me, you can use the cheaply available tubes as rods for your DIY rig. If you have an existing rod system and need compatibility just change the bit for the drill so it will accept the 15mm rods.

DIY+DSLR+Rigs+Layout2.jpg


Here is a video showing the possible configurations of the rig based on the basic baseplate. There are still a few more possibilities but these are the basic ones.

Here is the guide to the DIY baseplate and rods.

DIY+Bsseplate+part1+small.jpg


The rail block which is referenced in almost all the accessories has its own step by step guide.

For the rail block, high res image of part 1 and 2 of the Baseplate and rods, go here. http://www.ramasolaproductions.com/5.html
 
Last edited:
Nice, yes.. i've been using aluminium tubes from the hardware store to make mine. I've been using 14mm for my projects.
I've seen steal in 15mm, but I have shims that compensate for the 14mm and also its much lighter then steal.
Havent made a full shoulder, as im worried about strength. But perfect for a follow mount on a tripod or something.
Yes, wonderful work on yours... I really need a "drill press". I use a drill tap, but thats just not the same.

I've also seen some 13mm carbon tubes on the hobby sites. I'm tempted to get some and strengthen the thin aluminium tubes internally...
 
Unless you are pimping an F65 1/2in (12.7mm) tube is good for most rigging, its my stock stuff cars bikes whatever..

 
Havent made a full shoulder, as im worried about strength. But perfect for a follow mount on a tripod or something.
Yes, wonderful work on yours... I really need a "drill press". I use a drill tap, but thats just not the same.

I've also seen some 13mm carbon tubes on the hobby sites. I'm tempted to get some and strengthen the thin aluminium tubes internally...

Thanks. Yes, a drill press is a very useful tool as it frees up both your hands.
I've made the rig to have 2 configurations for shoulder mount, one straight and the other offset to allow the operator to use the camera's lcd via finder rather than an external lcd.
I'm still tweaking its height as the camera needs to be raised to make it eye level.
 
Unless you are pimping an F65 1/2in (12.7mm) tube is good for most rigging, its my stock stuff cars bikes whatever..

That's true Sam. DSLRs are so light aluminum is adequate for most uses.

You are right on the exact dimensions on the hardware tubes being 12.7 not 13mm. I'll edit my post to indicate this.
 
Here are images of some parts that I have on my laptop right now. The rest I'll have to properly layout when I get back to my PC.
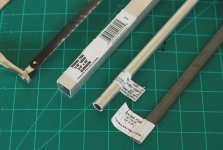
One are the Aluminum tubes, square is for the rail block, round is for the rods. The flat bar is the clamp for the rail block.

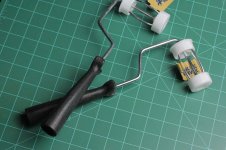
The other image is of the cheapo paint rollers which you can use for your handles. This one is the cheapest I could find at around a dollar. More pricey versions of 3 dollars each seem to be better, with the handles shaped to fit your fingers for better grip.

tubes and flatbar small.jpg

paint roller small.jpg
 
Posted this video on the first post.

It shows a few of the possible configurations you can do with this DIY DSLR rig design.


The step by step photo guide on how it's made is coming up next. :)
 
Very nice Ted, looking forward to the parts list and step by step. You're projects are always inspiring!
 
Here's a guide for a DIY shoulder pad. I'll be using this pad as both a shoulder pad for shoulder mounted configuration and as a chest pad for run and gun shooting.

_wsb_251x166_shoulder+pad.JPG


guide is posted at the link i posted earlier.
 
Last edited:
Ted, I think your time on the island has really made your DIY improv skills second to none!

;-)
 
Ted, I think your time on the island has really made your DIY improv skills second to none!

;-)

Thank you j. If by island you meant the island province where I came from, then yes. The lack of cheap local source of material necessitated the improv of a lot of the gear we used.
But also I think the investment of my parents in those LEGO toys when I was very young helped in the way I think. ;)

Here's the counterweight for the rig.

_wsb_233x167_counterweight.JPG


again, the step by step photo guide is here;
http://www.ramasolaproductions.com/5.html
 
Last edited:
Awesome work, and wonderful for you to illustrate it all for us...
Drill press for FTW!
Out here in Hungary, its a bit harder to get a good workshop outfitted. I'm missing my workshop back in the states right about now :(
 
Awesome work, and wonderful for you to illustrate it all for us...
Drill press for FTW!
Out here in Hungary, its a bit harder to get a good workshop outfitted. I'm missing my workshop back in the states right about now :(

Thank you daihard.
Yes, Drill press FTW indeed. The cost of one clearly pays for itself when you consider the cost of these rigs. ;)

Here's how the components come together.

_wsb_406x265_DIY+DSLR+Shoulder+mount+rig+small.jpg


Hope this helps. :)
 
Back
Top