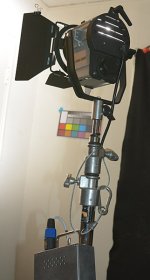
DIY DAYLIGHT 150 HMI $150... (OK, it's HID)

This worked out really well... cold-start CDM fresnel. Very pleased.
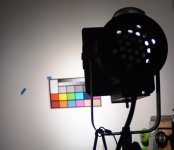
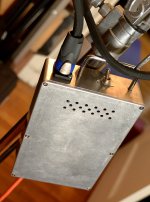
main.jpgballast.jpg

This 150 watt bulb, $29.00... (just waiting for the first whining response of "But it's only 85 CRI...". Fine, go find me a 95 CRI globe for the same price that renders this nicely...)

And this electronic ballast, $50 - flicker free to (at least) 1/300th shutter.

A donor fresnel, some enclosure parts for the ballast, wiring, etc. I think I spent $40 on parts, and I had an old Altman 6" fresnel (they're often on eBay for $30 - $50). Great budget fixture.

Result is a nice daylight fresnel, about 500-650 equivalent. The bulb is decent, has a bit of a magenta spike (which beats the hell out of green!) My intended use would be hair/rim lighting so color's fine.

I can post complete parts list and build notes if anyone wants to play with this. Works great and I'd not hesitate to use it on a client shoot, no duct tape or PVC pipe used.

RGB testing, I show this could actually use maybe 1/8 or less +green gel. The bit of pinkish warmth works for me though.
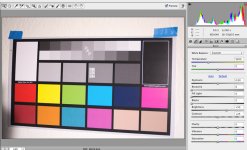
color-test.jpg
 
Ok, here's what I have:

DISCLAIMER

I'm not a licensed electrician. I'm barely an amateur gynecologist. HID technology involves pulse-start voltages of, like, 6,000 watts or amps or something, and this also uses 120v power. So this could burst into flames at any second. Make one at your own risk. (Seriously, you need pulse-start rated wire and socket for everything past the ballast! You need to know how to ground a circuit and wire a switch, etc. You need a grounded fixture where the wires are fastened properly with strain-relief and protection from abrasion. And so on.)

That said... on full flood at ten feet, this fixture gives F 5.6 1/2 @ 1/60th, 400 ISO.
This seems more in line with a 500 watt tungsten globe in the same fixture, haven't directly compared.

Fresnels aren't very efficient fixtures - someday I'll find a way to get a G12 base into a Flexipar. That would kick some nice ass. Flexipars really rock for efficiency.

So, here's the parts I used:

The bulb:
Cool Lights sells an 85 CRI, 5200k 150 watt bulb. It has pretty decent color rendering with a bit of a red/magenta spike (which actually looks pretty nice on skin - a bit of straw gel is pretty with this, too). This is a cold-restrike bulb, meaning if you shut the fixture down, the bulb needs to cool before it will restrike - usually 5 - 10 minutes.

Cool Lights stated via email that this globe is sufficiently UV shielded to use without UV gel. And that the bulb temperature is equivalent to a 150 watt tungsten lamp. So there's a lot of fixtures this could work in.

"85 CRI?" scoffs the know-it-alls... "I'd never use 85 CRI!" CRI is fairly meaningless as you get into the 80's. Is the light pretty? Does it correct easily to daylight without losing too many lumens to gels? You'll have to decide - I'm thrilled with it for the cost.

The Ballast:
Cool Lights sells a ballast for the above bulb... it's $399. I've tried the Alzo ballast and a multi-power grow ballast, none worked. Enter the $50 Light Park ballast - no flicker (I've tested up to 1/300th). it's widely available (Amazon Prime, baby!). It does require an enclosure however. With frame rates of (at least) 1/300th, you could use this for overcranked applications as well.

The fresnel:
I used a stamped-steel Altman (also sold as L&E) 6" theatrical fresnel. They're not Arri-pretty, but I've used them for over a decade. They're rated to 750 but many people stick a 1k in 'em. They're regularly on eBay for under $50. I don't know if this globe will work in a 3" or smaller fixture. I imagine a Chinese Arri knockoff would be pretty groovy - most people open 'em up to check the wiring anyway.

Mounting the bulb:
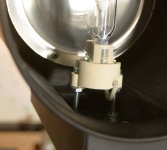
You're on your own here - use a pulse-rated G12 base (they pretty much all are) and you need to get the center of the bulb aligned with the center of the reflector. I used bolts and nuts and locktite red and made sort of standoff legs - that may be the easiest way. Every fixture will be different and it's up to you to disassemble the zoom mechanism and find a way.

detail.jpg

Keep in mind, there's nothing to keep you from using this in China balls, open faced stuff, etc... think about what you need daylight-wise at this wattage. (And remember that biax flos probably are an easier way to be covered for soft light - it's fresnels and pars we need for affordable daylight rigs).

The fixture-ballast cable:

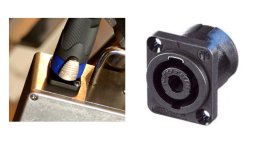
I used the 3ft. or so of nice fiberglass wrapped, high-voltage cable that my fixture came with. This isn't very long for a ballast cable. Other options would be to mount a panel connector on the fixture itself, or bolt a small metal enclosure to the yoke and put the connector there, with proper wiring and strain-relief to the fixture. I used Speakon connectors for this project.

I'll probably just buy a 6' Speakon extension. I don't know what the max cable I can use with a pulse-start ballast might be though.

About Speakon Connectors:

Speakon connectors are used in the audio biz, but several people have noticed the Chinese HMIs use them as well. Whatever you use, you'll need hot, neutral and ground, so at least 3 conductors. Speakons come in 2 and 4 pole, so get the 4 pole. They are rated for 40 amps - you could hook a dryer up to 'em.

The panel mounts are "male" and the cables are "female", a speakon naming oddity (well, it's kinda correct, depending how you look at it...). When you get the female cable connector, fiddle with it a bit - it has an odd way of strain-relieving the cable (which is kinda nice, and it tightens as you screw the parts together). Mine shipped with the strain relief inserted the wrong way, so make sure you understand the thing before assembling.

speakon.jpg

I suggest you drill & tap the Speakon panel-jack mounting holes - I can't see getting a nut on those screws; you could use self-tapping metal screws, but this is one of those gonna-get-tripped-on someday connectors. (Anyone in this biz should already have 1/4-20 and 3/8-16 bit & tap setups, it's a game changer for mounting and customizing, and it takes seconds to drill & thread a hole in aluminum). For this a 6-32 seems optimal, the bit, tap and handle should be under fifteen bucks.

I drilled a 1" hole for the panel jack, followed by the 2 screw holes, then threaded those for 6-32.

EDIT: In a post below, Paulears mentioned Powercon connectors. I agree they seem to make more sense for this project. Their form factor is similar but they're designed for power distro, not just audio. You might want to explore those as well.


The Enclosure:

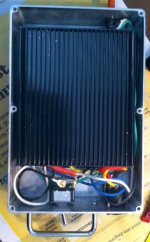
internal1.jpg

The Hammond box I chose is a great size. BUT... their specs didn't account for the middle screw standoffs (the lid screws on with 6 screws, 4 in the corners). The damn thing wouldn't fit! So, I ground out the standoffs from the bottom to about 1/2" from the top using an angle grinder. This means I had to sort of "slide" the ballast in place, but that worked fine. You may want to source a wider box if you don't have an angle grinder (ten bucks at harbor freight). A dremel would work but might take all day.

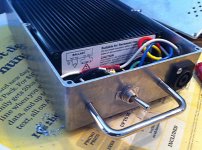
detail2.jpg

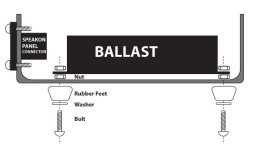
I used rubber feet, and bolted through those to mount the ballast in the box. I added a nut under the ballast to raise it up for ventilation. I drilled a lof of vent holes, but did it nice & clean, more like a vent grid than random holes. I also placed the handle to protect the switch.

plan.jpg

Other hardware:
A power switch, power cable, a handle, and some rubber feet. I tossed the wood screws supplied with the feet and used 1/2" #8-32 bolts. I ran the bolts through a washer, then the feet, then the enclosure, and fastened with nuts. This left enough screw to then set the ballast in place, and use more washers and nuts to fasten it down. The nuts under the ballast added some ventilation.

If I make another, I'll give the ballast its own screws - it was a ***** to tighten the nuts in that tight space - I think it would be easier to have the ballast nuts on the outside-bottom of the enclosure. Or optimally perhaps make threaded holes for the ballast, though the enclosure walls are pretty thin for that.

I used Locktite on everything.

Drilling for the speakon panel connector:
This requires a 1" hole - I drilled a 1/4" pilot hole, and then used a hole saw, very slowly. (Hole saw was about 1", but seemed about 1/16" smaller than a 1" spade bit??) It cut through the soft aluminum with no trouble at all. Then you add two small holes for the mounting screws. Just take it slow, and make sure the hole saw is in good shape and not wobbling. There's a fine line between a hole that's big enough and one that will show at the edges of the Speakon plate, which would look a little too DIY for some of us! If in doubt, make a smaller hole and then sand to fit - the hammond aluminum cuts very fast.

Ventilation:
This ballast is rated for enclosed spaces, looks like the case top and sides act as a heat sink. I raised the ballast with nuts, and drilled vent holes in the enclosure bottom. I also drilled vent holes in the enclosure top, at the opposite side (think how heat will flow in use). I don't know if this needs a fan - after running for 1 hour, the internal temp in the enclosure is 84 degrees, externally it's barely warm. After 2 hours, the case was warmer - I'm going to drill out the lid of the enclosure a lot more for more ventilation.

To keep my vent holes neat, I made a template in Adobe Illustrator, printed it, trimmed, and attached it to the enclosure with spray mount. Just drilled right through it, cleaned it off with solvent.

Ballast Wiring:
Use a nylon strain relief for the power cable and make sure it's good and tight - some electrical tape wrapped around the cable inside the enclosure can snug it up if it is slipping through. Use a step drill to get the proper sized hole.

Power cable black to (SPST) power switch, ballast black to power switch (polarity doesn't matter). Ballast white to power cable white.

The 2 colored ballast wires to the speakon (make a note of your poles, they are +1, +2, -1, -2 - you will use 3 of 4). Connect a ground to a third speakon terminal and fasten this to the enclosure.

The power switch I used has an on-off label plate, I like that. it would be easy to add a pilot light to the case if you needed one. The Speakon connector was solder type, they do make screw-on. I like solder. The neutral-to-neutral was soldered, wrapped with tape and the tape wrapped with heat shrink tubing (remember to slide the tubing on before ya solder.)

Fixture wiring:

Hot & Neutral from the fixture go to the terminals that will mate with the ballast connector, ground will mate with ground. Polarity doesn't matter in this setup.

PARTS

BULB: $29.00
Cool Lights CL-15060 150w 6000K Quartz Metal Halide Single End Bulb
http://www.coollights.biz/cl15060-150w-6000k-quartz-metal-halide-single-bulb-p-74.html
Color Temperature: 5400K
CRI: 85
Base: G12

Ballast: $49.99
Aquatic Life Light Park Electronic Ballast Aquarium Lamp/Light, 150-watt
http://www.amazon.com/gp/product/B00E3S7YCM/ref=oh_aui_detailpage_o03_s00?ie=UTF8&psc=1

BULB BASE (SOCKET)
G12 PULSE-RATED BASE:
SYLVANIA 69370 - G12 Base Socket for Metal Halide $4.51
https://www.1000bulbs.com/product/70041/SYLVANIA-69370.html

FROM MOUSER ELECTRONICS:


enclosure: hammond 1550G $19.04 546-1550G (requires minor modification)

speakon female chassis mount $2.67 568-NL4MP

speakon 4 pole female cable jack $5.09 568-NL4FX

Bushing for power cable $0.20 836-2871

(This was the correct size for everyday U.S. 12 gauge appliance/extension cable, used a step-drill for the hole)

handle: $7.09 534-7143
This handle does not come with screws - it requires #8-32 x 1/2" (you will need two)

SWITCH & MISC

Power switch: Ace Hardware #31499 w/ on-off plate $7.00

(You'll need a 120v SPST switch - I like the ace switch since it has terminals large enough for 12g wires, and has a fixed on-off label plate)

Power cable - I rescued a 20' extension cord that had a bad female end.

Rubber feet & mounting hardware (I used the 8-32 bolts below)
Hardware to mount ballast (8-32 bolts are a good size)
Extra nuts for ventilation standoff
2 6-32 x 1/2" screws for the speakon
(can't get a nut on there!)

TOOLS

A 6-32 drill bit and tap set for the speakon;

Power drill & metal bits
1" hole saw
A Step Drill is a godsend for switch & cable holes.

You may need a dremel tool or sand paper for the hole-saw cut. Mine needed a slight sanding to get wide enough.

Vise or clamps & wood scraps - this to clamp the enclosure down for drilling without scratching it all up.

A drill Press makes the vent holes fast and accurate - they're great to have around. Check Harbor Freight, I got one for $69 that's often on sale for $39. You can drill a 100 holes in a nice pattern in about 8 minutes with a press.

Locktite red.
 
Last edited:
Michael,

Awesome! Thanks for taking the time to detail the project. I have a couple of Colortran 1Ks that are sitting in my closet. I might be tempted. I'd lose some light, but they'd be cooler and lest prone to trip a breaker
 
Thanks - for once I wanted to do a DIY that didn't look cobbled together.

Those 1ks would be great for this project. I don't see this as a tungsten fresnel replacement though; put a full CTB on that 1K and it won't be as bright as this HID.

I often use 1/2 CTB on a 750 for rim or hair lighting - it's "almost" daylight and the warmth looks nice (Roger Deakins mentioned that trick on his forum). So this thing should be pretty handy.

Also, cool lights sells this globe in a 3200k style... can't see really needing that but it's there. It is nice to get 500-600 watts worth of light for 150 worth of amps & temp!

One note: the Speakon stuff isn't pulse-rated, so use at your own risk. I've made several fixtures that use a 400 watt mogul HID (6000k - 1/2 CTO and it's cleaner daylight than my kinos... would take a 2.5k tungsten with full CTB to get that much daylight!) and I check the wiring regularly for arcs, shorts, etc. The initial pulse to strike the bulb can be up to 6000 volts (as I understand it). Modern ballasts (supposedly) will trip their breakers if there's a short, but I do check for any signs of trouble. The Alzo 150 HID bulb & ballast work with household lamp wiring, so maybe I'm just being paranoid (or maybe those use a lower pulse?).
 
very nicely done Michael. I did some fixtures using the coollights lamps with an Alzo ballast (the ballasts re discontinued now so your info is very useful). I made a bare bulb to use in China balls. Nice thing about this is the lamps come in 4200K high CRI also. A lot of commercial lighting is now in that color temp range so they work well with the ambient.
 
Thanks forby - I have 2 of the Alzo ballasts (and 3 of the lights) - they would strike the CL bulb but it would flicker - like, not camera flicker but as if the filament was loose and someone was rattling the bulb! Cool Light said they've tested the Alzo stuff and it's actually something like 140 watts - they said they didn't think it would ever light their bulbs.

I have found the Alzo lights to be about the best out-of-the-box daylight of anything short of HMI though. Even made a fresnel once, but that soft bulb isn't the projector-style a fresnel works best with. They're just dynamite for chinas, except Alzo ballasts and HID lights are often just "FU, ain't gonna strike today, sorry about that, try me tomorrow". You really need spares on set. Probably why they've dumped them for LEDs.

There's a lot of 4200k bipin 150's out there, especially from Europe, many are cheaper than the cool lights bulb. Richard at CL says the 5200k's are custom made for them. Spectrum's a little odd but it evens out visually. Raw ballast and bulb for $80 is, to me, a pretty wicked deal for DIY. The fact it's a non-frosted "projector" style bulb is just icing on the cake.
 
The Phillips Mastercolour are the best i've seen-especially the 4200k. I've had good luck with the Alzo ballasts, but the lamps have been horrible. My ballasts seem to strike the Coollights lamps fine. I guess they had a lot of variation and quality control issues. I really like the form factor though-edison plugs and a switch-ready to go. But I'll have to plan for when they won't work.
 
Nice write up, looks interesting.

While fixtures from China use NL4 connectors I would caution using them for anything that isn't low voltage and/or wattage. NL4 and NL8 connectors have a tendency to cross patch contacts if they are not completely turned and locked. I would recommend using a true head to ballast type connector and cable or at very least use a connector with pins and a locking ring. LK (Link) connectors are widely used for this type of thing.

I don't mean to spread fear, I speak from seeing a simple NL8 connector on a major worldwide concert tour cause panic when the component it was powering was not working correctly. It was all due to the connector not being fully locked and the pins were crossing. FWIW
 
Good point on the Speakon - since I don't loan or rent stuff, I'm not too concerned about the locking... funny thing is, the way those connectors twist & click into place is oddly satisfying to me, so I expect I'll have good discipline (I made my living as a musician in the 80's and still play & record, so the speakon stuff feels familiar to me).

But if you have a link for a good connector source, please share. My 400 watt gear uses aquarium/grow light connectors (pretty robust stuff since they're used around water) but someday I'd like to swap everything out for matching cables and connectors.
 
Get rid of the Speakon - and simply use a Powercon - same nice locking size and price and rated for power connections, and available in in, and out versions for looping - which are what the Chinese and Europeans use on pro lighting kit. It's an accident waiting to happen when one of the sound guys, looking for their cable, pick up yours and stick it into their expense loudspeaker and fry it. Powercons are light blue or grey and instantly obvious, and won't go in a Speakon 'hole'. In the UK, seeing a speaker would probably generate a fail in a test - even though as a connector, they're capable.

Spikiness also need a 24mm mounting hole. The tiny bit extra in a 1" hole can make the 3mm mounting holes cross the cutout boundary too close and they pop through. It's a European design, so is a loose fit in a 1" hole. In the UK, we're still inches AND metric, so it's a common mistake and although one is usually OK, the breakthrough happens when you mount a few in a cluster rather easily!

Also remember that many ready made speak cables are only wired to circuit 1+/-, with no connection to 2 - so you'd need to buy the more expensive 4 circuit cables with 4 core, and waste one! Making your own with ordinary 3 core seems best value as they're simple connectors - just use the mains rated ones!
 
Last edited:
Well, my ballast cable is hardwired to the fixture, since my fresnel had 3 or 4 feet of nice heatproof wire... so the sound guy would need to be plugging a fresnel into a power amp. Which for all I know happens on Grateful Dead tours!

I'll look up the powercons though. And yes, making a three conductor cable with speakon hardware and 3x12 wire from the hardware store? About 1/4 the cost of the same 4-pole Speakon cable.
 
Wow, this a fantastic DIY project. Thanks for the great write-up and bootstrap engineering!

I have the CL-MF0150 Cool Lights Fresnel that uses this bulb, and am quite impressed with the quality of the light.
 
That's a good fixture if you can afford it. CL said there are lots of ballasts that will strike that globe, but they will all flicker unless they're super-high frequency. So I was very pleased to find a $50 solution with no flicker.

If I do another one of these, I'll get one of the $125-ish 1k fresnels from China though - they just look a lot nicer than the stamped-steel can fresnels.

I have 2 of the cool lights 3" fresnels, it might be really handy to do one of those as a 150 as well, if the globe will fit. that's a handy little light. (Cool lights used to sell it as a 70 watt CDM as well).
 
Yes, a 70 CDM Fresnel would be about perfect, as I often have to double-scrim the 150 (and sometimes add ND!).

I have a lovely old Mole 650w Fresnel that I would love to convert to CDM. Your DIY just might give me the resources (and inspiration) to try it. I even have the spare bulb lying around from CL.
 
UPDATE!!!

This ballast will also strike a GY9.5 globe - which is the lamp base in all of those Arri 3" fresnels (and the Chinese knockoffs). 150 Watts is just fine in a 3" rated for 300 watts, giving you a very compact but very bright little fresnel. It's a very stubby little bulb and doesn't align perfectly with the reflector, but (to my eyes anyway) looks just great. Here's the Osram HTI globe - they go for under $50. There's a DJ-lighting sort of knockoff out there for less, but it's 7200k.

And, bonus - this globe is about the best daylight rendering I've seen from anything, even high-end HMI globes. Really just about perfect 5000k at 90+ CRI. Impressive.

This is also kind of cool (but risky if you're inattentive or suffering from Alzheimers): since this globe works natively (no swapping sockets, etc) in many fixtures, you could make an Edison plug-to-ballast cable adapter (since you're just using 3 poles of the Speakon or Powercon) and with just a globe swap, your fixture could be 300 tungsten or about 500 daylight. You would have to be extremely cautious not to mix the bulbs up and run ballasted power to the tungsten or line current to the HTI. But I love the quick flexibility of that idea. (Leaving the cable adapter attached will remind me, don't know if that will work for everyone…)

To do that, you may want to use Speakon vs. Powercon, as Speakon makes a "female" connector that can be part of an "extension" type cable - with Powercon, there are only "males" and you'd ned the $20 connector box. Someone above mentioned that Speakon doesn't disconnect the hot lead as completely when twisting off as Powercon does and has can theoretically cause a short - but they're both high-amperage solutions and this isn't the type of unit you would disconnect with the power running.

Here's the little 300 with the ballast. I really dig this little light - it's a lot of power though, you probably want your scrim set handy...

300-fresnel.jpg
 
Nice job Michael!

Every time I try to do a project like this I all of a sudden get real busy. Which is a good thing. Maybe I should start more projects like this so my work will really pick up. :cheesy:
 
Thanks man - I think this one is really worth an afternoon. No electronics wizardry or arduino controllers or circuit boards or knowing what value capacitor does what (I can't do any of that sh*t!!). Really just basic hot/neutral/ground wiring, and being able to drill and tap some holes in soft aluminum. It all looks completely legit and professional, too.

I've got a thread in Lighting about using those source four exhibition pars - 575w cold strike 7200k HMI-ish par that's insanely efficient, and you **can** get a 6000k globe for under $200 if you want less gels. Problem is finding one, they're all over the place for $300 or so but for a time there were many for $150 or less. I want another one!
 
Michael, please build one of those for me :))

A gaffer told me build quality is super bad.

They vary. The lens/reflector isn't as perfect as an Arri in mine but the lights are decent. About any donor fixture will work, use the little GX9.5 for a small fresnel or the g12 for a larger unit.

Used the 300-fresnel version of this last week, shooting cleanup in a house that had a minor fire. No AC, 100+ day out, ran for a couple hours. Little ballast is pretty robust.
 
Back
Top