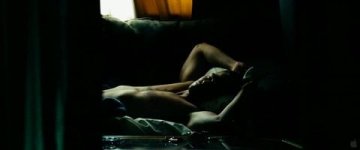
White balance every shot or every scene?

If you don't like the sound of a light meter, maybe invest in a $300 7" LCD screen which offers exposure tools like zebra stripes and false color. The 665GL-70NP model even has a peaking function which can be useful to help you focus quickly...

With the 600D you should totally be able to work with just windows and reflector no problem, you just need to learn more techniques.
 
If you don't like the sound of a light meter, maybe invest in a $300 7" LCD screen which offers exposure tools like zebra stripes and false color. The 665GL-70NP model even has a peaking function which can be useful to help you focus quickly...

But that's another $300!!!! Plus I'm Australia so we get the Australian tax. Everything is more expensive for little to no reason. Don't get me wrong I LOVE the sound of a light meter and would buy one today if I could.

With the 600D you should totally be able to work with just windows and reflector no problem, you just need to learn more techniques.

That's what I'm hoping for, and was part of the reason why I purchased it. They're supposed to be great with low light, and not having much budget, I'll be working with low light for a while I think.

What I'm telling myself is that they were making great movies in the 60s and 70s and they would have killed to have access to the camera I have. So I'm going to do the best I can with my camera, my 2 lenses, my tripod and reflector.

After all, an artist can still make a masterpiece with cheap paints and a piece of paper right?

I'll do the best with what I have (and thank you all for your help so far) and as I get better, I can invest in more gear.
 
Last edited:
All a histogram will show you is the distribution of dark to light pixels the camera is seeing, and a properly balanced exposed image will not necessarily have an evenly distributed histogram. In fact if I took a photo and ONLY showed you the histogram you would never know if the image was exposed properly or not, because it all depends on the scene to begin with. So the histogram is used in conjunction with evaluating the actual scene brightness and darkness, and has very little to do with determining a "proper" exposure. If you're suggesting to bring the camera to the subjects face so you can fill your frame and then read your histogram, that is pretty impractical. You should be lighting your scene long before you talent gets there and sits waiting for you to do it.

A light meter is how to do that.

You have to know how to read a histo - a bump in the middle will be the face - you have to know what you are looking for

Yes for metering hotspots on wide shots current histos are far from perfect

As for exposure tools on monitors could you clarify whether they work on the input signal or the output signal

The trouble with using a monitor (or a lightmeter) is the potential shifts (ie real ISO versus dialled ISO on the camera)

And you dont have to do a histo when the talent is arrived, a Pa or a grey card would do , same goes for a lightmeter

I guess our OP is on a budget, his camera has a histo, learning it is a cheap and 80% good solution

S
 
I think the real issue here is you're jumping straight into a project that needs the kinds of skills you build up gradually.

All the talk about light meters is good stuff - but the point of them is that it gives you the ability to measure the light level at a particular point in the shot. In many projects it will be the face of the most important person. The rest of the light on the area can be low or high, contrasty or even - the light meter will tell you the real result. Adjust the kit to suit, and the face will be perfectly lit. Through the viewfinder or on the screen, some bits could be blown out - so you need to reduce this - and other areas in shadow may have no detail - so you can change this. The important area will still be perfect. I find visual methods using histograms and zebra stripes tell you what is wrong, after you thought you were right! Setting up using the eye and graphs is still really well intended guesswork. Perhaps pointing out the suns reflection that will draw the eye, but you'd not noticed.

You have the ability to be able to have a very narrow plane of focus - with everything else soft or even very, very soft - or you can have a deep D0F by stopping down and closing the lens up and rectifying it with more light, lower shutter speeds, gain etc. These are artistic decisions - what the shot needs. There is no 'best' there is the most 'appropriate'. For me, shallow DoF needs to be for a specific purpose, NOT the permanent way to work.
 
I think your biggest mistake is that fact that you're doing this as a one man crew. I don't think you need a light meter or monitor, I think you need a DP who does the cinematography...
 
I think your biggest mistake is that fact that you're doing this as a one man crew. I don't think you need a light meter or monitor, I think you need a DP who does the cinematography...

I'm not planning to do this as a one man crew. I just want to know what I'm talking about before I put ads out for crew. That way if someone's not up to scratch I'll know about it. I've been on a few amateur shoots. I knew my time was being wasted. When it's my project, i don't want to be wasting other people's time due to my own lack of knowledge. That's why I'm shooting the test footage, and that's why I came here to ask questions about why it looks so crappy.

I've thought about getting a DP but I'm not going to learn as much that way. I want to know how to do this stuff myself.

Thanks for your help so far. Your links on lighting were excellent.
 
Ah, I thought you were to do it instead. However, you can always learn from your crew. I don't expect a director to understand about contrast ratios. I don't need them to ask me to have an F4 on the bright side while we're shooting at F5.6. I need them to talk about the mood and feeling, the creative part and I take care of the technical part. That's why you have big crews: They can focus on the technical and only in their department. A DP shouldn't have to think if you are to use a Sennheiser MK40 or 416, that's for the sound department to do. While it is good that you want to have an idea of what you're doing, don't get too caught up. As a director, your main focus is on the actors and the story. Communicate your vision with the crew of what to achieve and work from there instead.

But well, here is some breakdown on the problems with your footage:
Art direction: You shot this in your own room and does it show. A lot of people ignore this, but art direction and set design is a BIG PART of making a film. For example the open closet and the rug hanging in the shower is just awful (from a movie standpoint). I know these are tests, but art direction is very important. So get a set designer, I can not stress this enough.
Lighting: The lighting is bad in that it's just "light" that is very uneven and/or flat. It falls and spills everywhere. Basically... Had this been a real film, there's no way around it: You need to light it to look like film. Art direction and good lighting is what makes film look like film after all, not shallow depth of field or anything like that.
Odd angles/blocking: The start with the bed looked good, even if the top shot I think should have been closer (as it is rather intimate) and to match the other's better. But the other angles aren't very good. When she gets up from the bed and goes to the room you have chosen a VERY unflattering angle, causing her butt to fill upp the screen and because of it being slightly from below and straight behind, it makes it look very big. Good thing she wasn't mad about you about that. Then when she enters the bathroom, it's sort of the same thing, it's an angle for coverage of her passing by, but it's not nicely framed, with way too much headroom and taken from above causing her to look small for absolutely no reason. The mirror shot is better, but again, too much headroom and a bit too wide (too much dead space between her and the mirror, showing a toothbrush holder and a plug, big no-nos from an art direction standpoint). Having a tighter leaning with her leaning in would have rectified it. It's also not edited to well, as she starts/stops in every shots and exits frame in most of the shots, to keep on walking in the other. Standard is to cut in motion, to create a feeling of fluidity and movement, which sorry, this really lacks, as it drags on. The shot where she enters the bathroom takes almost two second before we even shows up! It ruins the flow completely, making it feel very stilty.
Lack of mood: This is the big issue. This all comes down to a feeling of feeling well... Nothing. All the departments underneath you need to create the feeling, the mood you want. That's why art direction, lighting, angles, music and sound is important: It creates that and should go hand in hand with the acting. You haven't done any color correction as well I guess? Right now the whole thing looks flat and dead. Very much like you shot her in a room, without any idea of what you want to tell. Because as a director, what you're telling is the most important thing, because you want the people working with you to get that and tell the same thing. That is all you should worry about.

Hope it didn't sound too mean, because I want to help you. I know it sort of boils down to: Stick to directing. But that's the point: Why do you have to learn five fields at the same time, when you should focus on one and just get an idea of the other? The time spent working with the camera you should instead spend that time working on the script, rehearsing with the actors, speaking with your production designer, DP and so on of how you want it to be and let them do their jobs.
 
There is a lot of good info growing in this thread, Paul and a few others hit the nail on the head. A lot goes into getting things to look good ie. location, art direction, talent, makeup, angles, lighting, getting coffee when you need it, etc...

Speaking strictly from a lighting perspective however:
As a photographer/DOP/cinematographer if you are on a serious budget restriction, or "no" budget, and still want to do a "good job" then I would do what Paul said and light your main talent as your priority and leave the rest of your light falling how and where it may. Lighting your SUBJECT consistently from scene to scene, shot to shot, day after day will save hours in post and keep the producers, editors and colourists from cursing you behind your back when none of your shots match lighting-wise. This won't always work though, you will almost always have to adjust your "lighting" by adding or removing light sources.

If the director expects you to light an ENTIRE scene with magic pixie dust, then demand a budget for lights, or run the other way and have nothing to do with the project. Some directors don't and won't understand lighting, and don't care to. I've backed out of a ton of these types of projects myself.

If you do have a budget to work with and want to take things up a level and light an "entire scene" then not only will you start exposing your main subject consistently, but you will also take account of the lighting going on in the rest of the scene. You will learn to raise ambient room light "naturally" without it looking lit so you can shoot at lower ISO's and at decent f-stops instead of "wide open". You will start lighting using contrast ratios between your subject and background again for a consistent look, mood and feeling on your project. You will need professional tools like the ones I mentioned in order to really know what the lighting in the scene is doing. Lastly, you might even get fancy by using rim/hair lights and really start pulling off that Casablanca movie look!

As for critique on your footage:
00:01 - My eye immediately looks out the window. While many people think the "entire" scene needs to be exposed, in fact, it does not. What do you want to emphasis here? The chain link fence or the girl in the bed who might be tossing and turning and having a dramatic moment as she wakes up at the beginning of a film? Always try to expose for the main subjects face first, then figure out how you can balance the rest of the scene by adding or removing light. You could also have shot at a different time of day, or during overcast, or tried a 4x4 reflector next to your camera to bounce some fill light into her face, or a daylight balanced light source.

00:04 - Completely different lighting look than the first shot but in general this lighting is good. Nice range from one side of the frame to the other.

00:16 - Looks much brighter of a scene and it would turn out that way on-camera even if you kept your f-stop the same as the previous shot looking down on the bed. Why? Because everything is white in the scene, and this is where some art direction or change of location can make all the difference. You might want to stop down on this shot, stop your whites from clipping, and if necessary even block some of the light coming in the room with whatever you have handy. Large ND sheets over windows is not uncommon if you want to shoot at a certain f-stop.

00:19 - Nothing wrong here I can see.

00:21 - Blown out corner either due to too much light, not sure where it was coming from but again some of it could be blocked or gelled if needed.
 
Last edited:
I think I've got you. So the least depth of field is when only what's in focus is sharp and the background is blur? That's what I was going for. So if that's the best technique for the least depth of field, why would you then close the aperture 2 stops?

That's 2 or 3 times it's been recommended to get a light meter. I would love to, but another $300 for a tool I don't know how to use properly (yet) is out of the question. I need to learn how to get the most out of the tools that I have.

For everyone who's mentioned the light meter, I am listening and thank you for the advice, it's purely a budget consideration at the moment. Otherwise I'd have lights, better lenses and stand alone mics as well. But the wife would kill me.

Death is short...

The reason for 'stopping down' a lens, especially a consumer 35mm lens, is the lens 'wide open' has a number of defects due to the 'cost of manufacture optimization'... While you may think a $500 or $1K buck lens is 'expensive'... good lenses that can be shot 'wide open', are more in the $20-30K region... So by stopping down, more of the center of the elements of the lens optics are used, and mitigate these defects.

There are some shots which require 'wide open' as I've indicated, and one has to accept the 'look' that results.

This is not 'stopping down' as some how different from the light meter... you would adjust the 'light' to compensate for stopping down. This is why one starts to require 1K, 2K, 5K, 10K Watt lights on movie sets. It is because by stopping down, using a 1/48 (traditional 24 fps) shutter speed, and a given ISO, one can only adjust either the F-stop or light level. If one wants to use a specific f-stop, say f/5.6... then one is forced to increase the light level to make a correct exposure.

There is no free lunch...

If you can't afford a light meter, then you need to spend a lot of time testing with the 'histogram' and spot meter options of the camera, if it has that sort of selection. This has to be done in conjunction with lighting setups, and by some empirical process you will 'learn' what works.

Again no free lunch... perhaps the wife is more forgiving of spending 'time' on your activities than spending money...

Well said. Film is expensive, no matter how you twist and turn it. This is the reason most people rent and few own. Buying glass for $20k is nothing most DPs afford, so instead, they rent it, same thing with cameras. I understand how we all come in and blast you with things, but well... It's because it all needs to be there. The industry is old and the way of working too. Once a workflow is established, more or less everybody stick to it. If you want to learn to make film, you might as well learn properly, instead of trying to weasel around it. It's not fun (at all) to hear, but that's the reality of it.
 
Couple of quick hits.

I use the false color on my DP-6 almost exclusively as my exposure tool. Not sure how it works (input or output signal), but it works, very pleased with the result.

2.8 and below are meant for occasional use. The bulk of your shooting should be in the 5.6 to 8 range. Most lenses perform best there.
 
00:04 - Completely different lighting look than the first shot but in general this lighting is good. Nice range from one side of the frame to the other.

This was my main reason for posting. All I did was move the camera. The lighting remained exactly the same. So if I light the subject, that will help mitigate this?
 
This was my main reason for posting. All I did was move the camera. The lighting remained exactly the same. So if I light the subject, that will help mitigate this?

Relighting the subject, or well sort of. In the first shot you exposed after the window, but in the second you exposed after the subject. However, you would have been stuck with a big power-window. Standard is to either bring up light inside, but if possible, most the time you would put ND gel on the window to bring it down. Secondly, you often cheat for the close-ups. Because lenses "fool" you with distances between subjects, you often need to adjust some for a close-up, plus you add some nice fill to smooth out skin to be nice to the talent.
 
Well in that scene, all the light is coming in from one direction so if you are trying to shoot the side that is "shaded" then obviously it will be darker than the side that is having light directly hit it. This is why to really appreciate the "amount" of light you have "landing" on your subject it really does make sense to take a light meter reading and see "hm, how many stops is this lighter or darker than what I just had". Our eyes are a horrible tool for measuring light so it does makes sense to use a tool to measure it.

The downside to "on or in-camera" tools (ie. histogram, waveform monitor, spot meter function, false color, zebra stripes, etc..) is that you have to use the camera in exact position with either a subject or grey card to "see the light in the scene". With a light meter you can spend hours before anyone is even around and study the light in the room before there is any pressure to get shooting - and like I said you can do it without the actual camera equipment.

I know I rant and rant in these forums about using light meters, but seriously it is the best tool in the world to compliment your existing tools. When I scout a location or if I visit one prior to an actual shoot, it is not unusual for me to make notes about the time of day and amount of light I measured for future reference. A meter really will help you learn what is going on in an area or room, or whatever.

I guess if you really don't want to get this technically crazed about lighting and using all the tools to do so, then probably what you could have just done was cheat that one shot by turning the bed around and putting it on the other wall, then shooting her from the side of the bed where her face was getting direct light from the window. Later in post you could flip the shot so she would have appeared to still be on the right side of the frame before getting out of bed and heading for the washroom. With this cheat however, you would not be able to show the bedroom window in the shot.
 
Last edited:
I know I rant and rant in these forums about using light meters, but seriously it is the best tool in the world to compliment your existing tools. When I scout a location or if I visit one prior to an actual shoot, it is not unusual for me to make notes about the time of day and amount of light I measured for future reference. A meter really will help you learn what is going on in an area or room, or whatever.

I can not agree more. Light meters are gold. It means that while your AC prepares the camera for the next shot, you can double check everything before-hand. You don't need to lug around a big tool, you can just walk over and take a reading in a few seconds to know and then tell the gaffer to say bring up the fill light. The other great thing is that you can use it with any camera, from either a 7D, to RED to 35mm a meter you can always bring along. You can keep it in the desired range of stops, to have perfect ratios for grading. Plus being able to take readings on the set, you get an idea of how much ambient fill is needed, thus knowing beforehand what lights to use. It's a tool that's been in every DPs belt for decades and for good reasons. It is the most single useful tool for the DP to use more or less.
 
I've thought about getting a DP but I'm not going to learn as much that way
Youre very wrong on this.Thats actually the best way, to be with this person and see how he works.
You need to watch movies closer, for example when someone is in bed then you can film him like this
http://i.imgur.com/iFWN6.jpg
http://i.imgur.com/z1uUN.jpg
151040cbxc.jpg

You dont need to show everything, I would hide something in shadow, this scene on frame grabs from "Unstoppable" trailer is early morning in the movie, its kinda dramatic look but sooooo much better looking than our regular room look when we wake up in the morning, whole room is setup like that so light hits him very nicely so you need to place your bed with actor in good spot, in your youtube vid i can see too much stuff, its distracting and too flat, you should study particular scenes and frames from movies, that is if youre aiming for similar look.You expose kinda fine, a bit overexposed when shes walking through room but i would change that bright white to something else like green so it doesnt look like overexposed pure white.
Dont figure out stuff yourself, waste of time and no need to reinvent the wheel, ask and talk with DP.
This takes time to learn, do more tests and try to frame stuff like they do it in the movies.First learn all basics to avoid mistakes and then you can invent your own style, not the other way around, most filmmakers without experience make some weird pointless shots like close ups on things when nothing is happening and it doesnt add anything to story, dont do that, also we dont need to see whole walk to the bathroom you can cut from bed to bathroom so you would have 2 lighting setups and on portraits/mid shots instead of figuring out how to light whole room.
There is sticky thread here about framing, read all sticky threads.
White balance for every setup/room/light if they're changing, if you meant exposure then you should keep continuity between shots so its not dark then bright then dark again in the same room.When setting up blocking and lighting then small tip is to always place the camera so your actor's darker cheek is facing towards camera, like here : http://images2.static-bluray.com/reviews/3889_19_large.jpg
http://images3.static-bluray.com/reviews/40_5_large.jpg
 

Attachments

  • 151040cbxc.jpg
    151040cbxc.jpg
    8.7 KB · Views: 0
Last edited:
Hey guys. Thanks everyone for the help. So much good information here that I can't respond to anyone in particular. I have to go away and chew on this for a while.

I really appreciate you all taking the time to dissect what I did. Yes there was brutality. But the end result will be a much better scene so I thank you.

I'm going to redo the shoot on sunday morning (the kids won't be here). So the light will be better.

I'm going to close the aperture a bit to give me some leeway and get maybe a slightly better image quality.

I'm going to leave the iso on 100, and adjust aperture instead. I'm trying for a film look so I'm stuck with 24 fps at 50 frames.

I'm going to physically move the bed to get a better angle on the light.

I know the editing was crap but it was the first time I've used the editing program.

I'm also probably going to get a spare pair of hands to hold my reflector for me.

I'll post the results here. Hopefully there'll be an improvement. Thanks again!
 
Right this threads convinced me to get a light meter.
Any good tutorials to check out?
Starcentrals posts are gold, though his blog was slightly too technical for my skill level.
 
Back
Top