Step-by-step DIY Kino instructions

pck

New member
Hi,

I've seen some neat DIY Kino but no step-by-step instructions. I just ordered 4 Philips TL 950 lights and
am looking for suitable ballasts, coroplast barndoors etc. I just don't how to put it together. Here is something I'd like
to emulate but the instructions to put it together are not available from guy who did it:

http://www.fredmiranda.com/forum/topic/1130916/0

Anyone make their own Kinos with step-by-step instructions? Thanks.
 
First thanks a lot for the link, looks awesome!
Maybe sign up, post or PM him? Would be a bit interested too, but it looks sort of "self-explanatory" to me. Mount the stuff where it's supposed to go basically.
 
IMO with so many knockoffs available at super low prices it makes more sense to buy than Make.

Yes and no. I own the Coollights copies, which are amazing, but I do like the larger, T8 based Kinos, of which there are fewer copies. This project is basically 90% of what a real Kino is (and how it was made) and I'm really looking into making one myself!
 
This link is an old thread but it had (what seems to be) a low cost solution with electronic ballast. I would be curious also, but I don't even want to pay 350 for one lol. The video was nice but he said something about shutter speed being 1/125th which (from my limited knowledge) wouldn't be good for video, right?

http://www.dvinfo.net/forum/photon-...-ballast-diy-home-made-kino-flo-question.html

This link goes to a video of how they made homemade KINOs for $100 http://www.theunderwaterrealm.com/archives/463
 
Last edited:
I'm doing my own homemade 48" kino project right now. I'll post a how-to vid when finished. I did a rough layout and hooked everything up, lots of light, no flicker at 24/30/60p with framerates of 48/60/125 on my FS100. I'll start a new thread in a few days with a writeup.
 
I'm doing my own homemade 48" kino project right now. I'll post a how-to vid when finished. I did a rough layout and hooked everything up, lots of light, no flicker at 24/30/60p with framerates of 48/60/125 on my FS100. I'll start a new thread in a few days with a writeup.

That would be the most appreciated! THANKS!:):dankk2:
 
When I built my Flos, I contacted someone at Fulham ballasts & gave them
the output specs of the size Kinos I wanted to build, and they told me which
of their ballasts was right for the bulbs I wanted to drive.
 
I'm doing my own homemade 48" kino project right now. I'll post a how-to vid when finished. I did a rough layout and hooked everything up, lots of light, no flicker at 24/30/60p with framerates of 48/60/125 on my FS100. I'll start a new thread in a few days with a writeup.

Hi, just checking in. I was wondering how the project was coming along.
 
You guys know that kinos and other pro flo's don't use stock ballasts (like the video about screwing shop lights to wooden strips shows), right? The ballasts are overdriving the bulbs to get higher refresh rates (no flicker) and higher output.

A DIY "Kino" should be overdriving - most DIY projects are just "bolt some shop lights together".
 
All off the shelf fluorescent ballasts underdrive bulbs just a bit. This is because in commercial lighting, they most care about life of bulb, not so much output. In film / tv lighting we care about the opposite. More output, life not quite as important. The issue of the frequency of output is another one too. For some reason many stock ballasts never list the output frequency, even if its a good one. Not sure why, maybe most buyers aren't sophisticated enough to understand the spec. That determines whether they flicker or not in front of your camera.

I am sure Kino Flo does overdriving of output (and driving frequency must be high as well) and we do it to a lesser extent on output (I don't go quite as far as they do and our ballasts drive at 40K to 50K hz frequency) but you'll never find an off the shelf commercial ballast which does overdriving of output. You'll have to figure out ways to do it for yourself in DIY if you want it.
 
Could you do a parabeam knock off instead please? :)
Not sure if you would call this a knockoff but I do plan on making a larger parabolic reflector for two 4' tubes. I'm using T8's because the ballasts I have are meant for those, but T12's would work as well with a different ballast since they're the same length and pin configuration.

PS - The ballasts that I got are Energypro TKT8's. They're only meant for normal lamps, not high output ones like you'd find in a 4 bank fixture, but they work great for how cheap they are. They don't flicker.
 
Cool would love to see how they turn out.

Not sure if you would call this a knockoff but I do plan on making a larger parabolic reflector for two 4' tubes. I'm using T8's because the ballasts I have are meant for those, but T12's would work as well with a different ballast since they're the same length and pin configuration.

PS - The ballasts that I got are Energypro TKT8's. They're only meant for normal lamps, not high output ones like you'd find in a 4 bank fixture, but they work great for how cheap they are. They don't flicker.
 
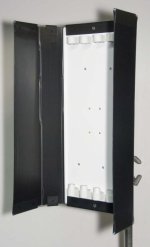
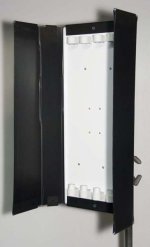
Wanted to share how I built my kinos. Started with a flat piece of .040 thick white aluminum. The thinner
the aluminum, the lighter your light will be. If you can find it, there is an .032 thickness. I Rounded the corners
for safety, and put a 1/2" 90 degree bend on the 2 sides that run parallel to the bulbs for stoutness. You will mount
the bulb fixtures to this piece. For the barndoors I used 4mm black coroplast. This can be found at sign supply or
plastic supply shops. The coroplast piece runs behind the aluminum and the two pieces will be attached to each
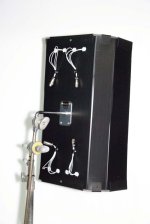
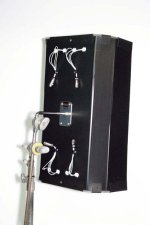
other with some actual Kino parts. You will need the following...(these are for a 4bank with 2' long bulbs) wire
channel repair kit prt-fix-4s, fixture Silver conduit prt-fh4, and fixture wire repair kit exp-for-s. These are available
at B&H Photo. All this may seem foreign, but if you do a little research on kino's & B&H's websites, you will see how
the parts work. I cut holes and ran the wiring out the back, wired with xlr connectors so I could have remote ballasts.
I built these many years ago, so they are set up for the t12 size bulb, but the shell should work with most fixtures.
I use the Fulham workhorse 7 ballast to run two lamps, based on the recommendation of Fulham. Color balance is
perfect & output is very close to Kino specs. Not flicker free at all speeds, but tested & flicker free at 1/24. 1/48.
1/60. & 1/120

flo_1small.jpgflo_2small.jpg
 

Attachments

  • flo_1small.jpg
    flo_1small.jpg
    31.3 KB · Views: 0
  • flo_2small.jpg
    flo_2small.jpg
    38.1 KB · Views: 0
Last edited:
Southerland,

Thanks so much for posting this? Seems like they don't flicker at 1/24 which is what most filmmakers would be concerned about right? May I ask what the total cost ended up being? Possibly a picture of them in action? Just wondering how much light it throws off.
 
Sorry, it's been too long ago to remember the cost per unit. As far as output, the Kino data specs says their 2' 4 bank puts out 29 foot candles @ 6' and this DIY unit puts out the same (using the Kino bulbs).
 
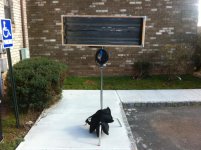
So, it's been a while, but I did not forget about this project, in fact I built the bulk of it back in September. However, I didn't get around to fully finishing it until now, here it is:
IMG_1746.jpg
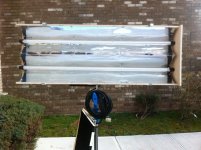
The gel frame is just 3/4x oak with some right angle brackets. The egg crate was purchased from Canal Plastics, one of the few places on Canal street that still offers useful products and not ripoff Louis Vuitton bags. It's actually two pieces doubled up, the parabolic reflector does enough of a job at directing the light that one piece of egg crate at only 3/8" thick wouldn't have done too much.
IMG_1749.jpg
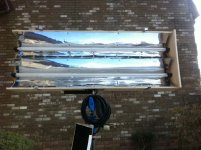
Above is without the egg crate, showing the reflectors. It's mirror finished aluminum purchased from eBay, the name of the eBay store escapes me but the company is called Online Metal Supply. This is the exact product - http://www.onlinemetalsupply.com/al...sheet-020-x-24-x-48-reflective-finish-94.html
IMG_1750.jpg
The reflector may look a bit crude, but notice how much the tubes fill the reflector above as opposed to below, which was taken from off-axis.
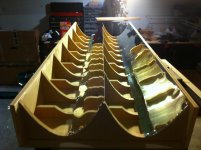
IMG_1477.jpg
Above is from when it was under construction. Each of those pieces had to be cut on a scroll saw to a near perfect parabola. If you have access to a machine that can bend sheet metal to the right shape it wouldn't be necessary to do this many of them. You don't need to screw the metal into all of them either, just doing half of them is more than enough. But when the metal starts out flat, you need the skeleton to keep it bent in the right shape.
IMG_1611.jpg
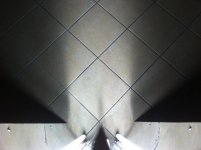
This is the shape of the light that it puts out. You can see that it's a pretty focused beam of moderately soft light. The egg crate would just reduce the spill coming out of the sides.

Next time I actually use it to light a person I'll post what it looks like.

After building this, I can say with fair certainty that I won't be making one like this ever again. I'm considering building some that only use a single tube, but this one is so heavy that I'd much rather it be in a medium roller than a C stand, and there's no way I would use it vertically. The mounting pin is already slightly bent from testing that out.
 
Back
Top