Get LED panels into your existing softboxes - this worked for me

Raise your hand if you're unimpressed with the LED panel softbox solutions. Oddball sizes, the fronts aren't recessed, not very big - like, who every reaches for a 24" square softbox?

Anyway, this is on a Aputure Lightstorm panel - I took the mounting part of a speedring (removed the manufacturer-specific spinner), attached it to the yoke with tapped holes and 1/4-20 thumb screw/T-handle knobs. Then a small length of baby pipe out to a grip head, which controls the angle. This works really well, though with a medium box it's pretty close to the front. A large gets better. Hopefully the photo makes sense:
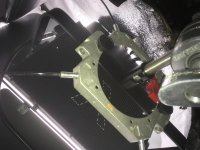
lightstorm.jpg

As far as the distance to the panel front, It would be pretty easy to make a much shorter yoke - so it wouldn't ever wrap around flat. If you were only using a panel for softboxes, that could be a solution for some lights. The aputure is well suited to this since the power controls are remote. Won't replace an 800 HMI or something, but I generally use a softbox vs. a panel for lower-key setups, and find I don't need near the lumens for those looks. But I did want to test it live, interview thursday with the LS in a Medium Photoflex, worked just fine, quick setup, etc:

dhl.jpg

Why the hell manufacturers don't integrate softbox pole holes in a standard configuration is way beyond my guessing powers. Been wondering that since I got my first quad biax panel.
 
I think possibly that the size issue comes down to one of sheer power. Much as people like to talk up LEDs, they're mainly not all that powerful - the most commonly owned stuff is rarely much above 300W - and trying to fill even a 4x4 with that much (or more to the point that little) power doesn't end up creating a particularly bright light.

Frequently - many times a week - I have conversations which begin with someone criticising HMIs because "you can't run them from batteries." Well, actually, you can, but then you're talking about a 200W HMI, which is going to be about as bright as most of these little LEDs. It's asinine. The problem with LEDs is that they're not big enough.

P
 
I think possibly that the size issue comes down to one of sheer power. Much as people like to talk up LEDs, they're mainly not all that powerful - the most commonly owned stuff is rarely much above 300W - and trying to fill even a 4x4 with that much (or more to the point that little) power doesn't end up creating a particularly bright light.

Frequently - many times a week - I have conversations which begin with someone criticising HMIs because "you can't run them from batteries." Well, actually, you can, but then you're talking about a 200W HMI, which is going to be about as bright as most of these little LEDs. It's asinine. The problem with LEDs is that they're not big enough.

P

Oh, I hear ya - I've seen the posts here of kids buying a 672 for a key light and think "you're in for a sad surprise"... (but it's the hair/cheek light in this shot, excellent light for what it does).

But 90% of my lit work is corporate interviews, facing off camera. For maybe 2 years now I've used a Starlite with medium box, with a mogul aquarium bulb and a 400 watt ballast. Needs 1/2 CTO (or 1/4 or none depending on other lights and so on) and 1/2 minus green. With the gels, I get 5.6 @ ISO400 which is my sweet spot for interviews without the window in the BG (575 HMI par for those), about a 1200 watt equivalent. But the heavy-ish ballast and heat were issues for me (but at least it didn't look ghetto). The Lightstorm in the same softbox gives me... about 5.6 and a half at 400 with my usual interview distance. (When it's just me and the subject looks off-camera, i go 5.6 and interview with a 5" HDMI in my lap and a focus whip. But I just can't look down during an interview and break eye contact, so f5.6 and hope they don't rock back & forth. When there's a person I can sit in the interviewer chair for an eye line, I tend to go 2.8 or F4 and watch focus. Thinking of getting an inflatable doll for that gig...)

So, it's a "works for me" situation and we're all unique in what we do, but seen some threads here about "I've got a huge investment in softboxes damn it!" And it looks like the Astra 6x is finally a panel with some really solid output - but for that money you could get a Rayzr 7 (which will be my next light I think and retire the 575 par).

But for the record, the Lightstorm puts out some impressive lumens and good light quality at a decent price - it feels a tad cool to me, but white balancing through an 82A or a scrap of 1/8 CTB can save some post work - I do that with most daylight sources).
 
Thanks Michael. Please, one more shot from further back to see the whole setup.

Sorry, that kit is packed as it's been an interview-ish week and more next week. But if I close up the back of the box and step away, you'll just see a scrap of baby pipe held in a grip head.

In the photo, you can see the speedring part is bolted to the yoke via tapped holes (yeah, I drilled up a $700 light the day I got it). The curve of the rods is the same as if there were no light, the light doesn't bump or affect them - haven't tried this in a small box, and I think a strip light would need to be at least 12" on the short side - my strips are like 8" so I'll get a bigger one soon. I have a 12" x 6' but that may be too heavy and would be silly with an LED panel anyway...) I've just left the adapter on the yoke so the panel won't store flat. In my case, I store it face down and stick some soft stuff in between the panel and the yoke, like bagged eggcrate and smaller popup reflectors. But the adapter comes off with 2 screws, no tools needed, in seconds if needed.

The spud/TVMP is the stock spud that came with the light, in its stock mounting. You use that to set the panel horizontal or vertical in the softbox - it will go either way in a medium with no trouble. Then you use the grip head to angle the whole thing up/down.

it takes no more time to setup than if I were putting the softbox on a speedotron head. I set the panel inside the softbox face down, lift it up and plug in the rods. Pretty happy with this and it will be my interview go-to for a while now. For higher key gigs, I'll use a baby double header and a 4x4 scrim jim panel.
 
Bravo Michael. This is a great and relatively simple solution to a vexing problem. I have two Chimeras sitting around collecting dust (unless being used with strobes). My only reservation is that I've never tapped threads into anything. A trip to Harbor Freight may be in my future.
Thanks for taking the time to share.
 
Bravo Michael. This is a great and relatively simple solution to a vexing problem. I have two Chimeras sitting around collecting dust (unless being used with strobes). My only reservation is that I've never tapped threads into anything. A trip to Harbor Freight may be in my future.
Thanks for taking the time to share.

Thanks - I thought it was fairly elegant for what-it-is.

Couple tips - if you can afford it, get a drill press when you're at HF (under a hundred bucks, easy, and get on their site and sign up for coupon emails - they seem to have a huge sale every weekend and regularly have 20% off coupons). For these kinds of holes, you really don't want to be at an angle. And once you find out how much you can customize your gear with a 1/4-20 tap (and a 3/8-16), you'll get your money's worth out of it.

I removed the yoke, drilled tiny starter holes in the speed ring part so the drill bit wouldn't walk at all, and then taped it to the yoke to all-hell. Then I drilled through both pieces at the same time - you get perfect alignment that way.

Keep in mind, the drill bit is minutely smaller than the threaded hole will be - the extra metal is for cutting the threads. So you then need a slightly larger drill bit on the speedring. (If you blow the match-up of the holes, that can save you as well). Once you drill through both parts, remove the tape or clamps, and then drill the speedring holes a hair larger - just enough for the knob to go through.

The actual tapping is pretty simple and there are likely you tube videos - get a t-handle for the tap, work it in til it gets tight, back it out a bit, then back in, til you're through. A couple drops of oil is wise. The yoke seems to be aluminum so it's like 30 seconds and threaded.
 
That is very clever, Michael. I'll be rescuing my Chimera's from collecting dust on my storage shelves, now. Driling and tapping holes on old or cheap film gear is one of my hobbies.
 
I actually just let a the frame of Chimera quick release ring set against the diffusion panel on the front of the LED panel. I then add some velcro to the back of the led panel and use the velcro on the flaps of the back of the chimera to hold the chimera to the LED panel.
 
I actually just let a the frame of Chimera quick release ring set against the diffusion panel on the front of the LED panel. I then add some velcro to the back of the led panel and use the velcro on the flaps of the back of the chimera to hold the chimera to the LED panel.

I didn't know there was a ring that big... so it doesn't block a big portion of the LEDs? Love to see a pic.

I'm thinking I'll make a short/stubby yoke for the Lightstorm to get the panel further back in the softbox. But I did 9 hours of trade show testimonials yesterday and was really pleased with the setup. Goes up fast, low heat (I was given a small and cleared out hotel meeting room, maybe 30' x 15' - pretty heavenly actually, had my own studio essentially) and used the lightstorm for the key, a 672 for shoulders/cheekbones/hair, and a 150w HID fresnel for the BG. No heat problems at all, no fans, it was a smooth day.
 
Back
Top