
Navigation
Install the app
How to install the app on iOS
Follow along with the video below to see how to install our site as a web app on your home screen.
Note: This feature may not be available in some browsers.
More options
You are using an out of date browser. It may not display this or other websites correctly.
You should upgrade or use an alternative browser.
You should upgrade or use an alternative browser.
DIY IndieSlider...
- Thread starter ZazaCast
- Start date

JoeJITSU
Veteran
Zaza,
I know it's here on the forums somewhere. Do you have the part # 's for Igus and link? I tried ordering from you twice.....paypal had an issue with my account because of a past situation with my son. So I unfortunately have to this route. Unless you have google checkout. Also is there an inexpensive head for this? Thanks
I know it's here on the forums somewhere. Do you have the part # 's for Igus and link? I tried ordering from you twice.....paypal had an issue with my account because of a past situation with my son. So I unfortunately have to this route. Unless you have google checkout. Also is there an inexpensive head for this? Thanks
Howard Sheldon
Member
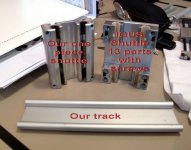
Yes Pacific L is the company I have been dealing with. They have a better slide shuttle that is one piece instead of 5 pieces so no screw loose problems. The rail is the same. I brought the camera slide product to them months ago and they said they did not want to sell them one slide at a time. Maybe they changed their mind. They are a US company that puts Americans to work.
Howard Sheldon
Howard Sheldon
JoeJITSU
Veteran
Also this complete package for a 1000mm goes for around $85. That is what the lady told me. I'm trying to confirm right now.
http://www.pacific-bearing.com/templates/Cam_Roller_Technology_Template.aspx?id=7328
http://www.pacific-bearing.com/templates/Cam_Roller_Technology_Template.aspx?id=7328
JoeJITSU
Veteran
Here's the page to pick your sliders and rails. Pretty confusing at first. Hope this helps if anyone decides to go with rollers instead.
http://www.pacific-bearing.com/workarea/downloadasset.aspx?id=8226
http://www.pacific-bearing.com/workarea/downloadasset.aspx?id=8226

ZazaCast
Major Contributor
Zaza,
I know it's here on the forums somewhere. Do you have the part # 's for Igus and link? I tried ordering from you twice.....paypal had an issue with my account because of a past situation with my son. So I unfortunately have to this route. Unless you have google checkout. Also is there an inexpensive head for this? Thanks
Joe-
Everything is in the very first post.... or on my web site: http://www.zazaslider.com/instructions.html
Email me directly & send a check: zaza@zazaslider.com
I like the Manfrotto 701RC2 (got it on eBay cheap and it works great)!
Last edited:
Howard Sheldon
Member
I just spoke to them and I mistook what he said. It seems the one piece slide (or shuttle ) that looks like the Ingus slide is in development and not ready for sale. But they will sell any of the other slides or tracks that are in the current catalog on a one piece basis. As I said they are an american company and employ american workers. I personally like keeping american workers working. I personally did get the one piece slide as a sample from them and I love it as there are no screws to ever loosen. They are a very big company and have very many solutions to a camera slider question.
Howard
P.S. Don't get me wrong I do appreciate the ZAZA but I would personally have the slide as one piece.
I think our ZAZA man has done a wonderful job bringing it to all of us.
Howard
P.S. Don't get me wrong I do appreciate the ZAZA but I would personally have the slide as one piece.
I think our ZAZA man has done a wonderful job bringing it to all of us.
ZazaCast
Major Contributor
I just spoke to them and I mistook what he said. It seems the one piece slide (or shuttle ) that looks like the Ingus slide is in development and not ready for sale. But they will sell any of the other slides or tracks that are in the current catalog on a one piece basis. As I said they are an american company and employ american workers. I personally like keeping american workers working. I personally did get the one piece slide as a sample from them and I love it as there are no screws to ever loosen. They are a very big company and have very many solutions to a camera slider question.
Howard
P.S. Don't get me wrong I do appreciate the ZAZA but I would personally have the slide as one piece.
I think our ZAZA man has done a wonderful job bringing it to all of us.
Howard, thanks for the praise, but ... really... again? You need to do your research (I'm an American too).
igus manufactures all kinds of it's parts in their Rhode Island plant, including the rail. Yes, they also have plants in other countries and when (if) they need more stock, they might have to get it shipped in from Germany. That's just good business.
If you want to bust on a company, pick Apple, ALL their hardware is made in China.:shocked: ...but I digress...
As I've stated before, I've talked with an Applications Engineer at PBC on many occasions and received samples of many different types of rail and carriages. The closest thing they have to the igus W system (in design and price) is what they call the "Modular Guide"....I was told it was manufactured in China! The sample I got didn't even come close to the quality and smoothness of the igus product...not even close (I don't want to bash any company, but it was totally un-usable for this application).
I spent many months researching (and continue to do so) all the linear motion companies I could find, have experimented with samples....and for MY money, igus was the very best option for quality and price....that's why I started the thread here. I'd appreciate it if we can keep the focus of this thread on igus products and not cloud it with all the other brands out there. Thanks in advance for respecting my request. You can always start another thread, it's a free country.
Now if you really want to support the US...buy your slider from me....yes, the parts come from igus, but each and every ZazaSlider is built by hand with TLC by yours truly. Even the feet I designed, prototyped and fabricated are polished & assembled by me to assure a high level of quality, afforability (although most DIYer's are broke anyways) and functionality (now I'm starting to sound like that Dyson guy...LOL).
So, again, thanks for the kind comments and please don't take my comments the wrong way. To each their own...and I own ZazaSlider.com, which proudly uses igus parts.
 rogar-BigGrin(DBG)
Cheers to all & happy sliding.:beer:
IGUS USA Matt Mowry
New member
Tips from igus
Tips from igus
Hello All - I am the N. American Product Manager for igus, and just read this thread. I definitely appreciate all of the great input you guys have given us recently, and wanted let you know a things about our parts to help make your lives a little easier:
* This is important and will help to fix the issue of "misalignment" that I have been reading about:
1. The WW-16-60-10 and WW-10-80-10 are sold with only 4 bolts holding the 4 zinc carriages to the carriage top plate. You may notice there are 4 empty places on the plate where a screw could be - most machinery manufacturers use these extra 4 holes to mount the carriage system to their machine. However, I understand most of you are not using them at all, which means each carriage can potentially pivot (when you remove the carriage from the rail, like if remove it to put it in your trunk, attach the camera, etc) - this may indeed cause misalignment.
* Here is the fix: You need to add 4 more bolts to the carriage plate (to make a total of 8 bolts). I will try to upload a pdf with instructions, but you should:
1. Slide the carriage (ww-16-60, etc) over the rail (ws-16-60-1000)
2. Loosen all 8 screws on the top plate
3. Press down firmly in the center of the plate while using an allen wrench to tighten the center 4 screws. (The 'press-force' you apply will keep the carriages straight as you tighten them.)
4. When the 4 center screws are tight slide the carriage to one end of the rail and back to make sure it is smooth.
5. Reapply the same force and tighten the outer 4 screws.
6. You can now remove the carriage safely from the rail all you want.
The WW-10-80-10 uses an M6x16 coarse thread stainless cap screw (DIN 7984 M6 x 16-A2). The WW-16-60-10/15 use an M8x20 coarse thread version: (DIN7984M8X20A2). A hardware store, or a local screw supplier should carry them in your area.
We are making up new parts that will include these extra bolts, and will be providing an option for tje 3/8-16 center tap to both the carriage and the rail most of you seem to want.
2. The WS-16-60 rail, the zinc carriages, and almost all of our extrusions and castings are produced in North America - ie, we are putting Americans to work too! The thermoplastic linear bearing material (ok, the yellow or gray plastic liners) are, however, made in Germany. But the rest is manufactured and assembled right here!
Thanks again for your business and creativity, we truly enjoy working with you all.
Regards -
Matt Mowry
DryLin Product Manager
igus, INC
Attachments

thekreative
Veteran
Hey Matt,
Great to have you show up on the thread.
Great to have you show up on the thread.
Howard Sheldon
Member
http://www.dvxuser.com/V6/attachment.php?attachmentid=17459&stc=1&d=1273336644
This should answer your comment and yes made in the USA
This should answer your comment and yes made in the USA
Attachments
did you have a website?http://www.dvxuser.com/V6/attachment.php?attachmentid=17459&stc=1&d=1273336644
This should answer your comment and yes made in the USA
how smooth are these compare with igus?>
Last edited:
I hope this hasn't been covered, please forgive me if I missed it. . .
I came up with a couple of improvements for the rail I wanted to share.
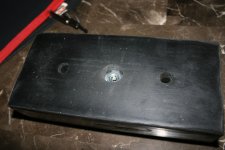
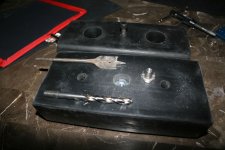
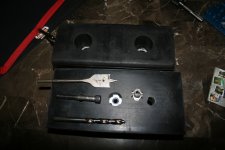
The first has to do with mounting the rubber boat bumpers to the rail. The original poster drilled from the top and used JB weld. I mounted a t-nut on the bottom of the block, using only the rubber to hold it in place, and it works wonderfully.
Here's what you need:
- Power Drill
- 1" drill bit (size based on outside T-Nut diameter)
- 3/8" drill bit
- 1 - 3/8" t-nut for each block you want to mount (My rail is 1450mm with a 20lb camera so I have 3)
- 1 - 3/8" x 3" hex bolt for each block
Procedure:
1. Find center of rubber block on bottom and mark it.
2. Using the 1" drill bit drill a hole about 3/4" deep. (you can use tape to mark depth on the drill bit)
3. Using the 3/8" drill bit put it in the center of the 1" hole and drill the rest of the way through. Be careful to stay straight on both of these holes. If you widen them out, the T-nut won't be held snug by the rubber and may fall out!
4. Turn the block over, using the 3/8" drill bit widen out the hole at the top, being careful not to widen it too deep. You want the bolt to slide in and out easily, but you want the t-nut to be held firmly in place.
5. Install the T-nut by by driving it straight into the hole on the bottom. I used a deep well socket that was about 1" outer diameter to apply even pressure downward. This is important to keep the t-nut from falling out years down the road when it's not attached.
6. Push your bolt in, and screw it down. A little oil will help it catch the threads the first time. Take the bolt back out.
7. Optional: I drilled out one of the existing holes with the 3/8" drill bit, but you can do it however you like. Drill a new hole or whatever. A threaded bolt will require a hex nut that has thread all the way tot he top though!
8. Install your rail without tools by simply holding the hex nut with your fingers while turning the rubber block. Mounting the rail this way will let you pull it as tight as you want because it's grabbing from the bottom. You can see the rail marks in the picture where it really pulls the rail into the rubber and makes a nice secure connection that can be added/removed in the field without tools.
Enjoy your slider. Thanks to the community here that made this such a great project. I hope this was helpful.
The second idea has to do with mounting. I ordered 2 carriages. I think it was an extra 50 bucks. One I mounted a fluid head directly on the carriage (bogen 3063), and the other I'm mounting a Euro/Elemac mount. I have a dolly with an elemac post, and this will let me quickly switch between the dolly and the slider without having 2 separate 100mm high hat standoffs to lug around. There's a guy on ebay who sold them for ~50 bucks. He's on DVX here, but I haven't seen him lately.
Okay, that's it for me, here are some pics to help with the instructions:
Attachments
Last edited:
Howard Sheldon
Member
The Pacific bearing one piece slider has teflon pads that they have a patent on and they call it something else. I like it because there are no screws to loosen up. http://www.pacific-bearing.com/sales.aspx You will find many solutions to many different types of sliders. I find it just as smooth and the Pacific Bearing engineers say DON'T USE WD 40 BUT YOU CAN USE "3 in 1 oil" I have and I just wipe everything down when done. With the 3 in ONE oil it gets really quiet so quiet you can't hear any slide sound at all.
Howard
Howard
Last edited:
Howard Sheldon
Member
Here is my slider rig.
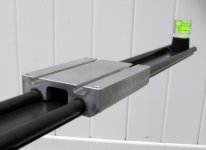
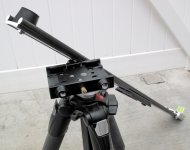
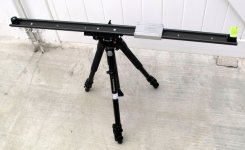
I think a second tripod is called for.
Howard Sheldon
I think a second tripod is called for.
Howard Sheldon
Last edited:
ZazaCast
Major Contributor
Just used this set-up over the weekend and it was great. (thought I'd sharerogar-BigGrin(DBG))

I also did a bit more vertical sliding with this set-up. After reversing the legs on one side &
extending them all the way out, I used a couple 15lb. sandbags and it worked like a charm.

I also just started using a few knobs to attach the feet and it allows me to swap-out carriages quick & easy.
(I use both a 100mm and a 150mm w/lock, each has a different head in it)


Happy Sliding!
rogar-BigGrin(DBG))I also did a bit more vertical sliding with this set-up. After reversing the legs on one side &
extending them all the way out, I used a couple 15lb. sandbags and it worked like a charm.
I also just started using a few knobs to attach the feet and it allows me to swap-out carriages quick & easy.
(I use both a 100mm and a 150mm w/lock, each has a different head in it)
Happy Sliding!