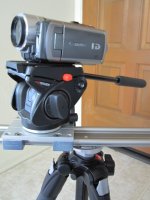
DIY IndieSlider...

Is the 501 HDV and the 7D with the kit lens too heavy for the 10-40? I'm having trouble with the silky smoothness.

Weight-wise... no... but you have to keep the weight centered on the carriage. If the weight of the lens extends too far it will cause the carriage to bind. I wish I had recommended you get the 16-60.

So...if you can, slide the camera back a bit in the head (plate adjustment) and get it weight centered...play with it a bit. Worst case, get a lighter-duty head (701 or something) for the slider or attach the camera directly to the carriage without a head.

let me know how you make out....no worries, we'll get you sliding smoothly!
 
If you want crane shots... get a crane. It's very tricky trying to apply pressure on the back of the rail for counter-weight and controling the pan head of the camera all at the same time...and unless you have three arms, forget about focus.

If you'r going to try this, you really need a heavy duty tripod. Kessler is demoing it on their K-Pod with a hercules head (package costs $809.95)...you need something like that.

Get the best heads you can afford.

Good luck on the builds!

thank you for your help!

I phoned them this morning and I asked about the 10-40-10. They said that they'd recommend the 10-80-10 instead due to its wider base. But I need the 10-40-10 because of the predrilled holes that i can easily tap. I dont have a drill press so that might be a problem. I'll see how much it'd cost me to rent one.

I was going to order the manual clamp for the shuttle (WHK-10) so that i could clamp it at the end and do some crane shots but after reading your post, i guess it'd be best not to try it out as i'd need a heavy duty tripod and all i have is the 055 PRO.

Oh and the funny thing was when i phoned them, they said that they have a 4 week back order for the WS-16-60 because so many people have ordered this product.

Thank you for your help once again!

Oh and here's a tip. If you do order a custom length, make sure that you order the following lengths so that your pre-drilled holes line right in the middle of the rail.

3-holes = 280mm
5-holes = 520mm
7-holes = 760mm
9-holes = 1000mm
11-holes = 1240mm
13-holes = 1480mm
15-holes = 1720mm
17-holes = 1920mm
 
Weight-wise... no... but you have to keep the weight centered on the carriage. If the weight of the lens extends too far it will cause the carriage to bind. I wish I had recommended you get the 16-60.

So...if you can, slide the camera back a bit in the head (plate adjustment) and get it weight centered...play with it a bit. Worst case, get a lighter-duty head (701 or something) for the slider or attach the camera directly to the carriage without a head.

let me know how you make out....no worries, we'll get you sliding smoothly!


Thanks. I will play with it today. I just orderd the 701 from B&H. I really wanted a separate head for the slider anyway.
 
Thanks. I will play with it today. I just orderd the 701 from B&H. I really wanted a separate head for the slider anyway.

Cool... that 701 should also allow you to adjust the camera forward & back to get the balance right. Keep me posted... I want to make sure you get the result you're looking for.
 
Hi ZazaCast,

Thanks very much for taking the time to help me out, it's much appreciated.

I'm looking forward to getting this project up and running !

A question for you, - I just watched your film " Miss Laid" , in the opening sequence, you slowly pan around the lady in the bed.....

did you have a circular track that the camear slid on ? or was this accomplished using your ZaZaSlider ?

The shot starts at her feet, and slowly slides / glides around her feet, and the along her body.. that was fantastic !

Thank you for any info you want to share.

thank you

Dave.


Yes, you can attach the camera directly to the carriage. If you want the best of both worlds there are two options;

1. find the center of the carriage, drill your 5/16" hole and tap it 3/8"-16. Then find an adapter (3/8 on the outside to 1/4 on the inside) and screw it into the hole. This will allow you to then screw a 1/4-20 up through the center and into the base of your camera.
http://www.bhphotovideo.com/c/product/101501-REG/Arca_Swiss_809011_Adapter_Screw_3_8_16_to.html

2. find the center of the carriage and drill two different holes just off-center, one would be 3/8...the other 1/4. That small amount of off-center will not affect the slide or balance al all.

There you have it!
 
Hi ZazaCast,

Thanks very much for taking the time to help me out, it's much appreciated.

I'm looking forward to getting this project up and running !

A question for you, - I just watched your film " Miss Laid" , in the opening sequence, you slowly pan around the lady in the bed.....

did you have a circular track that the camear slid on ? or was this accomplished using your ZaZaSlider ?

The shot starts at her feet, and slowly slides / glides around her feet, and the along her body.. that was fantastic !

Thank you for any info you want to share.

thank you

Dave.

Thanks for noticing...I thought that was a really cool shot too, but I don't think anyone commented on it. Strange?

That was accomplished with both! I mounted my ZazaSlider on the small Manfrotto tripod (the one in the first post),
that in turn sat on a dolly I made that used the wheels from my kessler k-pod swivel dolly wheels...and that sat on a length of flex-track. Confused yet?
picture.php


The flex-track went from the foot of the bed, around the side to the headboard. To get the shot, I had the camera all the way to the end of the slider (close to me). I began to dolly along the track until I was about half-way around her body, from there I continued the "dolly" by sliding the camera. I had to do this because there was a night table next to the bed that I couldn't move (the motel had it bolted down).

So, after 4 tries, I got the perfect flow of dolly/slide in one smooth take! There you have it. Simple.

Thanks again for watching & noticing! Now, do you want to know about the shower scene?:happy:
 
Yes kind of confused.... this flex track, you don't have a picture of it do you ? ... I was going to say you used tiny pvc pipe like you have in the image there, but I guess not.

Yes, strange that nobody noticed this... and it was super smooth too. I enjoye that part.

As for the shower scene.... that was funny ! , 80% of woman... in the shower... ah I'm no good at singing anyway... or something like that LOL ....

I'd have to watch the shower scene again to see if I saw something that I was super curious about, but if you have time, please DO post :-)

edit: haha, you were maybe wondering if I thought it wa acting or it was real ! LOL

I've got questions, about your famous ZazaSlider, but I'll ask in another new post.

Dave

Thanks for noticing...I thought that was a really cool shot too, but I don't think anyone commented on it. Strange?
Confused yet?


The flex-track went from the foot of the bed, around the side to the headboard. To get the shot, I had the camera all the way to the end of the slider (close to me). I began to dolly along the track until I was about half-way around her body, from there I continued the "dolly" by sliding the camera. I had to do this because there was a night table next to the bed that I couldn't move (the motel had it bolted down).

So, after 4 tries, I got the perfect flow of dolly/slide in one smooth take! There you have it. Simple.

Thanks again for watching & noticing! Now, do you want to know about the shower scene?:happy:
 
Last edited:
Hi
I am thinking of mounting my 1m ingus rail directly on my libec h38 head .
I would like some advice on how to do this
The libecs h38 head quick release plate has a 1/4"-20 thread screw
Do I drill a hole into the ingus rail and then use a 1/4"-20 tap to thread it . If so which drill bit size do I need .
OR
Do I use a 3/8 16 quick release plate and use a 3/8 16 tap to the thread the center hole (my rail came with holes already in them) .
Are there and problems issues with mounting the ingus rails directly onto a tripod head
Thanks
 
Last edited:
Hi
I am thinking of mounting my 1m ingus rail directly on my libec h38 head .
I would like some advice on how to do this
The libecs h38 head quick release plate has a 1/4"-20 thread screw
Do I drill a hole into the ingus rail and then use a 1/4"-20 tap to tread it . If so which drill bit size do need .
OR
Do I use a 3/8 16 quick release plate and use a 3/8 16 tap to the thread the center hole (my rail came with holes already in them) .
Are there and problems issues with mounting the ingus rails directly onto a tripod head
Thanks

I'd drill a new hole just to the side of the center hole and tap it 1/4-20.

1/4-20 requires a 13/64" hole to tap.
3/8-16 requires a 5/16" hole to tap.
 
10-40

10-40

Hey guys, my first post was #1223. I have since seen some questions on the 10-40 slider so I thought I would check back in.
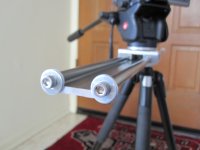
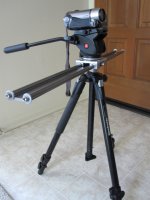
I have a canon HF100, and manfrotto 701 head and 190 sticks. So I went with the smaller and lighter 10-40 materials. I ordered 30 inches and it was $90 with shipping.
A couple notes:
- the 10-40 stuff is great for my light set up. But any more camera weight and I can see how it may be beneficial to go with the larger 16-60 materials.
- I only ordered a 30 inch rail, and that is more than enough for me. Sometimes with my small tripod, when I am at the end of the rail, it seems like it might tip over. I am even thinking of getting an 18 inch rail so I can put it on my carry-on luggage when I travel (I am a light packer and HATE checking luggage. And the 30 inch rail would make me have to bring a larger bag and then have to check it. But, will I be allowed to carry-on a tripod and slider?? Well, thats a whole other question...)

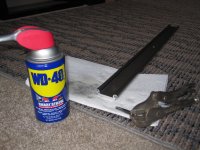
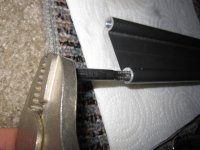
I bought the rails with out the holes. And I am glad I did. It was so easy, I mean SO easy to drill and tap the holes. A little tip (I don't think I have seen it yet) is to use WD40 when taping the holes. It helped A LOT with the friction and for cleaning out the shavings. Also, the ends of the 10-40 don't have holes like the 16-60, so I got a 1/4 tap kit for the end stoppers. Then I used the same stuff that Cinegang used in the 1st post.
I am super happy with my slider!
 

Attachments

  • igus zazaslider-1.jpg
    igus zazaslider-1.jpg
    166.2 KB · Views: 0
  • igus zazaslider-2.jpg
    igus zazaslider-2.jpg
    324.8 KB · Views: 0
  • igus zazaslider-3.jpg
    igus zazaslider-3.jpg
    261.9 KB · Views: 0
  • igus zazaslider-4.jpg
    igus zazaslider-4.jpg
    320.2 KB · Views: 0
  • igus zazaslider-5.jpg
    igus zazaslider-5.jpg
    327.4 KB · Views: 0
Nice job on the build...glad you like it.
Happy sliding!

Note: Instead of vise-grips, you should pick-up a "T-handle tap wrench" at the hardware store, it makes it much easier to use.....and costs like $5.00.
 
Nice job on the build...glad you like it.
Happy sliding!

Note: Instead of vise-grips, you should pick-up a "T-handle tap wrench" at the hardware store, it makes it much easier to use.....and costs like $5.00.

Yeah, when I got home I realized that I forgot the tap wrench. So I tried the vice grips and they worked fairly well. I wanted to show that in the picture in case any one is in the same predicament!
 
Also, the ends of the 10-40 don't have holes like the 16-60, so I got a 1/4 tap kit for the end stoppers.

Now that leaves one big question. How did you drill the holes for the threads into the ends. I don'tthink thats so super easy to do. Do you have a drill press?
 
Now that leaves one big question. How did you drill the holes for the threads into the ends. I don'tthink thats so super easy to do. Do you have a drill press?

No drill press used. I placed the rail laying flat on a few pieces of wood and then had a friend put his weight on the rail, and I slowly drilled right down the middle of the ends. It sounds scary, but it wasn't very hard at all. But there isn't a lot of room for error, so I was extra careful when I started the hole. Once it was started, it was smooth and easy!
 
you really don't need a drillpress to drill such a shallow hole.

Just hold your drill firmly, and drill, you will be through the metal in 10 seconds. With the metal rail so thin, how much in reality in terms of degrees do you think you could off by ? .... your eye could never detect it, nor will a screw.

Just take your time, and you'll have no problem. Just before you start drilling make sure your drill is nice and straight, if you have a friend, have them stand back 6 feet or so and look at your drill from a few angles, so he can confirm you are pretty perpendicular to the rail, and away you go.

good luck.


Now that leaves one big question. How did you drill the holes for the threads into the ends. I don'tthink thats so super easy to do. Do you have a drill press?
 
Back
Top