Shizopolis
Member
what are tips for correct exposure for interviews? What should be zebra value for skin?
Follow along with the video below to see how to install our site as a web app on your home screen.
Note: This feature may not be available in some browsers.

what are tips for correct exposure for interviews? What should be zebra value for skin?
Basically because of the nature of the curve to slog, everything is lower than we might expect. If you don't consider these values then you run the risk of adding a lot of compression of your image in the highlights region. Shooting 1-2 stops over middle grey is not necessarily bad, there are good reasons, for example depending on the scene itself, when you might decide to shoot dead on these slog2 values, or shoot over them.
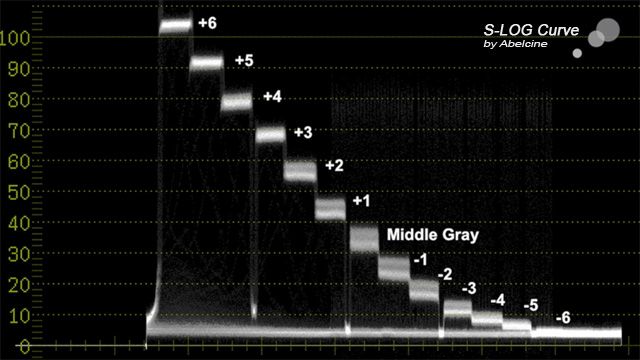
I've been shooting a lot of slog2 over the last couple of days - docco style, so exposure is just roughed in then corrected in Resolve later on (using resolve ACES - slog2 IDT, Rec709 ODT). I've generally been putting skin tones at 40-50% (using false colour) they come out about right. Thing is, there's so much latitude that, eve if they're a little over, they pull back fine.
How do you have your false colour setup Colin?
One caution against using false color when shooting in slog is that the range values of false color will not match up to what they are in a log scale.
So while one stop over slog middle grey might show as a color on your monitor, you would be missing other key levels you would typically want to monitor.
If you can adjust the setting values for false color that is great, but many monitors use fixed values which utilize the full waveform scale with traditional values of interest. Also using an exposure tool on an slog signal rather than LUT'd slog signal means you reduce the overall granularity of monitoring the signal, and again slog is a super hyper curve with exponential representation of the image.
I sometimes monitor in slog too don't get me wrong - just pointing out that using LUT's is the best way to monitor exposure when working with log gammas. Sony really got this backwards when they introduced log gammas and should have introduced in-camera LUTs at the exact same time for the benefit of working in a "traditional" scale.
")