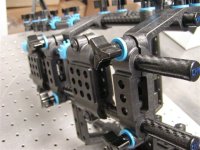
Cage + Pull Focus -- would these work?

I just ordered a T2i, I want to get a cage and pull focus system to go with the camera, eventually plan to mount an LCD hdmi monitor on top. I really feel in the dark on the whole cage and rails and pull focus thing-- wondering if anybody can help me know if these two systems would play nice together for a cage + pull focus?

Pull Focus
http://www.dfocussystem.com/dfocus.html

Cage
http://www.cpmfilmtools.com/DSLR_Camera_Rod_Kit_p/avi_dslr.htm

And while we are on the topic, what the heck are the two LONG rails topside on this cage system for?
http://www.cpmfilmtools.com/DSLR_Shoulder_Rig_p/shoot_dslr_shldr.htm
 
I just ordered a T2i, I want to get a cage and pull focus system to go with the camera, eventually plan to mount an LCD hdmi monitor on top. I really feel in the dark on the whole cage and rails and pull focus thing-- wondering if anybody can help me know if these two systems would play nice together for a cage + pull focus?

Pull Focus
http://www.dfocussystem.com/dfocus.html

Cage
http://www.cpmfilmtools.com/DSLR_Camera_Rod_Kit_p/avi_dslr.htm

And while we are on the topic, what the heck are the two LONG rails topside on this cage system for?
http://www.cpmfilmtools.com/DSLR_Shoulder_Rig_p/shoot_dslr_shldr.htm

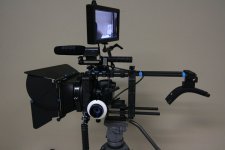
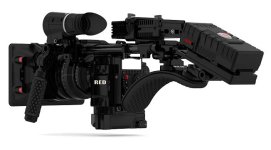
In a word, yes. Picture attached is Keatens rig. We configure our shooter rigs with one full strut and one half strut. The half strut is for access to that 'corner' of the camera. Usually for the follow focus. The top rails on the last link is for our shooter line of shoulder rigs. Keaten bought his shoulder rig before we had finished tooling our own shoulder mount. Having cages with four rods we are in the unique position to under sling the camera. The top rods project back with a shoulder pad. The camera sits low on the bottom rods. I feel this provides a more stable shooting rig. Lower center of gravity, less fatigue. When I saw the picture from RED on there run N gun it looked very stable.
We also have our new sidewinder which is a conventional over the rod configuration that is offset for viewfinder/Lcd/loop style shooting. We have also had several people purchase the shooter rig with an offset bracket and convert the underslung rig to a conventional rig with excellent results. With the right pieces you can configure an offset shooter rig on our site for less then 400.00. If anyone wants a rig like this let me know. Our bundled rigs are usually 7-10% less then individual pieces. I want to make sure you don't pay more then you should.

Thanks,

Steve

If you go to our facebook page you can see several pictures that customers have uploaded. Might give you some ideas.

http://www.facebook.com/pages/Lusby-MD/CPM-Film-Tools/236849416888
 

Attachments

  • 25853_390888146888_236849416888_3869964_8019590_n.jpg
    25853_390888146888_236849416888_3869964_8019590_n.jpg
    46.6 KB · Views: 0
  • runNgun.JPG
    runNgun.JPG
    40.9 KB · Views: 0
Thanks Steve, that helps a lot. If I started with something basic like your most inexpensive cage (the Flyer Cage kit)
http://www.cpmfilmtools.com/DSLR_Camera_Rod_Kit_p/flyr_dslr.htm
(1) is that expandable in the future by adding additional rods and such off your site?
(2) can the colored washers be added (purchased separately of course) to that Flyer cage to jazz up the look?

(3) can you explain to me what exactly this (side carbon rail paid) would be used for, and would it attach to the Flyer cage?
http://www.cpmfilmtools.com/ProductDetails.asp?ProductCode=BNDL_SD_RAIL&Show=TechSpecs
 
Thanks Steve, that helps a lot. If I started with something basic like your most inexpensive cage (the Flyer Cage kit)
http://www.cpmfilmtools.com/DSLR_Camera_Rod_Kit_p/flyr_dslr.htm
(1) is that expandable in the future by adding additional rods and such off your site?
(2) can the colored washers be added (purchased separately of course) to that Flyer cage to jazz up the look?

(3) can you explain to me what exactly this (side carbon rail paid) would be used for, and would it attach to the Flyer cage?
http://www.cpmfilmtools.com/ProductDetails.asp?ProductCode=BNDL_SD_RAIL&Show=TechSpecs


Flyer cage is exactly what you are looking for if you want low cost to begin with and the ability to expand as youre needs require. All of our gear is compatible with all other kits, both forward and back. So you will never need to replace any individual pieces with a newer version that will not work with an existing rig you own. Just upgrade with other pieces as your shoots and skills dictate.
We have the colored washers as seperate items and can easily be added. A lot of people like the ability to use the colored washers to tell the difference bettwen multiple set-ups, at a glace you know what the blue rig is compared to the red, etc. They are on the first page of the rail parts link;
http://www.cpmfilmtools.com/DSLR_cable_organizer_p/rs-1.htm

As for the last item that is a bundled pack that is mostly used for those that want to add a set of side rails to an existing cage. We bundled this specific item for a lower cost. All our bundeld gear runs 7-10% less then the individual pieces. So there is some cost savings in the bundles. I attached a picture of our shooter shoulder rig with the side bundle. With this you can easily add digital records, battery units, mics, etc. The bonus of the side rails is you can slide the pieces forward and back to aid with balance.

Thanks,

Steve
 

Attachments

  • side_bundle_demo.jpg
    side_bundle_demo.jpg
    57.3 KB · Views: 0
Steve, fwiw, coming from an amateur short films filmmaker like myself, it would be really helpful if your company/product website would add some photos showing the rigs with actual camera gear (matte box, camera, focus puller, lcd, battery for lcd, etc) attached to the rig/cage hardware. I am sure pro DPs don't need to see those example photos of rigs with stuff attached, but I would wager one of my paychecks if your company did that your sales would jump from people like me looking to buy but confused over what to buy and whether it will work with what I have in mind, etc. I really appreciate your being here on the forum to answer my questions.
randall
 
Steve, fwiw, coming from an amateur short films filmmaker like myself, it would be really helpful if your company/product website would add some photos showing the rigs with actual camera gear (matte box, camera, focus puller, lcd, battery for lcd, etc) attached to the rig/cage hardware. I am sure pro DPs don't need to see those example photos of rigs with stuff attached, but I would wager one of my paychecks if your company did that your sales would jump from people like me looking to buy but confused over what to buy and whether it will work with what I have in mind, etc. I really appreciate your being here on the forum to answer my questions.
randall

We are slowly collecting an inventory of DSLR cameras, once we get them our plan is to re-take all the rig pictures including the cameras. Until then our facebook page is a good place to see some pictures of rigs that our customers and we have set up.

http://www.facebook.com/pages/Lusby-MD/CPM-Film-Tools/236849416888

Being a part of DVX users has been a huge bonus for us in tweaking and sometimes re-designing our gear. This is our forth month in selling our rigs and in that short time we have made some unique new designs, influenced a lot by forums like this! I love this place.

Thanks,

Steve
 
I am still having a very hard time understanding what the parts are for an how accessories attach to the cage/rigs by looking at the Facebook photos. Hopefully with time that will improve. Also looking forward to such photos on your product website in the future. It would be really nice to have some extreme close-up photos showing e.g. how to attach a DP1x smallhd monitor to a rig, how to attach a Rode shotgun microphone to a rig, close-up showing how to attach (as in what hardware is needed and where to get the hardware) a pull focus gizmo to the cage/rig to use on a camera/lens-- that sort of info/photos would help me easily decide to buy one system over another, and spend more money on parts and accessories from a site such as yours. Just giving some feedback from one amateur filmmaker, perhaps my brains is slower to figure this stuff out than most (a distinct possibility).
randall

.... Until then our facebook page is a good place to see some pictures of rigs that our customers and we have set up.
http://www.facebook.com/pages/Lusby-MD/CPM-Film-Tools/236849416888
...
 
I am still having a very hard time understanding what the parts are for an how accessories attach to the cage/rigs by looking at the Facebook photos. Hopefully with time that will improve. Also looking forward to such photos on your product website in the future. It would be really nice to have some extreme close-up photos showing e.g. how to attach a DP1x smallhd monitor to a rig, how to attach a Rode shotgun microphone to a rig, close-up showing how to attach (as in what hardware is needed and where to get the hardware) a pull focus gizmo to the cage/rig to use on a camera/lens-- that sort of info/photos would help me easily decide to buy one system over another, and spend more money on parts and accessories from a site such as yours. Just giving some feedback from one amateur filmmaker, perhaps my brains is slower to figure this stuff out than most (a distinct possibility).
randall

There is a lot to figure out on the DSLR kitting if starting from scratch. I make it a point to anyone that has questions that there is no such thing as too many questions about our rigs (or anyone elses rig or gear for that matter). This stuff is expensive and recomending a piece of equipment that might not work or fit your style of shooting is just bad mojo. Not being able to explain what our gear is capable of, or not capable of is bad business.

To help with the explaination of things it is our hope to have our instructional DVD finished this week. We have been working on it for what feels like forever. Everytime a new mold would come out of the tool room we would want to include that as well. As it sits the DVD will include everything we have tooled and molded up till last week. And we decided to include the Sidewinder as we have the proto type parts we can use for assembly. Have a DVD burner and printer ready to go! We will include the DVD in all the rigs we sell and break it down into its smaller 2-5 minute assembly portions and upload them to the normal places.

Thanks,

Steve


Steve
 

Attachments

  • P1050017.JPG
    P1050017.JPG
    50.9 KB · Views: 0
Wow, I could sure use that DVD before choosing what to buy, I wish you guys would make that instructional video or its clips available for download or streaming viewing on your website or vimeo/youtube for noobs like me trying to figure out what components at your site to buy. As you said, this stuff is too expensive to second guess, and with a 15% restocking fee and the expensive paying shipping and return shipping something bought then returned, I want to be sure I get the right rig at the start.
 
I just ordered this cage system. One question for anybody-- do I need to buy some other piece of equipment/accessory to be able to mount my Canon T2i (arrives tomorrow) to the pan on the cage system? I use a Bogen-Manfrotto tripod with a fluid head, really nice, and of course has a quick release tripod adaptor (I have several of those from other photography tripods). Just not certain how my camera will attach to the cage, and then how the cage will quick attach/release from the tripod head?
 
Any manfrotto 357 or 577 quick release system will bolt to our belly pan as will our own QR system. The belly pan is split in half, so open it up and bolt the tripod dovetail plate to the bottom of the belly pan. On the top of the belly pan you bolt the QR base here. Then you simple bolt the two halves of the belly pan together (with the rods inbetween).

Steve
 
Back
Top