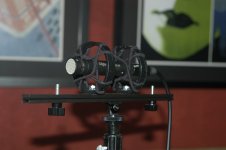
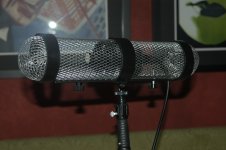
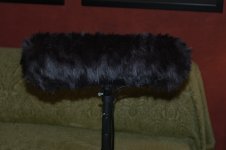
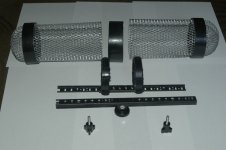
Here's my crack at a shock mount and zeppelin

Hello,

Well this is my first official upload so not sure if the pictures will post or not so here goes.

Wanted to see if I could come up with a shock mount/zeppelin solution that would be cheap and relatively easy using limited tools. I did a lot of research of other peoples' designs on this forum and anywhere else I could find plus I looked at pictures of real zeppelins and what I was trying to achieve was something that looks good and functions too.

I originally tried to get all my supplies from either home improvement stores (Home Depot, Lowes) plus a few readily available retail chains for odds and ends (Kmart, Big Lots) plus a fabric store for the fur and velcro but they could also be had at larger retail chains such as Walmart. The only speciality item which I did not need to purchase and already had was the mic holder from an old mic (which I glued to the bottom of the shock mount assembly in order to mount it to the boom pole).

The actual cost of the shock mount/zeppelin skeleton was $21.37 (this amount does not include any of the paint used). Fabric and velcro cost $8.61. Total cost $29.98 before taxes.

I've made a detailed list of supplies if anyone is interested but don't want to bore you with it now if you're not.

Please feel free to pick it apart, recommend improvement, etc. As you will see in the pictures this is a pretty large zeppelin (16" across) for my little Oktava mic so I'm thinking of making a scaled down version, more like 10" across so I will be able to get the mic closer to my subject.

Why the Oktava you might ask and not a boom? Money! It's my first mic purchase on limited funds and after doing the research this seemed like the most bang for my buck. I ordered the mic at the same time I was designing the shock mount/zeppelin and I'd seen pictures of small mics in larger zeppelin enclosures plus I figured a large enclosure would give me room to grow :) Now that I've been doing some tests I think I would rather be able to put the mic closer to my subjects and figured it would help if I lost the 6" off the zeppelin enclosure. Those of you who know sound will 6" really make a difference?

Thanx in advance for any comments or suggestions.
 

Attachments

  • DSC_1915.JPG
    DSC_1915.JPG
    122.5 KB · Views: 0
  • DSC_1924.JPG
    DSC_1924.JPG
    87 KB · Views: 0
  • DSC_1935.JPG
    DSC_1935.JPG
    128 KB · Views: 0
  • DSC_1944.JPG
    DSC_1944.JPG
    97.7 KB · Views: 0
I don't think I have seen a DIY zeppelin that looked that good! Very impressive! How did you get the ends so round? Come-on now... dish!
 
Wow, such a glowing comment from a DIY veteran. Thanx!

Wow, such a glowing comment from a DIY veteran. Thanx!

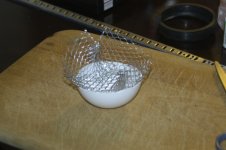
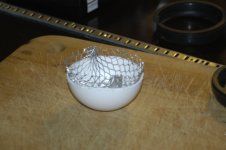
No prob Edweirdo. Actually it was quite easy since I used very pliable Aluminum Gutter Gard ($3.88 for 6" x 20' at Home Depot). I chose this wire over other rolled mesh wire because it has a finished edge on 2 sides and is not as painful to work with on bare hands. All I did was take a 3.5" plastic baseball (Kmart $1.99 pack of 2), sawed it in half, then cut a piece of wire about 4.5" long then pressed it into the half circular mold I created with the baseball pressing and shaping with my fingers then I cut off the excess wire that stuck out with a pair of scissors. When cutting, leave about a 1/2" of mesh above the mold (see the 2nd picture).

I originally used a wiffle ball but that turned out to be too small but I do have a picture of that to give you some idea of what the wire looks like once pressed into the half circular form.
 

Attachments

  • DSC_1903.JPG
    DSC_1903.JPG
    126.8 KB · Views: 0
  • DSC_1906.JPG
    DSC_1906.JPG
    115.8 KB · Views: 0
Last edited:
WOW! Congrats on your kit. It's true, this is the best looking zepp/mount I have ever come across with. 5 stars too!

Btw, how and what did you use to connect the Gutter Gards together? Was it a PVC tube?

Alan
 
I just double click on the pics and wow much better (bigger). I didn't even see the rack mounts that you used from the smaller picture, damn what a great job!
 
Helooka...definitely the cleanest DIY zep I've seen. Simple, pretty, and cheap. Awesome.

Now you need to test it in some wind. I just finished making up some dead cats for a Rode VM and AT822 which I used to record audio on a sailboat during the Chicago to Mackinac Island race. I found the dead cats a huge improvement in wind, but the zeppelin is definitely the next step. Any chance of you testing this in front of a strong wind source (like a fan) and posting it?
 
First - Thank you to everyone who left feedback and the ratings!

To answer Alan Changs question: I did use a 3" PVC coupler (Home Depot $0.69) and cut 1" off each end using a hacksaw. Thus it turned one coupler into 3 pieces. I used the two 1" pieces for the end caps and the remaining coupler middle which ended up being a little over an inch/inch and a half for the middle connecting the two pieces of zeppelin onto the shock mount. You can't see it in the pictures but I also cut out about a 1/2" of the bottom of the middle connector so it would slide onto the shock mount sides. All 3 pieces were painted with black plastic spray paint (love this stuff by the way, even with the rough edges of the wire rubbing up against it no peeling or chipping, great stuff!). Hope that was enough info.

guskersthecat: The fan test was the first thing I did once I finished the fur cover. I think it sounds pretty good, no popping and I hear the motor but I'll let more trained audio ears be the judge. You'll hear my irritating voice in the background as I thought for some strange reason I would be heard above the din of the fan, doh! I first placed it sideways and then pointed it directly into the fan.

All you audio techs: really would like your feedback please.

http://www.dvxuser6.com/uploaded/17699/1155763047.mov
 
Last edited:
Any chance on hearing the tests you performed? I'd love to hear how it worked with the Oktava as I have one myself.

Any chance you'd be willing to cough up the parts list/instructions, or better yet, would you be willing to make one? If so, how much would you charge?

Thanks,
Larry
 
Any chance we could see a list of what you used? And just a few questions.
Are those black rings PVC?
How did you connect the mesh together on the ends to form the ring?
Did you have to make a slot in the bottom of the mesh to fit over the middle shock mount rings?
 
I looked at the first pic thinkin you ordered a kit. Wow, nice job. Its always nice to see a diy look semi pro. Working on my jib/dolly today, and now have motivation to keep at it. Thanks for sharing that.
 
zach72 said:
1. Any chance we could see a list of what you used? And just a few questions.
2. Are those black rings PVC?
3. How did you connect the mesh together on the ends to form the ring?
4. Did you have to make a slot in the bottom of the mesh to fit over the middle shock mount rings?

1. Yes, I will do a post of materials (give me a few days)

2. Yes they are PVC rings - see my post #8 in this thread

3. I used JB Kwik Weld to attach the mesh to the PVC as well as the nuts for the clamp knobs, the screws holding the rings that make up the shock mount, and the mic holder attached to the bottom of the shock mount

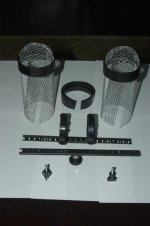
4. Yes, there is a slot at the bottom of the mesh, all it does is slide between the bracket sandwich and is held there by friction from the tightened clamp knobs. I've attached a different view of the exploded assembly where you can see the gap in the mesh.
 

Attachments

  • DSC_1917a.jpg
    DSC_1917a.jpg
    111.6 KB · Views: 0
Last edited:
Parts list and some partial assembly instructions

Parts list and some partial assembly instructions

You asked for it so here is the parts list:

1. 6"x20' Aluminum Gutter Gard - Home Depot - $3.88
2. 36" Rubbermaid Zinc E5 Upright Shelving Bracket - Home Depot - $1.17
3. 3" PVC Pipe Coupler (White) - Home Depot - $0.69
4. 2" PVC Pipe Coupler (Black) - Home Depot - $0.63
5. JB Kwik Weld - Home Depot - $4.19

6. 10-32x3/4" Clamp Knobs - Lowes - $2.82 ea (purchase 2)
7. 10-32x1/2" Combo Bolts with Nuts (package of 10) - Lowes - $1.18

8. 3.5" Baseball 2 Pak - Kmart - $1.99

9. 1 Package Assorted Hair Accessories - Big Lots (or anywhere hair products sold) - $2.00

10. Mic Holder - already had but can be purchased at BH Photo or elsewhere - about $10 (hopefully less)

11. 3/8 yard of Fake Fur - JoAnne Frabrics - $5.62
12. 3/4"x30" Velcro - JoAnne Fabrics - $2.99


Tools I used:

Hacksaw
Phillips/Regular Screwdrivers
Dremel Tool
File
Sandpaper
Wrench


What follows is not a tutorial but rather some helpful info to get you started. Not all items will be discussed just the ones I think need a little clarification.

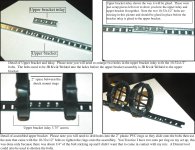
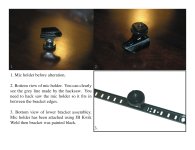
a. Cut shelving bracket into 2 10.5" pieces for the upper and lower brackets of the shockmount plus an additional 3.75" piece to be used as the upper bracket inlay (see attached pictures)***BEWARE OF ALUMINUM SPLINTERS***These brackets are made of aluminum so be extra careful. Watch out for dust and splinters while cutting as these can lodge under the skin and are painful***

b. 3" coupler - Discussed in post #8 of this thread

c. Cut 1/2" off each end of the 2" coupler, this will be your rings for the shock mount. You'll have the middle left over, this can be tossed

d. 10-32x1/2" combo bolts with nuts - 2 bolts will be used to hold the shockmount rings onto the mount along with 4 nuts (see picture attached), you will also be using another 2 of the nuts to glue onto the upper bracket for the clamp knobs to screw into

e. 3.5" baseball - discussed in post #3

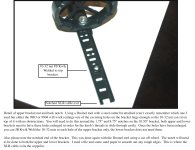
f. mic holder - you will be hacksawing that down and glueing it to the bottom bracket of the shockmount for the base (see picture attached)

Hope this helps somewhat. I have a feeling there will be questions just bare with me on my response time :)
 

Attachments

  • shockmount detail.jpg
    shockmount detail.jpg
    193.7 KB · Views: 0
  • Nutnotch detail.jpg
    Nutnotch detail.jpg
    139.3 KB · Views: 0
  • micholder howto.jpg
    micholder howto.jpg
    115 KB · Views: 0
Last edited:
Thanks for the info on the PVC tubing. I'm way too impressed by your creativity and detail on this zepp/windscreen kit project. Lots of materials and patience to assembly this kind of work. Much credit to you my friend!
 
Larry R said:
Helooka - Any chance of getting you to build one of these for me? How much would you charge?

I was about to ask the same thing, but I guess I can do it myself. It won't look the same nor have the same quality though. Just a first project in mind.
 
Again, thanx to everyone for the kind words. I love this forum and the ideas/inspiration it has provided me in the creation of this project.

To Larry R and Alan Chang: I'm very flattered that you like this design so much that you would pay to have it made. Unfortunately I am but one man living in a studio apartment. This project took over my kitchen for about a week. Since I don't have a dedicated work space I'm afraid I won't be able to accommodate your requests. Also I've got some other ideas cooking that I'd like to see come to life and thanks to dvxuser and all the positive feedback I'm looking forward to tackling them soon.

Now I just need some more inspiration...back to the forums!
 
Don't worry. I am not looking for trouble.

Yesterday, I actually went dont to The Home Depot and tried finding the Guttar Gard. To my surprise, they didn't carry any and that goes for 2 nearby stores. I'm very disappointed at them, but Lowes was around the corner as well. I stopped by and found a heap load of Guttar Gard. I was about to purchase some, but decided that I need a more detail list of supplies instead of spending 1 to 2 hours per store looking around for stuff. Later, I popped into a Home Depot Pro store and found even more Guttar Gard (They're not that bad afterall). Right now, I'm just researching some more before I get the necessary supplies.

Helooka, I'm glad you have gotten those inspiration from here. It's a wonderful community.
 
Back
Top