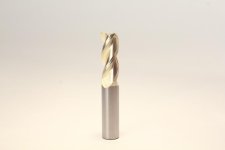
Well, THAT was a pain in the A**!!! Most challenging photoshoot to date.

David G. Smith

Steak Knife Member
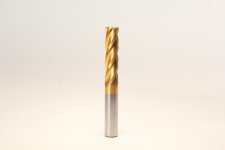
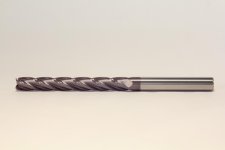
I never realized how hard it would be to get the lighting right to take these photos:
Good one small.jpg

IMG_5038.jpg

IMG_5090.jpg

IMG_5136.jpg

and another 120 or so more cutting tools.

My housemate works for a machine tool manufacturer and I have been talking to the marketing manager there about possibly doing a video for them. He has not committed to doing a video but he called me and asked me if I would be interested in shooting stills of some of the tools they make for their up coming print and on-line catalog. The money was pretty good so I agreed. To be honest, I was kind of unimpressed with the job and a bit cocky (Inside, to myself) about the project. You know, "Yawn....Sure man, I'll take photos of your tools for that kind of money. Sh*t buddy, I'ze a movie camera dude, I GOT THIS!!".... HA, HA, HA.... Silly Rabbit! Oh boy, was that attitude quickly dashed. It became very clear how challenging the job would be when I was about 30 seconds into the first test shot on the the first tool. Like,"Ahhh, I have to shoot very shiny metal objects against a shadowless white background... and make it look good!!! Oh boy!. I had scheduled a day to go to the office and do the shoot, but we were very rushed. I looked at my results, which I was not very satisfied with, called the marketing manager back and let him know that I wanted to re-shoot the photos and that I would do it at my house under a much more controlled environment. He packed up all the tools; all 120 or so of them, and sent them home with my housemate.

This is the set up I used to shoot the photos.

Camera Geek living Room Cropped smaller.jpg

I shot the photos with a Canon T2i, using a vintage Vivitar Series 1 28 -105mm f2.8 -3.5 Macro zoom lens. The tripod is my trusty Miller 20 and sticks.

For the lighting:

The key light, shooting through the umbrella, is a vintage "Cameralite" 650 watt open faced tungsten light. This is what I call a "Pocket 650" . I use DYS bulbs in them so they are really 600 watt lights, but the term "Pocket Six Fiddy" just rolls off the tongue! They are rated for up to 650 but the DYS bulbs are readily available and inexpensive. The umbrella is a 33 inch white translucent one bought off of eBay for around $13.00. An umbrella adapter is used to mount the light and umbrella. I buy those off of eBay for lower prices.

The back ground is lit primarily by a Smith-Victor Q60 600 watt open faced light on the right. The first light kit I ever bought was three of these Smith-Victor lights and stands that I bought for, I think, $35.00 in 1990. As you can see, I am still using them. I used the two blade barn doors on the light to keep the light off of the product and mainly on the background.

The background is evened out by the Mole-Richardson 2351 Midget 200 watt Fresnel, on the left behind the umbrella. It was bought used off of eBay. I used the 4 blade barn doors to keep the light off of the product and zoomed it to about medium flood to keep the exposure across the back ground even.

The top light is a Home Depot type heavy duty clamp reflector work light with a frosted 250 watt medium base screw in halogen bulb. Buy them off of eBay, they are much more inexpensive there. I really like these lights and keep 4 or 5 of them in my kit at all times. They are small, light weight, inexpensive and can be mounted almost anywhere. They are great for adding some background splash and accents, or as a top light like here. The top light in this set up was essential to "Killing" the product shadows, which was a requirement of the job specs.

The white background is cut from a 48" by 12' piece of bulletin board paper bought from a big box arts and craft store.

The Smith-Victor and Cameralite lights are supported by cheap light weight Chinese aluminum stands. The Mole Midget and the top light are supported by Matthews Maxi Kit steel stands. The background is supported by two "JS PRO Heavy Duty 10ft Studio Light Stand". Those stands are plastic and aluminum and are not really very good. I had to modify the heads of them, by changing the spud set screw to a larger one right out of the box. They are Tall, light and disposable, as far as I am concerned.

The background horizontal support and the top light boom are pure DIY cut pieces of 1/2" PVC pipe from a hardware store. You can get a 10' piece of PVC pipe for about $1.77 (At a Home Depot down the street from me). I keep several pieces along with elbows and "T" connectors and a PVC pipe cutter around all the time. The stuff is very handy. The top light boom is mounted to the Maxi Kit Steel stand with a DMK E-Image Gobo Grip Head. I have bought several from these guys.

And of course, lots of spring clamps, which are handy as sliced bread, and a dab or two of gaffer's tape.

This photo shoot was a challenge. Getting the light right; getting the exposure right, orienting each tools to show the cutting edges; dealing with strange reflections and dealing with fingerprints all took a lot of time. To fight the fingerprints I had to clean each individual tool with rubbing alcohol and wear vinyl exam gloves when handling the tools. I found that, even with the gloves, if you held one of the tools tightly for too long the fingerprints came THROUGH THE GLOVES. Depending on how the flutes of the tool were oriented I kept getting some very strange reflections from the Smith-Victor background light that looked like defects in the tool. After trying to orient the light and tool to cut the reflections I ended up getting a 3"X5" index card and hand holding it up to flag the reflections on many of the tools. I would have to hold the card in my right hand, get it set to cut the reflections then double check my focus and trigger the shutter with my left hand. This was a major chore. One of the biggest issues was staying organized and shooting the products in the order that they are in the catalog. Going back and labeling the photos with the product number was one of the mind numbing but meticulous tasks required. I do have to say that my experience shooting, and lighting, for film and video projects and my putting together an admittedly low budget and maybe a little bit irregular, but varied, light and grip kit, and knowing how to use it, saved my butt.

Just thought I would share this.
 
Last edited:
I am not surprised at all. Lighting people and typical backgrounds is fairly "easy" as those surfaces tend to behave in certain simple, predictable ways. Metal, glass and related materials on the other hand are a nightmare and have entire books written about JUST how to light those specific things. . .from what angles relative to the camera's axis they reflect light at to where to place your gigantic black and white pieces of foam core to create definition and modeling on those types of surfaces. Lot of crazy setups and math/geometry involved, not an easy thing to do at all.

Food's another one. I visited a high end food shoot set once. Never have I seen so much bullshit to light a plate of pasta.
 
Yeah, tell me about it. I remember one of my mentors, a great gaffer and DP, complaining all the time about doing food shoots. He ranted once about spending an hour trying to get a glint off of a pepperoni on a pizza for a food shoot. I have been on shoots for cars and they are a major pain to try and light.
 
Oh man. I have been THERE. First, shooting glass. Not just glass, but glass art. Thousands of geometric forms glued together near-seamlessly. If it's not dust, it's oils from handling it (these suckers are heavy!). If it's not a reflection of the pedestal, it's an unsightly hotspot. Hotspots were bad; small flares were desirable. I was lighting with a certain amount of hard light to make it pop but my early efforts had huge, blown-out flares and were much darker. It was very dramatic but the client wanted more detail out of it, so further experimentation was called for. Sadly I don't have a setup photo. I ended up surrounding them with soft light and one point source a ways off. I'm gonna just post some links because the picture was so huge in the preview.
http://imgur.com/QZ4u1We
http://imgur.com/o7v76eM

Shooting product in a whitebox was easy by comparison: http://www.flickr.com/photos/51035539640@N01/8964739155/

But still a pain. Every product needs to be positioned differently due to the limits of the material or the way it reflects or catches the light or doesn't look "three-dimensional" enough...

That whitebox I built with a cardboard box and white paper. This was very fragile and not portable. Later product shoots I built bigger white boxes out of two c-stands, a load of grip clips, and cheap white shower liners from Wal-Mart. This was bigger but still a huge pain.

Since then I have purchased a folding whitebox, I think it was this one: http://www.amazon.com/CowboyStudio-...6952133&sr=8-3&keywords=white+box+photography

I have yet to use it but reviews seem largely positive. Should be fine as long as I just blast light from every direction. Saves a lot of time because the whitebox does all the diffusion for you.

One last note. The ideal situation for whitebox photography is to have the backdrop totally blown out. That way the inevitable wrinkles are gone. What I found when shooting some bigger pieces of luggage was that the very minimal shadow of the product, just underneath, showed wrinkles. I solved this by putting a piece of white foamcore underneath the bag to achieve that "Apple look" like you have. Since then I've shot every piece of product on foam core, but everything always needs tweaking regardless.
 
Last edited:
I thought about getting one of those white shooting tents but I did not have the time on this shoot. I still may pick one up to try it out. The wrinkles in the fabric would be what I would worry about the most with a light tent. It was pretty easy to keep the bulletin board paper that I used above smooth.
 
Just thought I would share this.

Cool! I love these threads.

The end result looks great and I love the fact you achieved it with a t2i. Now these images we are seeing are with the real background, correct? My very short experience shooting stills for catalog work....I would shoot various toys in a white tent, THEN clip out in photoshop and put on a white background. (then draw in the shadows, ect.) Well, I was quickly back to video production work, but it was an experience.

Food's another one. I visited a high end food shoot set once. Never have I seen so much bulls*%t to light a plate of pasta.
I have no real desire to get into that specified line of work, but I'd love to be a fly on the wall at one of these shoots....
 
to echo what scott said, the other far less headache inducing option is to get the background OK, and then just magic wand the thing in photoshop and put in whatever tone of white you'd like, even if you don't know ps, magic wand doesn't take long to learn, and the damn thing is indeed magic!

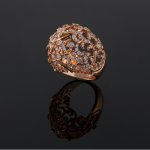
my wife has started doing some jewlery shots and is having the same fun you are. i have a huge light tent, and it does solve the issue of very reflective items reflecting everything and everything, they come with a front cover to make it full enclosed, so only the lens is peeping through, so you only have to deal with a 82mm'ish diameter circle to avoid reflecting. but sometimes we use it, sometimes we dont, depends on the item. a round/circularish item like those drill bits probably would benefit from it, but as you demonstrated, great shots can be had in open air. it's the matte finish on them that saved you a metric **** ton of more headache :)

oh and since you mentioned using older glass instead of the latest and greatest. we went through that same process, trying everything from a nikon 50mm, canon 28-135, 24-105L, all with and without a bellows macro extension, and the one we ended up deciding was best? my mother's nikon AF-28-105, no macro tube needed (she gave me her old nikon film camera with a that lens, which ive kept mostly just on display.)

focus stacking is next on the learn list, and the only way to get completely in focus macro shots of anything more than a few mm in depth

ring-3 - Copy.jpg
 
Yeah, those shots are with the actual background and are not tweaked at all in post. With 120 plus tools to deal with, I did not want any involved post work to do.

I am not looking to do too much more of this kind of work either, but I am glad I did this gig. At least I now have a base understanding of the complexities involved.

Darren, these shoot were actually taken at the "Close focus" end of the lens and not actually with the Macro function. I tried it but ran into issues with the macro depth of field. How would you do "Focus Stacking"?
 
I think if I was ever asked to do something like this I'd take the "easy" way out and look up literature/a book/tutorials on how to light for these types of objects/setups, and imitate. No reason to reinvent the wheel. Provided it was small objects. If it was large art pieces or something on location somewhere, I'd get a legit gaffer.
 
the lighting isn't all that hard if you know how to look at it, which is entirely in terms of reflection, because with metal/shiny objects even if they are matte, are going to reflect everything that's around them. if you look at david's shots, you can see the lighter parts of the tool is where the light source is, and the darker part isn't just a less exposed part, it's actually a reflection of that dark part of the room. I would pin the biggest consideration as the size of the light source, david used an umbrella which effectively made a huge light source for the relatively small object. so if you were to shrink down to the drill bit's size and look around, you'd see that because the light source is so large, from the bit's perspective it's seeing more white than dark. a light tent gives you the most control over this by putting white all around it, and you can really fine tune your shadows and highlights by varying flood to spot, intensity and distance of your lights to the different sides and angles of the light tent.
 
I might be able to help here although I have limited experience with product photography. My experience is natural history photography. Some insects are extremely reflective. However, I developed principles and methods whereby I could completely eliminate specular reflection and greatly reduce the dynamic range of reflected light. Some beetles and bees have deep blacks, and yet highly reflective surfaces. Unfortunately whilst I did write volumes about the principles, unfortunately the site they were written on is no longer directly accessible so I can't link to them.

I called the principle concave diffusion and if you Google concave diffuser you will get quite a bit of information from others that have tried, developed and tested these methods. Although there are 2 very different types of difuser called a concave diffuser. Whilst this was for flash light it should work the same for continuous lighting. The principle is that specular reflections are essentially a reflection of the light source, usually from a convex surface. In the close-up region light drop off (inverse square law) happens over very small distances. This is because doubling or halving of the distance is relatively short, compared to longer ranges. Even if your overhead light has a large area diffuser, the edges will be proportionally much further away from the subect than the centre - yet is from the centre that specular reflections develop. In other words it is the wrong way around, the centre provides more illumination than the edges, whereas to eliminate specular reflections, you need the opposite effect.

This is best achieved with a curved diffuser which essentially wraps around the subject. This takes the centre of the light source further away from the subject, and puts the edges of the light source far close to the subject. This is necessary to imitate the diffuse daylight of an overcast sky. Because I photograph insects etc, this curved light tent is sited on the end of the lens.
4552445322_8ff854fa69_o.jpg

I originally used a plastic water cooler type cup, hence the name cup diffuser that is often used.
3647672121_19c2fee4c2_o.jpg


Before this it was impossible to capture reflective subjects like this using flash, except maybe using cross-polarization, which soaks up a lot of light.
4582559038_67296b4eba_b.jpg


However, this can easily be scaled up. On a large set up using external lights I would just use a larger U-shaped piece. I tend to use vellum paper or foam for smaller diffusers but a variety of materials will work.

Just for clarification, I've also used the term concave diffuser, which refers to a type of inverted dome in a reflector. This actually focuses the light but would take too long to explain here, although you can see them mounted on my flash heads in the first image.

As regards the funny background effects on the background paper. I would highly recommend a look at Niall Benvie's 255 method, which is now used with the Meet Your Neighbours project for wildlife and nature.
http://meetyourneighbours.net/

Here a piece of back illuminated perspex is used for the background.
http://imagesfromtheedge.com/blog/?page_id=1197

Just to sum up for smallish reflective subjects I'd recommend putting a U-shaped diffuser of diffuser paper strengh over the subject. I've found vellum paper is superb, but you'd need it in bigger sizes than standard for anything but small subjects. It has some rigidiy so can be shaped. This is an easy addition to your other lighting i.e. you can add it or take it away. If you wanted some camera movement I'd make it funnel shaped as this shape works well with this diffusion principle. The quality of light can be adjusted a bit depending on the positioning of the outer lights, but the changes will be greatly dampened and not so obvious as with if it was without the diffuser. This works in a lot of ways, one of them being the light is bounced all around the interior filling in shadows and reducing the dynamic range of the light reflected off the subject. Essentially it does this because the reflected light will always be less bright than the highlights, but will fill in the shadows meaning less f-stops between the highlight and shadows. For the background it appears that back illuminating it is best to get rid of these uneven effects the lighting has on the background.
 
Last edited:
That is very interesting. I remember visiting a set where they where shooting a high end car promo. The gaffer (One of my mentors) had set up a large U shaped curved silk above the car and was putting light through that. I never understood the need for the shape until now. Thanks.
 
I think if I was ever asked to do something like this I'd take the "easy" way out and look up literature/a book/tutorials on how to light for these types of objects/setups, and imitate. No reason to reinvent the wheel. Provided it was small objects. If it was large art pieces or something on location somewhere, I'd get a legit gaffer.

Yeah Josh, I as not as naive as the narrative in the OP really lets on that I am. I am a huge fan of having a visual reference for the work that I do and I did do research prior to this shoot. I spent an evening studying the images on the websites of the competitors of the company that I worked for and then went off and studied some more still life and product photos. From what I could find on shooting the photos like I did I could see that a light tent, as discussed above, would be the way to go but I just did not have time to get one. From the time that I was asked to do the shoot until I was finished was four days. I just got the check for the gig and I am definitely going to pick up a light tent to have around with some of the cash.
 
I might be able to help here although I have limited experience with product photography. My experience is natural history photography. Some insects are extremely reflective. However, I developed principles and methods whereby I could completely eliminate specular reflection and greatly reduce the dynamic range of reflected light. Some beetles and bees have deep blacks, and yet highly reflective surfaces. Unfortunately whilst I did write volumes about the principles, unfortunately the site they were written on is no longer directly accessible so I can't link to them.

I called the principle concave diffusion and if you Google concave diffuser you will get quite a bit of information from others that have tried, developed and tested these methods. Although there are 2 very different types of difuser called a concave diffuser. Whilst this was for flash light it should work the same for continuous lighting. The principle is that specular reflections are essentially a reflection of the light source, usually from a convex surface. In the close-up region light drop off (inverse square law) happens over very small distances. This is because doubling or halving of the distance is relatively short, compared to longer ranges. Even if your overhead light has a large area diffuser, the edges will be proportionally much further away from the subect than the centre - yet is from the centre that specular reflections develop. In other words it is the wrong way around, the centre provides more illumination than the edges, whereas to eliminate specular reflections, you need the opposite effect.

This is best achieved with a curved diffuser which essentially wraps around the subject. This takes the centre of the light source further away from the subject, and puts the edges of the light source far close to the subject. This is necessary to imitate the diffuse daylight of an overcast sky. Because I photograph insects etc, this curved light tent is sited on the end of the lens.
View attachment 79947

I originally used a plastic water cooler type cup, hence the name cup diffuser that is often used.
3647672121_19c2fee4c2_o.jpg


Before this it was impossible to capture reflective subjects like this using flash, except maybe using cross-polarization, which soaks up a lot of light.
4582559038_67296b4eba_b.jpg


However, this can easily be scaled up. On a large set up using external lights I would just use a larger U-shaped piece. I tend to use vellum paper or foam for smaller diffusers but a variety of materials will work.

Just for clarification, I've also used the term concave diffuser, which refers to a type of inverted dome in a reflector. This actually focuses the light but would take too long to explain here, although you can see them mounted on my flash heads in the first image.

As regards the funny background effects on the background paper. I would highly recommend a look at Niall Benvie's 255 method, which is now used with the Meet Your Neighbours project for wildlife and nature.
http://meetyourneighbours.net/

Here a piece of back illuminated perspex is used for the background.
http://imagesfromtheedge.com/blog/?page_id=1197

Just to sum up for smallish reflective subjects I'd recommend putting a U-shaped diffuser of diffuser paper strengh over the subject. I've found vellum paper is superb, but you'd need it in bigger sizes than standard for anything but small subjects. It has some rigidiy so can be shaped. This is an easy addition to your other lighting i.e. you can add it or take it away. If you wanted some camera movement I'd make it funnel shaped as this shape works well with this diffusion principle. The quality of light can be adjusted a bit depending on the positioning of the outer lights, but the changes will be greatly dampened and not so obvious as with if it was without the diffuser. This works in a lot of ways, one of them being the light is bounced all around the interior filling in shadows and reducing the dynamic range of the light reflected off the subject. Essentially it does this because the reflected light will always be less bright than the highlights, but will fill in the shadows meaning less f-stops between the highlight and shadows. For the background it appears that back illuminating it is best to get rid of these uneven effects the lighting has on the background.

nice bug! what lens is it?
 
My girlfriend does photography and has a great book about product photography that had detailed descriptions of the setups and how the angles/geometry work for lighting shiny reflective things. If youre interested i can find out the exact title.
 
My girlfriend does photography and has a great book about product photography that had detailed descriptions of the setups and how the angles/geometry work for lighting shiny reflective things. If youre interested i can find out the exact title.

That would be cool. I would love the name of the book. Thanks.
 
Looks like the book is called
"Light: science and magic"

youll know its the one i mean if it has the phrase "family of angles" used throughout
 
Back
Top