Short coming up - asking for Lighting opinion/knowlegde -

M.R.

Active member
Hi,

I have a shoot coming up. I haven't got a lot of experience, followed directing in film school -but my interest lies more in cinematography, so asking for your opinion and knowledge.


About the short in image terms: it should be natural, meaning not overdone looks. Quite bright colors (and light) but with a softness to it. That might sound a bit contradicting, softness more in the latitude and gradient of colors. (all in all not too much contrast)

I'll start with the first scene, which is in a very small room and dimly lit from natural light due to surrounding buildings.
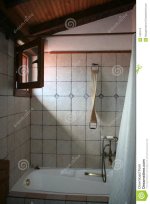
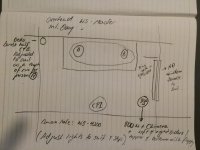
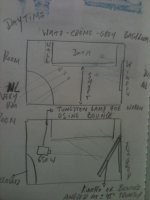
Below is some more information about the room, as well as how I think I would light it. (NL stands for Natural Light)
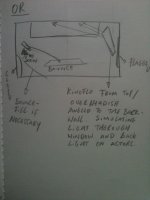
IMG_0250.jpgIMG_0251.jpg

As you might have seen, I would flag the window as it's winter time and light changes quiet fast. Also the scène is quite important and will probably take some time. Maybe I'm overdoing it? Should I just keep natural light - making life a little easier?

I'm not fond of kino's but because of the dimensions of the room they might come in handy.
Also worried about that it should look like daytime.

When using tungsten light, I would use tungsten tubes in the Kino, as I'm flagging natural light. So I'd just White Balance it accordingly. Or is that not so good idea?

I'll add some other scenes soon.

Thanks ahead
 
Like you mentioned yourself, I feel as though you might be over-thinking it.
Quite often people tend to shy away from using the existing light sources in bathrooms, but it's real easy to land that "stage lit" look as soon as you start to build upon what's already there. If you look at five random people's living rooms you'll find them (most of the time) completely different light wise. But if you look at their bathrooms they'll almost always be lit similarly, and because it's such a small and generic space we all sort of have this idea of what bathrooms 'feel' like.
99% of the time in small spaces I'll bounce off of the floor, ceiling or walls and use negative fill as needed.

Check out
http://images.google.com/search?tbm=isch&q=bathroom
and see if you find a good reference photo
 
Hi:

I recently created a guide for requesting lighting advice and will say that you've included a good amount of that information here, which is helpful. What is missing for me is a sense of where the actors will be as well as camera placement, because in a space this small that starts to dictate the lighting approach.

I personally would not rely on available light unless you have a cloudless day and the scene can be comfortably shot within daylight hours, and the sun will never hit the window. Even then the only advantage is to minimize gear inside the room, which is relevant in this instance.

If you do decide to black out the window and start from scratch, I feel like you will end up fighting the 650 or 300 used for bounces in the middle of the room, having to shuffle them around for different shots, keeping them from flaring the lens etc. and thus I think your instinct to use Kinos is probably a good one (or quality LED panels if you have access to those) as they are self-contained. Make sure you have the louvres (aka egg crates, grids) for them to help control spill on the walls.

I think the placement of the primary instrument in the second drawing is better than the first--coming from the side will keep things from flattening out too much. You'll get a nice sense of directionality of light on the wall behind the tub, as it grades down in intensity away from the window wall. If you do feel that fill is necessary, I'd keep it as far to the right as you can to avoid flattening things out. It may feel most natural if you do a gentle ceiling bounce, or into the wall if you prefer it lower (for maximum spread you may even want to use a second Kino for the bounce rather than a fresnel). More natural still is to use a small passive bounce for closeups. It may be nice to suggest a little color difference between the two units, either add a 1/4 CTB onto the "window" unit or a 1/4 CTO on the bounce (will have essentially the same effect depending on how you grade the footage). If the bounce is a tungsten unit, you can dim it to achieve the same thing.
 
Thanks for the quick answers!

That's a nice guide, good that you point it out since it didn't cross my eye yet.
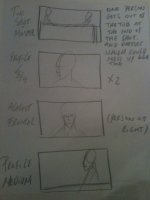
When drawing the floor plan I was thinking that I should add camera/actor(s). Anyhow, I made a very rough simple kid board/shotlist.

On the flagging part, it might make things a little more complex. But I think it's a better idea, I've only never really done this before (simulating daylight like this) which makes me a little nervous. We'll have like 3-4 hours before it's dark, and in between lighting will change drastically. Especially that last hour. Also if weather is like really dark it will create a look we aren't really looking for.

Thanks for the tip on the egg crate. I was also thinking of adding an extra diffusion over the kino. Would a ceiling bounce not feel like nighttime -like if there is light coming from a fixture of the ceiling-?

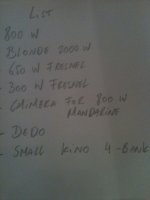
Following your guide I made a list (below) and where the actors would be (in the tub).

IMG_0252 kopie.JPGIMG_0254.JPG

I agree on the not flattening it too much, it creates a rather artificial look.

EDIT: Was thinking of a subtle colored floor bounce (dimly)
 
Last edited:
I have a few questions.

1/ Is the room in an apartment thats too high to utilise the window? My point is if its street level, I'd shoot the scene at night with full light control - I'd have to assume then that the window won't be seen.

2/ Whats the story? Romantic comedy? Drama? Action? Horror and whats going on with the actors at this point in the story, happy, confused, angry, messed up, psychotic etc.

3/ Any option for practical placement?

1) The room is indeed an apartment, and not at street/ground level. The windows won't be seen -which is not a problem at all-.

2) More like romantic comedy. Scene at that moment is happy - very happy. But would not want to overdo a romantic look - Subtle white-blueish-lightgrey colors while skin tones pop out (and maybe with a splash of light orange)- I'll try to find some references.

3) What do you mean with practical placement?


Thanks
 
Non-comedy, non-romance... I think I did this with two lights. One outside over the camera butted up against the ceiling. And one inside the bathroom pointed up to the corner for bounce, and then also using the mirror as well.
It's been a while since I did this shot, and I unfortunately did not record the exact placement of lights...

But I was using something like the Lowel 500W tota light 'kit' with 3 lights.

(I just snapped this frame from my finished film, and there is supposed to be a 'slight' blur... in case anyone was wondering...).

attachment.php
 
Last edited:
two words- china ball.

come up with a method to hang the china ball just out of frame. Use some blackwrap, duvetyne, or any black cloth on the sides of the china ball to prevent the light from going everywhere. I would try to hang the china ball so that it is lighting the actors from the "inside", from the side opposite the camera on your two shot. Hang it up against the back wall of the tub. Wrap it in black cloth leaving only the very bottom of the china ball exposed. Put it on a dimmer. Be careful with power around actors in water. Secure that light well lest it fall into the water and zap your actors.

by "practical placement" Noel means placing a light in the shot that is a "practical" light, a light that the room would believable have placed in the room. In other words, a "normal" everyday light such as a table lamp.

Avoid attempting to light the room for every shot. That is, demand that you are allowed to re-light for the different shots. The trick there is to alter the lighting so that it is best for each shot but not have it change so much as to be an obvious change in lighting.

One advantage you have here is that bathroom lighting is typically pretty toppy ( from above ) and flat. It's a bit expected that your subjects will be lit from above...expected that their faces will not be lit with low, frontal light. Even expected that their eyes will be a bit hooded...as in the examples below-

bathtub-scene_slither_1168.png


1500_what_lies_beneath.jpg


I would avoid any hard light unless it is from high above as it just isn't believable if there is not a window to motivate the hard light. A hard light from above would be believable as coming from a bare household bulb in the ceiling...but hard light from a high angle is very difficult to pull off and have it flattering for the actors faces.

Searching online I found this bathtub scene with two people facing each other, the scene appears to be top-lit with a soft source. Note how they are lit from above but also from the side opposite the camera. There is also a very subtle hairlight on each actor in the scene-

https://www.youtube.com/watch?v=JnCeVYmCYXY


Another way to light this is to tape the bounce against the back wall of the tub. Affix it to the wall so that it is at a 45 degree angle, leaning out at the top. ( put a piece of tape along the bottom of the card and then create two "straps" out of gaff tape that are attached to the top of the card allowing it to lean away from the wall at the top, allowing it to be pitched forward. ) Then hit the bounce with a fresnel from camera side of the scene. This gives you a source that is larger than the china ball. Just use the barn doors on the fresnel to cut the light so that it only hits the bounce card affixed to the back wall of the tub. This method also avoids the danger of a lighting unit hung directly over actors in a tub of water. Use the Dedo on the arm of a c-stand for a very subtle hair light on the singles of each actor. I'd make it almost imperceptible. Knock that baby way down with scrims, ND gel, or bobbinette ( black netting ). Diffiusing a light inside the light's own barn doors is a good technique for controlling light when you don't the ability to control the spill from the diffusion with flags. Making snoots for lights out of blackwrap or black coreplast is another great technique. Control, control, control. Always fighting the battle for control of the light.

If nothing else I would put the 300w fresnel on a stand near the camera and spot it into the wall opposite the camera, on the back side of the tub. Aim the light at the point where the ceiling meets the wall. Do you best to flag the lens.

You have encountered one of the most difficult situations in lighting- trying to light in a very small space without the light going everywhere. Controlling soft sources in a small room is highly challenging. Enjoy that challenge. If you have access to the lighting equipment perform some tests with different setups in your own home prior to the shoot.
 
Last edited:
Oh yes! I totally forgot what practicals meant in English. Of course!
But I think adding practicals in a bathroom would give a feeling of nighttime instead of daytime?

Also the examples you gave with light coming from above are very good for evening/nighttime but less for daytime I think. Or am I totally wrong and not understanding something?

I searched some references from films. They are not really references for framing but rather for mood - light (more or less) - colors
Mood 1.jpg

The first image is more or less how I would like the skin colors to be while also being an example of the softness - it could have a tiny bit of extra punch though.
The second image is more about the lighting. Where I would place a kino slight overhead at the right. Facing towards the wall of the tub and spilling some on the actors. I'm guessing I'll need a bounce since one kino-flo for emulating daylight will probably not be enough (small 4 bank). I'd probably as CharlesPapert mentioned place it as much as possible to the right -window side. I also might direct something to the floor as that is also quite natural in daylight.
The third image is more about the mood/colors in a more general way note that the skin tones should be warmer, providing a less dramatic and rather light - romantic look.

=> at least that's what I think I'm aiming for for this scene
 
Also the examples you gave with light coming from above are very good for evening/nighttime but less for daytime I think. Or am I totally wrong and not understanding something?

My example definitely was 'night time'.

One idea for doing the bathroom 'day' would be to put either a mirror or silver bounce in the actual window frame, Then point the light at that bounce. If one had the ability to 'focus' the light so that it shown on the bounce the light would read as if the sun is shining through the window.

The reason for 'reflect/bounce' would be that trying to put the light+diffusion to look like 'sun' in the window may extend the stands and equipment into the area of shooting.

I thinking a camera set up of near the door, pointed to the tub area, light over camera, but pointed to the bounce in the whidow, and blackwrapped such that there is minimal spill outside of what is falling on the bounce area.

This is pure a gedankenexperiment as I don't have the resources to check this out.
 
If you are going for a daytime look I would use the 300w fresnel to simulate a shaft of sunlight raking the back wall of the tub. Allow the light simulating sunlight to have a hard edge to it so that it appears to be cut by the frame of the window. If you go with that setup it's expected that the actor with their back to the window would be strongly backlit on the single while the other actor would be more front lit. Underlight the single shot of the actor with their back to the window in comparison to the single shot of the actor facing the window. I would try to have it so that the simulated shaft of sunlight did not hit the face of the actor facing the window. Just let that actor be lit from all the light bouncing off the back wall. So to recap- the 300w fresnel is cut on top and left side. Cut on top so that you simulate the top frame of the window and cut on the side so that it does not directly hit the actor facing the window. You could accomplish this cut with something as simple as a rectangle cut out of a piece of cardboard, the cardboard placed on a stand a couple of feet away from the 300w fresnel.

Something like this light-

rustic-bathroom-lit-sunlight-open-window-1081314.jpg

It might be that the only other source you need is a bounce card near the camera lens. If the single light and bounce is too moody try hitting the ceiling with the 650w to bring up the overall level of the room in relation to the shaft of light. Use the barn doors on the 650 and scrims to reduce it's output. Where you hit the ceiling with the light from the 650 can alter the look according to your desire. Aim the 650 at a spot above the actors- the result is more toppy. Aim the 650 at a spot on the ceiling opposite the tub and further over the camera- the result is more front fill.

Post some still frames from your shoot after you are done. Good luck. We are all pulling for you!
 
Last edited:
3) What do you mean with practical placement?

Thanks

Anything that is a light source within the shot. Lamp / candles etc.

Excluding that Ive drawn up some rough light diagrams and this may not be what I'd use as its entirely based on what you have at hand and also a few grip additions. Some of these I may change on the day based on looking at the actual space and is it working for me. Important to note this is how I'd approach it - the next person may be entirely different. Forgive my images - roughed them very quickly.

And FWIW I'd kill that MS profile unless you have a need to show that person as alone - lots of neg space in the frame. Seems counter intuitive for the theme.

Tough set up in this tight space. Lights would need to be adjusted for output to suit space.

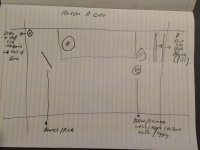
Image 1 - Master MWS - I'm not sure how familiar you are with some things so I'll add some definition to parts .

Siders are cutters / flags on the side of the light - these keep the light source going where you want it to go. Toppers / Bottomers - cutters / flags placed at top and bottom of lights.

MASTER.jpg

This is a 3 1/2 light set up. Id want to retain the window source a little for overall room ambience but need to ND down to match light outputs (if easier to cut completely then go ahead and so)- the amount will depend on time of day / position of room to external sun source etc.

1/ The key light - 800w with chimera - lots of control needed here - siders plus topper and bottomer with floppy - Very important to keep this off the walls / ceiling / floor. This light will also lneed an overhead cutter as close to talent as you can get and place to avoid the light smashing all over the back wall . I'd want it to be hitting from the top of the tub to top of heads only. Best place would be overhead of talent out of frame of course. This will help you retain some contrast. Also add CTO to suit your shot - but with camera at 4200 - you should be in the ball park.

2/ Fill light - Kino with right sider.

3/ Rim for Person A only - Dedo - position high and as far into the corner as possible. Make sure the barns are closed down and the light is pointed correctly. Adjust to suite persons position.

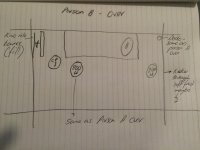
Image 2 - Person A over - MCU

Forgot to note this on drawings but for this and next shot - cut window entirely.

PERSON A OVER.jpg

1/ Key light - 800 w + Chimera - need your light controls here again per previous. Add egg crate if you have one.

2/ Fill - Kino into high bounce. Plus overhead cutter behind talent and out of frame.

3/ Wall light - the important thing with this one is to dim down to suit and make sure it's on the opposite side to key. You may also want to add a right sider to fine tune.

4/ Kicker - soft rim with bounce should get you there.

Image 3 - Person B over - MCU

Pretty much same as Person A over - though I've added a harder source through soft frost as back light to emulate window closer. I'd be putting your male the side (take that as a very generalised approach).

Just realised I didn't note it. Kicker will need cut as well though maybe just left sider.

PERSON B OVER.jpg

Adjust your outputs of each unit to get your ratios where they look good.
 
Thanks to the person who said to put a bounce board where the window is supposed to be.
It gave the best result as the bathroom was even smaller than I thought.

I took some phone pic's which I'll post soon when I have more time.

Also thanks all for the help, especially Noel with the diagrams. I will look into them later so I can learn some more.
 
IMG_0257.jpg

As promised. it's not very clear but you can see the bounce board. I will post some stills when I have permission.

Edit: No clue why the image is turned...

Happy Holidays!
 
Hi guys, I'm new here and a beginner in terms of lighting and everything else, I'm aware that you already shot the scene so there is not much you can apply anymore, however I was thinking about your scene and thought about placing a blind for example in front of the light on the far right where you flagged the window to make the blind shadows fall on the wall just above the actors, and then just bounce some light to lift the overall ambient light in the room. With the blind's shadow on the wall you will leave no doubt that it is day time and also you would have gotten rid of any flat look you were worried about.
having said that, this is just my humble opinion and in fact I have been reading the contribution from other ladies and gents and have learnt a lot already, so thank you
 
Last edited:
Back
Top