
jamesstone
Member
UPDATE:
Just a quick test run I did this afternoon, nothing fancy, just me and the dog.
http://www.stonehengemotionpictures.com/dollytest.wmv
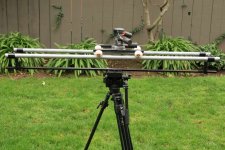
A while back I built a mini dolly to ride on some 1 1/2 " pvc we were using for our floor dolly. At the time the pvc was just strapped to a couple of plastic saw horses. So this got my thinking about making a better looking and functioning system.
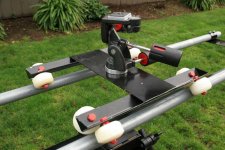
My first design consisted of 4" pieces of unistrut bolted to a 3"x12" pieces of metal. Then the pvc was secured with bungies. I fixed a 4" legnth of 3/4" conduit to it and welded on a bolt with a set screw. The intention was that the brackets could be mounted on C-stands, and with a bunch of these brackes you could run like a 20' track.
Well things change. I really didn't like the look of the unistrut, and our tracking shots never went beyond 10', so it was off to the drawing board.
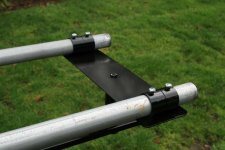
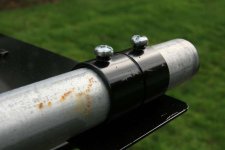
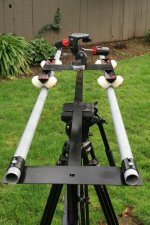
Instead of unistrut, I spot welded two 1" emt couplers to a new piece of 3x12" metal. I gound down then stop in the middle so that the 1" emt can slide all the way through. Now instead of bungies I use the set screws included on the coupler. I also reused the mounting post from the old design.

Presto a way cleaner and more professional looking unit.
Now for the support system. It's a distant dream of mine to own C stands, but I know it's probably not gonna happen. So I need a way to mount it to the tripod I allready own. What I did was to weld two 5/8" bolts to a 5' piece of 1/2x3" box tubing. The brackets attach to these posts. The I drilled a hole in the center of the box tubing and welded in a nut for the tripod base to mount to. On each side of the middle I welded on two flanges to help stabilize the unit on the base.
 All in all it's pretty good. The dolly rolls smoothly on the pipes.

Let me know what you guys think,
~James
Just a quick test run I did this afternoon, nothing fancy, just me and the dog.
http://www.stonehengemotionpictures.com/dollytest.wmv
A while back I built a mini dolly to ride on some 1 1/2 " pvc we were using for our floor dolly. At the time the pvc was just strapped to a couple of plastic saw horses. So this got my thinking about making a better looking and functioning system.
My first design consisted of 4" pieces of unistrut bolted to a 3"x12" pieces of metal. Then the pvc was secured with bungies. I fixed a 4" legnth of 3/4" conduit to it and welded on a bolt with a set screw. The intention was that the brackets could be mounted on C-stands, and with a bunch of these brackes you could run like a 20' track.
Well things change. I really didn't like the look of the unistrut, and our tracking shots never went beyond 10', so it was off to the drawing board.
Instead of unistrut, I spot welded two 1" emt couplers to a new piece of 3x12" metal. I gound down then stop in the middle so that the 1" emt can slide all the way through. Now instead of bungies I use the set screws included on the coupler. I also reused the mounting post from the old design.
Presto a way cleaner and more professional looking unit.
Now for the support system. It's a distant dream of mine to own C stands, but I know it's probably not gonna happen. So I need a way to mount it to the tripod I allready own. What I did was to weld two 5/8" bolts to a 5' piece of 1/2x3" box tubing. The brackets attach to these posts. The I drilled a hole in the center of the box tubing and welded in a nut for the tripod base to mount to. On each side of the middle I welded on two flanges to help stabilize the unit on the base.
Let me know what you guys think,
~James
Attachments
Last edited:


 rogar-Evil(DBG):.