lighting with on-screen practicals?

Can someone speak up about how to do this on the DVX100 without getting blown out whites? Is it perhaps only possible with low light capable cameras, or maybe this look is only for making high key / low contrast images?

User " Perrone Ford" posted a reply to a related question, a while ago, that ended up being basically a mini- lighting tutorial, about lighting the set (over focusing on the talent), and using practicals to light- Ive been searching and haven't found it yet.

Thanks :D
 
Fundamentally, you are doing two things...

1. Creating "Pools" of light so that your talent is able to move through the places you've blocked out, and stay lit within tolerances.
2. The practicals that you are lighting with, and the dark places in the scene, both need to be within the dynamic range of the camera, and within the contrast scheme you have set.

In other words, if you don't want any area in the room to be less than F4, and your practicals are reading F8, then that is going to be within the dynamic range of practically any camera. If you set your key at F8, but the light falls off to F1.2, then you're going to have a real problem if you don't want anything in the room to read "black"

Make sense?
 
I think he's asking what you have to do to keep your practicals from then blowing out. Usually it's pretty difficult to use the practicals to actually light the scene and to have them also be within the dynamic range of your camera as well. It is doable though.

You can do a bunch of different things.

For cameras that are light hungry - Put all of your practicals on dimmers, use them to motivate the light in the scene, but don't really use them to light the scene. From here you sneak small lights in from outside the frame to light your actors.

Again for the light hungry cameras you can just put bigger bulbs in your practicals, as long as they can hold the load. You can find up to 500 watt bulbs that fit in the normal edison socket, so as long as your actors are close you should be fine.

From here on out, here's a few ways you can keep your practicals from blowing out.

Streaks n Tips. - It's a hair product that they use to temporarily change your hair color. If you get black you can spray it on one side of the light bulb and you can clean it off later. This will keep the front of the lightbulb dimmer than the sides and so you'll light your talent, but it won't blow out on camera.

The other thing you can do is just use small cuts of ND gel. Same concept as streaks n tips, but again you just put it on the front of the bulb. If you can find a good way to apply it, it's more versatile as you can use ND .3, .6, or .9 depending on what strength you need.

You can also just frame out the practicals! Easiest way to go about it.
 
Go out and either get dimmers or buy 20-30 watt lamps to stick in practicals. If you scout out a location early, it's not hard to have the correct lamps on hand to replace with.
 
Matching overall scene levels from key to practicals to fill so as to fit within the DR limits of your camera is the primary approach. There are many possible ways to achieve this depending on the look you want. Experiment! This is one reason I still use a light meter even with modern video cameras. A decent combination incident meter/spot meter gives you an absolute reference measurement of your contrast range and also acts as a guide to exposure settings. A histogram, Zebras or waveform monitor are useful guides, but on camera LCD's and EVF's typically are not. You often capture more range than small monitors can show. Allowing a practical to burn out a bit in the extreme highlights is not necessarily a bad thing as long as the rest of the scene is in balance and actors are appropriately illuminated.
 
Similar to what Razz16mm wrote above, I pretty well said the same thing in your other post "What should MARKER read on your darkest darks?". 1.) Set your overall exposure using your camera tools or external monitor (waveform monitor common with some of them). 2.) Use your light meter to check ratios between background, foreground, midground/subject, and lighting ratios on face between key to fill.

The only thing I want to add to this post is that lighting with practicals is really hard to do with the digital medium unless you are shooting raw and can push the image several stops in post. I have this argument repeatedly with individuals who claim to be professional and have shot on film, etc.. etc.. but what most of these DOP's or gaffers don't realize is that you can underexpose film by 3 stops and still get a usable image out of it, so lighting using practicals on film is a totally different universe compared to lighting using practicals when shooting digital.

My advise, you can have practical light in your scene but you will almost always need to raise the overall ambient in the room to get a good clean image (IRE 15-20 for dark) and 60-70 for faces. If anyone doubts this, then a good little test to try is to take your light meter and meter near your practical light, then head over to the opposite side of the room and take a reading. If your meter even manages to take a reading, I guarantee it will far exceed a 4:1 lighting ratio.

:D
 
A lot of lighting cameramen I know carry the Ikea 300W squeezer (about $8) for their practical dimming and have PH211, PH212 and PH213 (all about 3200K) bulbs to cover most situations. As Perrone said, depending on what you want to see (and not see), you need to watch your ratios. That means you need to know the limitations of the camera and work to the subject matter you're shooting. There are as many justifications for shooting high ratio as there are for shooting low ratio and flat. Every shoot has its own demands.
 
Thanks a million everyone. I originally wanted to do a Kubrickian light-bulbs-in-shot thing, but am quickly learning that it may not suit my purposes, current skill level, and as I suspected, my camera. Maybe someone else can rock it, but for now...

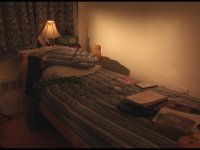
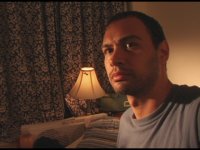
Any words on these shots?

I put a 25 watt in the practical, there's a 200 Watt Lowel pro-light, really close, as key, and a 350 watt floodlight bounced off the far wall for fill. In the wide I exposed the walls to go under 100 percent zebras, and checked the marker to try and get the shadows around 20-30 ish. In the close shot I exposed using 80 zebras on me, and I think the wall was ok (actually I might have stopped down a tiny bit so Im under 80). I feel like I must be doing something wrong if (I think) I'm correctly exposed at the same time that my white walls are. In Vegas I upped the contrast a bit with a gentle S-curve.


And yeah, it's me. So embarrassing.
 

Attachments

  • warm room 2a.jpg
    warm room 2a.jpg
    50.4 KB · Views: 0
  • warm room 2b.jpg
    warm room 2b.jpg
    64 KB · Views: 0
Not awful, but does the quality of your supposed key light in the scene match the quality of the light hitting your face? Try softening it up a bit and backing it off. It looks very sourcy now, like it's coming from a light off screen...and it's too hard to wrap that far around your face if it's supposed to coming from the light in the back.
 
I think the problem is you are trying to light a scene without any actual motivation going on. By that I mean, what is taking place in this scene? That might help a bit...
 
Thanks all, I get it now. I've been largely ignoring motivation until now. Just got a softbox for my Omni (actually two, a medium and small), so, happy about that.
 
Can someone speak up about how to do this on the DVX100 without getting blown out whites?


One thing you can do is to use your zebras to determine how far over your exposure can go and still retain detail. Do a test with your camera,

to find out at what % zebras you will loose all detail. If your camera has a preset for the zebras--set it for the % that just holds the last detail

of highlight. Then read your practicals(or your brightest areas) with the zebras--set the exposure so that the zebras just come on in those

areas, and you'll have detail. Add your other lights to balance. Carry some different wattage bulbs with you to have brightness options with

your practical lamps--the translucency of lamp shades will vary.
 
sound of crickets. <tumbleweed blows by>

yikes. these must look awful.


Oh, I see--you were using your zebras! Your lighting is not awful.
It's not believable that the lamp would put that much light on the wall. The brightest part of the lamp--directly
under the shade-- is not even as bright as the wall. If you're going for low key, reduce the light hitting the wall.
If you're going for a little higher key, put a brighter bulb in the lamp. You just need to learn about balancing your practicals with
your movie lights. As far as the light on you--it's not bad. Sometimes you have to cheat the direction of the light, or have an
unexplained source.
 
Back
Top