Lighting a room and a ballroom

trueindie

Active member
I'm not a cinematographer. I like to think I'm a director. Probably not that either.

I watch a lot of cinematography videos. Almost all of them talk about three point lighting. I've watched so many of these videos that I've almost come to hate three point lighting. In fact I can't stand it any more. I don't want to watch another video on hair lights. I want to know how to light a room, not a built set with lights on the ceiling, but an actual room, like a living room. Is there any video out there or training out there on this subject?

If there isn't any such videos anyone is aware of, but if people have some advice, I would like to know how to light these two particular situations:

1. Square Room:
800sq ft
Large windows on one side letting in ample sunlight

2. A Square Ball Room.
5000sq ft
20ft ceilings. Giant windows on one side letting in ample sunlight.

Shooting with T2i, at ISO 200 or 400, at 24fps at 1/50 shutter speed
17mm 2.8 Lens, so a lot of the room will be in view, at about f/6
Shoot will occur on a sunny day. Most of the background will be visible for most of the shoot. Very few close-ups.

Light Kit: 4x1000 LED lights. 2x300 LED lights. 8x160 LED lights. 2x300W Fresnel lights. Unlimited amounts of bouncers and stands.

Shoot will mostly take place from the window side, i.e. window will not be in shot.

If further clarification is required, just ask. If I've failed to be clear, it's probably because I'm not a cinematographer, and I hope you will excuse this shortcoming. I'd be most grateful for any advice. Even if it is just a pointer on possible things to look out for.

Many thanks and best regards,
Aveek
 
Lighting big wide shots is extremely hard, especially with a cheap camera that cannot really dig into those blacks or hold highlights.

I guess in movies such shots are often done at great cost firing large lights in through the windows and changing the practical fixtures (existing lights) for more powerful versions.

For close ups the lights may be further augmented with fill lights or reflectors moved around on a shot by shot basis

BTW I call shooting away from the windows "Dead" because the frame does not lead anywhere.
 
Apart from rigging your LED panels to the ceiling in order to generate some ambient levels, you're not going to get very far lighting a 5000sq ft ballroom with that lighting package (especially at 200-400 ISO). You'll have to rely on the ambient light coming in from the window, and then accent it and compliment it by placing the fixtures you do have on your key talent (or whatever it is you want to focus on).

Also, by having the window behind your camera, you'll have a frontal key for all of your talent, which is fine, but won't give you the sort of shaping across faces that a reverse keyed backlight or sidelight might give you.

My advice is simple, get yourself a gaffer. Most will do independent projects for discounted rates if you're very polite and they aren't booked on those dates.
 
Lighting big wide shots is extremely hard, especially with a cheap camera that cannot really dig into those blacks or hold highlights.
Tell me about it :), but hey I gotta live in the world of my budget right.
BTW I call shooting away from the windows "Dead" because the frame does not lead anywhere.

I don't understand this. Could you please elaborate? thx.

Apart from rigging your LED panels to the ceiling in order to generate some ambient levels, you're not going to get very far lighting a 5000sq ft ballroom with that lighting package (especially at 200-400 ISO). You'll have to rely on the ambient light coming in from the window, and then accent it and compliment it by placing the fixtures you do have on your key talent (or whatever it is you want to focus on).

Also, by having the window behind your camera, you'll have a frontal key for all of your talent, which is fine, but won't give you the sort of shaping across faces that a reverse keyed backlight or sidelight might give you.

My advice is simple, get yourself a gaffer. Most will do independent projects for discounted rates if you're very polite and they aren't booked on those dates.

I loved your advice. I've got a good buddy of mine who's been a gaffer on a few hollywood productions. I'm going to force him to help me. He's going to have no choice in the matter. To hell with being polite. :)

Could you also kindly explain the "reverse keyed backlight" statement please?

Thanks so much for the response guys.
 
Motion is 2d we try to create a 3d illusion, shooting the 'dead' side of the room the scene lacks depth, with windows and the like the shot has more 'depth'; this is not technical - it is artistic.

As mentioned above shooting straight on to windows can also lack the sculptural modelling of light compared to shooting at 90 or 45 degrees to them if they are the key light.

As for your budget. One of the skills of low budget is to find scenes that will work, or ways of shooting them - this is a hard one, I wonder why the story is best told mainly in a wide shot - most are not.
 
Could you also kindly explain the "reverse keyed backlight" statement please?

A reverse key is where your key light comes from behind the talent, and is then bounced back at them to illuminate their features. Gives the talent a nice strong backlight that can really make them 'pop' on the screen.

Here's a shot from a scene I lit this week :

fZLWMk7.jpg


The sole key light source is a four-bank Kino up high and behind the actors, fill comes from a reflector on the camera side of the actors bouncing the light back on our moustachioed friend's face (with a little extra kick provided by the candlelight flicker from the table).

This is a reverse-key light.
 
Motion is 2d we try to create a 3d illusion, shooting the 'dead' side of the room the scene lacks depth, with windows and the like the shot has more 'depth'; this is not technical - it is artistic.

As mentioned above shooting straight on to windows can also lack the sculptural modelling of light compared to shooting at 90 or 45 degrees to them if they are the key light.

The subjects will be at 90 degrees to the window, which will be the key. The camera angles will be at 45 degrees to the window.

As for your budget. One of the skills of low budget is to find scenes that will work, or ways of shooting them - this is a hard one, I wonder why the story is best told mainly in a wide shot - most are not.

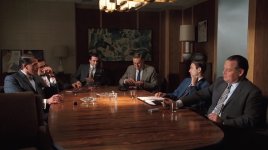
This is a 75 to 80 minute film. 70% of the film is two people talking to each other. The other 30% is three or four people talking to each other. In trying to figure out how to shoot such a talkie movie, I looked at a few shows where people are talking to each other, and not much action happening. I watched "the sunset limited" and a couple of other movies (can't remember them now), whose style I decided against. I decided that I liked the style of "Mad Men." Things are shot wide, from the waist level. Almost no depth of field, unless there is a close-up. Characters are allowed to move about with ease, sit down, shuffle papers, pour drinks, etc. Things are generally lit quite uniformly. There are not really that much play with shadows in the office room, unless called for because of the situation.

That's the look I want. My location, the rooms, are also quite interesting and quite beautiful, and I want to show it off, because I think it adds to the situation in the film.

That is the reasoning for my decision. Hope I was able to explain myself.

Also, I wanted to mention that I like shooting with multiple cameras. This film will almost certainly be shot with at least 2 cameras, if not 3. If anyone has any pointers on that, I'd love to hear that also.

Here are examples of three of my shorts (Not trying to plug my films, just giving you guys some context on my abilities. You may think they're lacking, and advise me appropriately. That's what I need and want):
http://www.youtube.com/watch?v=pWnEYxFSfq0
http://www.youtube.com/watch?v=-hCh6CJI77g
http://falsestudios.com/clips/flow/bl.html

Thanks so much for your time and kind advice.
Best,
aveek
 
Last edited:
A reverse key is where your key light comes from behind the talent, and is then bounced back at them to illuminate their features. Gives the talent a nice strong backlight that can really make them 'pop' on the screen.

Here's a shot from a scene I lit this week :

fZLWMk7.jpg


The sole key light source is a four-bank Kino up high and behind the actors, fill comes from a reflector on the camera side of the actors bouncing the light back on our moustachioed friend's face (with a little extra kick provided by the candlelight flicker from the table).

This is a reverse-key light.

Thanks for explaining that. Fantastic really!

How come the lighting in this scene has so much volume? What I mean is that on the top left corner, I can almost see the light itself. What is the secret to achieving that kind of look, should I wish to do it?

Thanks again,
Aveek
 
Yes you should wish to do it. The easiest way is with fog. Flaring the lens can have that effect too, but it's not easy to control. I'd also want to hear how Grug did it in this very nice shot :)
 
Thanks for explaining that. Fantastic really!

How come the lighting in this scene has so much volume? What I mean is that on the top left corner, I can almost see the light itself. What is the secret to achieving that kind of look, should I wish to do it?

Thanks again,
Aveek

Yes you should wish to do it. The easiest way is with fog. Flaring the lens can have that effect too, but it's not easy to control. I'd also want to hear how Grug did it in this very nice shot :)

Well guys, you've pretty much collectively answered your question there :) Aveek, in the top left hand corner the reason you feel like you can almost see the light itself - is because you can almost see it! The stand supporting the light is probably less than an inch out of frame, and the fixture itself is very close to the top of frame - which is creating a slight veiling flare in that top left corner.

The effect is heightened by shooting wide-open at T/2.1 on the lens, and the rest of the effect comes from the use of some light diffusion (Black Promist 1/4) in front of the lens.

Samuel, you guess right with the fog. I used a haze machine on almost every shot in this film (with the sole exception of this scene I think - where circumstances got in the way). Having used so much haze in the rest of the film, I wanted this scene to match - so because I couldn't use the haze on this occasion, I flared the lens slightly to get a similar veiling effect to the light.

And that's pretty much all there is to it: a reverse key light, light diffusion, and a slight flaring of the lens. Try it on your next shoot and see how you go.
 
Then congrats: you got a really outstanding result for a no-fog shot. I guess the very well suited composition helps the flare work particularly well as "air density". Very nice.
 
The subjects will be at 90 degrees to the window, which will be the key. The camera angles will be at 45 degrees to the window.

You're all set. That will look great.

Something that is missing from this conversation is any discussion of mood, tone, feel. You can't hope to ask or discuss how a lighting setup should be done without this. The ideal would be if you found a frame grab or a photo or even a painting that shows the vibe you'd like to emulate, and at that point the practicality of how to achieve it can be addressed. In many indie circumstances, the choices are limited based on the specifics of the location, gear and crew available etc. so it may require some reverse engineering...but there are still so many ways to skin a cat.
 
The ideal would be if you found a frame grab or a photo or even a painting that shows the vibe you'd like to emulate, and at that point the practicality of how to achieve it can be addressed.

This is such a beautiful sentence, I cannot begin to tell you. In fact it's one of the most beautiful sentences I've ever read in a filmmaking forum.

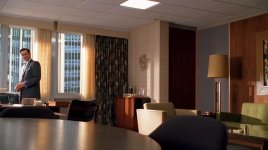
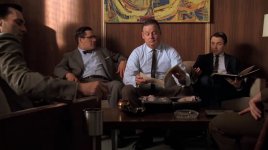
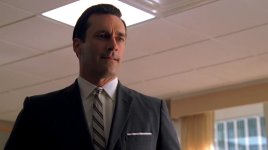
Here are some pictures: Please address each and every one of them if you like.

MadMen_ConferenceRoom.jpgMadMen_DraperRoom.jpgMadMen_Draper_Office.jpgMadMen_Draper_waist.jpg

Thanks so much.
Best regards,
Aveek
 
This is such a beautiful sentence, I cannot begin to tell you. In fact it's one of the most beautiful sentences I've ever read in a filmmaking forum.

Here are some pictures: Please address each and every one of them if you like.

View attachment 76510View attachment 76511View attachment 76512View attachment 76513

Thanks so much.
Best regards,
Aveek

Just to make sure, you realize that those scenes from "Mad Men" were shot on a stage and every light in there is highly controlled?

That being said, in situations like you described in the OP, I would suggest the approach of going from wide to close. By that I mean, shoot your beauty long shots or establishing shots when the ambient light from the windows is perfect; lighting the room exactly the way you want it. Use your lighting kit, which, actually, ain't that bad of a kit, to agument the natural light and establish the look and feel that you want. Don't sweat mixed lighting. I think using lights of different colors is a great way to add depth and faciltate visual direction. So, establish your scene geography, get your talent into place, get them making any big moves or changes in location within the scene, shoot basic coverage of the wide scene to give flexibility in editing and get the talent out of the scene; all in the wide beauty shoot (As appropriate). Don't shoot multiple takes of a the wide master; that is just a waste of time.

Once you have the appropriate coverage of the wide beauty shot, start moving in on the scene, shooting your mediums, two shots (or what ever) and CUs. Bring in your lighting gear and match the closer shots to the master as best you can. There is a lot of leeway, or creative liscense, when lighting the closer shots in a situation like this but you do have to be kind of rational about it. As you move in closer, and that light from the windows radically changes (As it will), you end up in CUs, which are, realatively, much easier to light and control to match the rest of the scene. By the time you get to you CUs, it could be dark out side and you can still keep shooting.

Thanks for taking the time to write all of that. I truly appreciate it. Thanks for letting me know that it's okay to have different colored lights, and allaying some of my fears that even if the light from outside changes, if things are planned properly, everything will still be alright, even with the changing lights. One DP was trying to instill the fear of God in me that lights changing outside meant that I might have to shoot on a different day to ensure continuity. I thought he was crazy. I'm not making Citizen Kane or some sort of masterpiece for god's sake. It's a goddamn independent movie.

Yes, :) I'm fully aware about how Mad Men is shot. I've done quite a bit of reading on the subject. I know I won't be able to recreate Mad Men, I'm just using Mad Men as my approach to how I frame, more than how I light.

Also, I'm glad you feel my light kit isn't terrible. I'm adding a couple of 650W fresnels to the mix before the shooting begins.

Thanks again. Really appreciate the guidance.
Best,
Aveek
 
The saving grace (here in the UK at least) is that the vast proportion of real house rooms, and business premises have textured white ceiling finishes, and if you want soft and even light to fill in your keys and effect/modelling light, then simply throwing some light on the ceiling works as a big reflector. Certainly not 'art' lighting, but it does give you even downlighting from near to far. Any form of direct lighting often falls down purely because the camera sees the rapid drop off in light levels as the distances increase. Thank God for white ceilings!
 
Hi, sorry I haven't been able to comment since you put the pictures up.

David Smith's post above is quite solid. I would suggest this about not doing too many takes of the master (from a directorial standpoint): while it is true that sometimes people get hung up about this and it is often the least-used shot of a sequence, the reality is that it is something of an on-camera rehearsal, it's an opportunity to tune and shape performances and "find" the scene before you go into tighter coverage. Not to say that all scenes need it, but I have watched many directors do what seems to be a nonsensical number of masters and then a much more limited number of takes of closeups because they have the performances where they want them, the actors are locked in. Not to say that this is the right or wrong way to do it, but it is done.

From a lighting standpoint, something that can be drawn from the Mad Men stills is that the ambient daylight is punctuated with a certain amount of sunlight here and there (again, we all know it's shot on stage and lit from scratch, I'm talking about the result). While it's usually better to push the sun hits from outside to allow for the natural cut of the window to shape the light, it can be done from inside as well. I've used PAR cans and Source 4's to add hot splashes of light through a room. A popular approach that I use a lot (as does Chris Manley over at MM, at least in this pictures) is to top-cut the light to avoid hitting the actor's neck and head but letting it play on the body. This adds some dimension and also it tends to look more realistic, as it's tougher to simulate sun on a face than on the body. Just one of those things. You can use a solid for a complete cut, or diffusion in a frame to still allow the source to play on the face but in a more subtle way than the hard light.

I'm not sure what kind of LED's you are using, I'm guessing they aren't punchy spot-type, but if they were or if you had access to other units, you can line them up at the window and use them to add accents to walls, pillars, bodies etc as you see fit. The more back-y they are (off axis to camera), the better they will tend to play--90 degrees or more is best.

As I think I mentioned before, having the windows face north or south is ideal because you will be able to maintain a fairly consistent level (depending on how close the adjoining building or trees is that may reflect into the room) for much of the day. Several scouts at different times or at the very least using a compass or sun app wil help you learn how long you have for a solid shooting timeframe.

This is an example of a classroom look I did last year that is less dramatic than the MM clips but still utilizing a side-lit window feel. Because we were scheduled to shoot until after dark, I blacked the side windows and recreated them with a length of ultrabounce lit with a series of three or four 2K blondes to create the ambient daylight. A brace of PAR 64's with narrow bulbs clustered towards the back corner of the window pushed a series of highlights across the students. Finally an M18 with full CTO was set in a corner to the side of the teacher with a half-grid topper to pop him out a bit. The ceiling tubes were changed out to Kino FLo 32's. It's a simple look but sells what it's supposed to be.
 
Last edited:
This is an example of a classroom look I did last year that is less dramatic than the MM clips but still utilizing a side-lit window feel. Because we were scheduled to shoot until after dark, I blacked the side windows and recreated them with a length of ultrabounce lit with a series of three or four 2K blondes to create the ambient daylight. A brace of PAR 64's with narrow bulbs clustered towards the back corner of the window pushed a series of highlights across the students. Finally an M18 with full CTO was set in a corner to the side of the teacher with a half-grid topper to pop him out a bit. The ceiling tubes were changed out to Kino FLo 32's. It's a simple look but sells what it's supposed to be.

Lighting be damned, that skit was hilarious! (but thanks for the lighting plan breakdown, it worked a treat)
 
Hi, sorry I haven't been able to comment since you put the pictures up.

David Smith's post above is quite solid. I would suggest this about not doing too many takes of the master (from a directorial standpoint): while it is true that sometimes people get hung up about this and it is often the least-used shot of a sequence, the reality is that it is something of an on-camera rehearsal, it's an opportunity to tune and shape performances and "find" the scene before you go into tighter coverage. Not to say that all scenes need it, but I have watched many directors do what seems to be a nonsensical number of masters and then a much more limited number of takes of closeups because they have the performances where they want them, the actors are locked in. Not to say that this is the right or wrong way to do it, but it is done.

I actually plan on a large percentage of wide and medium shots. I took a look at "the sunset limited (environment: closed room)" and "my dinner with andre (environment: open restaurant, but immediate wall background)," and there's something claustrophobic about both films. While I love Tommy Lee Jones and Sam Jackson and feel that both have great expressions, all the close-ups in "the sunset limited" didn't really seem to work.

If you look at "Mad Men" and "Rope," both are shot wide or medium, both in closed environments and shot mostly from the waist level (Mad Men almost exclusively so. You'd be hard pressed to find an eye level shot, unless someone is sitting down). "12 Angry Men" is also shot in a closed environment, but almost all shots are eye level, or higher. But this too has a lot of wide shots, and some close-ups during dramatic moments. But these three films all have an open feel to them, although the action is taking place in closed environments. "12 Angry Men" is kind of the scenario I'm working with for almost 70% of the movie. I feel like I can't have too many close-ups. The wide shots are not really for the purpose of "beauty shots" but more for the "feel." This is my thinking at the moment. And I like the waist level shots of Mad Men and Rope. It's not dramatic, but it makes the characters feel a little larger than yourself. Again these are just my conclusions and thinking at the moment, and how I'm approaching the shoot.

If anyone has any input on the framing including use of close-ups and wides, I'd love to hear it. If my conclusions from what I wrote above seems nonsensical to you, I'd like to hear about it. Framing is almost the most important thing to me when I'm shooting anything, or just thinking about a shot. I'd like to know very much if you think there's something wrong with the way I'm thinking.

From a lighting standpoint, something that can be drawn from the Mad Men stills is that the ambient daylight is punctuated with a certain amount of sunlight here and there (again, we all know it's shot on stage and lit from scratch, I'm talking about the result). While it's usually better to push the sun hits from outside to allow for the natural cut of the window to shape the light, it can be done from inside as well. I've used PAR cans and Source 4's to add hot splashes of light through a room. A popular approach that I use a lot (as does Chris Manley over at MM, at least in this pictures) is to top-cut the light to avoid hitting the actor's neck and head but letting it play on the body. This adds some dimension and also it tends to look more realistic, as it's tougher to simulate sun on a face than on the body. Just one of those things.

This is fantastic info. I noticed that on Mad Men (I watch it over and over again, if you can tell), and I was wondering why they did that. I thought maybe to suggest time of day. It makes so much sense now :).

I'm not sure what kind of LED's you are using, I'm guessing they aren't punchy spot-type, but if they were or if you had access to other units, you can line them up at the window and use them to add accents to walls, pillars, bodies etc as you see fit. The more back-y they are (off axis to camera), the better they will tend to play--90 degrees or more is best.

They're not punchy spots. Definitely not. I'm beginning to think more and more that I will have them behind the camera to augment the sun when it needs augmenting, and use the Fresnel's from a distance as fills. All the little itty bitty LEDs can hide behind the furniture to accent different parts of the room where it makes sense.

As I think I mentioned before, having the windows face north or south is ideal because you will be able to maintain a fairly consistent level (depending on how close the adjoining building or trees is that may reflect into the room) for much of the day. Several scouts at different times or at the very least using a compass or sun app wil help you learn how long you have for a solid shooting timeframe.

In one of the rooms, the windows face south. In the other, the windows face West, but there is a large building shielding us from the Sun

This is an example of a classroom look I did last year that is less dramatic than the MM clips but still utilizing a side-lit window feel. Because we were scheduled to shoot until after dark, I blacked the side windows and recreated them with a length of ultrabounce lit with a series of three or four 2K blondes to create the ambient daylight. A brace of PAR 64's with narrow bulbs clustered towards the back corner of the window pushed a series of highlights across the students. Finally an M18 with full CTO was set in a corner to the side of the teacher with a half-grid topper to pop him out a bit. The ceiling tubes were changed out to Kino FLo 32's. It's a simple look but sells what it's supposed to be.

Hilarious bit :). Thanks for describing the setup, it helped me see it as I was watching.

Thanks guys. Shoot is coming up 1st week of November. I'm in the middle of finalizing the dates with the hotel I'm supposed to shoot in.

Brilliant forum. Lots of people with lots of practical advice. It's so lacking when talking to the every day filmmaker. It's almost heart breaking.

Cheers,
Aveek

ps. Charles, I read your excellent posts on two camera setup in the sticky. I was wondering if you used multiple cameras in the skit in the link.
 
Last edited:
ps. Charles, I read your excellent posts on two camera setup in the sticky. I was wondering if you used multiple cameras in the skit in the link.

Oh, you got through that endless manifesto? Congrats! Ha. Yes, we used two cameras on that sketch; probably 95% of everything we shoot on Key & Peele is two cameras/no waiting. That kind of lighting setup allows for a lot of two camera possibilities, since it's not particularly "delicate" i.e. only works from certain angles without relighting.
 
Back
Top