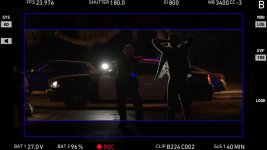
Key & Peele - Behind the Scenes with DP Charles Papert

From the last episode of the season:


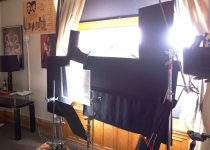
In this one I was going for a naturalistic afternoon vibe. The room at the location had an adjoining sunroom which gave me a reasonable sized window to light through. The tricky part was that we had decided to master the scene with the windows essentially behind (actually just to the side) of camera, so the challenge was to avoid a flat looking scene. A 6K through a window at the back corner of the room provided a little soft back edge, and for the key I pushed in some hot sunlight via a couple of 4K HMI's, delivering splashes on the pool table and actor's bodies, while keeping their faces slightly under key to create some contrast. This required a rather complicated array of gobos:

PontheC.jpg

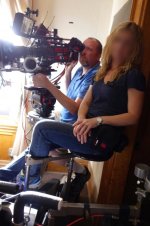
The odd-shaped piece of showcard at top left was to help level out our man Keegan who was positioned between guys with both darker clothing and skin tones. What's tough about sending two lights through a single window is that a gobo from one can start to affect the other light and it becomes a house of cards. And of course the cameras were positioned perilously close to the window!

pontheccamera copy.jpg

Jordan's side was much simpler; we buried an M18 high up in the corner spotted in on the sofa to continue the background heat and reshaped the sidelight through the window.
 
Last edited:
Another from the final episode:


The church location was quite manageable, as the windows opened to a hallway rather than the outside world so they were easy to control. We pushed a head through each window (2K open face or Maxibrute) and ran ultrabounce under the heads which we then frontlit so the windows would read hot to camera. The shaft coming from the left towards the pulpit was a Xenon, which deliver punch and a controlled beam.

The most fun part of this sketch was creating the period footage that was projected on the screen (actually a post effect). While it would have been fun to shoot these on film, we used our usual Alexas for budgetary reasons. I lit with big eye fresnels with no diffusion as would have been done in the day (theoretically the exteriors would have been arcs, but once again...budget...). Since we knew we were delivering in black and white, I could use a 10K outside without worrying about mixing color temperatures. I'm especially fond of the hard shadows on the wall at 1:30!

With all of the projector effects and altered contrast it's not as easy to tell, but from the camera originals with just the color stripped out, we were all amazed at how period-looking the material looked. I've had a lot of fun over the past three seasons recreating classic film looks with the Alexa, it really gives such a flexible and filmic image. Of course credit must be given to our colorist Steve Porter who is able to work the magic!
 
Last edited:
Well, season 4 of Key & Peele has begun, with episode 1 airing last Wednesday. This will be a 22 episode season which is far longer than any so far, split into two chunks of 11 episodes. We are currently shooting the back half now.

The season opener featured the following:


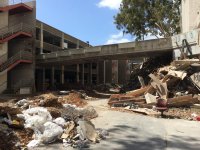
We were very lucky to find a fantastic location that needed very little art direction, a shopping mall that had been partially demolished and then abandoned:

deadmall.jpg

Our fantastic art department added graffiti and we pumped in smoke and voila, big production value!

We shot this one essentially in order, and because this was our second sketch of the day (we generally shoot two a day), we began under the unforgiving mid-day sun which would not have been my choice by any means! With the amount we had to shoot, I couldn't consider bringing in overhead nets so had to simply embrace the contrast, and added a little fill into the shadows where necessary. As the day wore on, more of the environment fell into shade and I was able to shape things a bit more via a 12x12 with M90 (9K HMI), which I'd generally use as a side or back edge. A #2 blue streak filter added some mock-anamorphic texture.

On a much more everyday level, this sketch:


We shot this in the historic Herald Examiner building in downtown LA, a wonderful 100-year old structure built by the same architect as Hearst Castle. Since the titular newspaper's demise 25 years ago, the building has been used for film shoots and houses a number of well-worn standing sets (the police station was used for Usual Suspects and more recently Brooklyn Nine-Nine). This sketch was shot in the top floor suites which were presumably used by William Randolph Hearst back in the day. While I had natural ambient side light to work with through the numerous lead glass french doors, I wanted to shape things a bit more and aimed two M40's down at the ground to create the sense of sunlight bouncing up into the actor's faces, particular on Jordan (as Stan Lee). A couple of M18's sliced past the M40's to create heat on the back walls to further sell the sense of sunlight. I was happy with the way the effect turned out, but after we had done a number of takes, at a certain point the level seemed to increase on Jordan's face. I kept walking into the room to check to see if the sun had come around and was glinting off a building, if a diffusion frame was dropping, any clue as to why the values were changing throughout the scene. Finally, I realized that each time he threw a picture off the easel it was landing on the floor in the hot floor skip from the M40, creating a slowly enlarging white bounce on the mid-tone carpet! On the early takes a prop man was scooping up each picture as it landed but he apparently gave up once we got into the closeups, which was when the problem emerged. If you look closely in Jordan's glasses in the closeup, you can see the reflection of the pictures lying on the ground. The exposure change is relatively subtle, perhaps 1/2 to 2/3 of a stop when all is said and done, but it was enough to mess with my head! Had I been able to attend that color correction session I would have likely made an attempt to equalize the values on his face and the wall behind him, but I was otherwise engaged so, no such luck.

New episodes every Wednesday, and several sketches will be posted online from each show.
 
Last edited:
Dark comedy! Looks great. I loved the lighting on the Ty Burell Nazi scene... nice deep frames and great angles. I also think the car stuff on the desert looks fantastic.
 
Keep it coming Charles, I love what you've done and your break down and thoughts are hugely informative - good stuff
 
Dark comedy! Looks great. I loved the lighting on the Ty Burell Nazi scene... nice deep frames and great angles. I also think the car stuff on the desert looks fantastic.

Thanks! Here's that Nazi sketch:


Car stuff--I keep meaning to edit some BTS video I shot of this to put up. We shot the exteriors of the car in the desert, and the rest was shot rear-projection with 5 cameras simultaneously (the background plates were shot on the exact same stretch of road). This allowed us to roll much longer takes and no-one had to bake in the heat. Tremendous lighting challenge to make all 5 angles look good and not wash out the projection screens!
 
Last edited:
Thanks! Here's that Nazi sketch:


Car stuff--I keep meaning to edit some BTS video I shot of this to put up. We shot the exteriors of the car in the desert, and the rest was shot rear-projection with 5 cameras simultaneously (the background plates were shot on the exact same stretch of road). This allowed us to roll much longer takes and no-one had to bake in the heat. Tremendous lighting challenge to make all 5 angles look good and not wash out the projection screens!

Wow.. I would love to see that setup. I also noticed how you changed the light in the car to match the time of day on the plates. High noon shadowed from the top. It looks really great. Wow.. projections screens huh? I've only ever done green screens for car interiors like that. Beautiful!
 
WOW I'm so glad I logged in today and found this thread. HUGE fan of the Key & Peele skits, I got my gf and many friends hooked on them too! Our favorite ones are "Wendell -- The Power of Wings" and the "I said biiiiiiitch" episode..... HILARIOUS.
Thanks for the posts Charles! Very interested in all the details you've posted. Keep them coming!!!!
 
Also glad I found this thread! If possible I would like to know more about the productions itself, budget often can`t be discussed of course, but size of kit, crew, talent, writers etc. gives an estimate about how much effort goes into the video we end up seeing on YT.
Anyways: Thanks for sharing!
 
Our favorite ones are "Wendell -- The Power of Wings" and the "I said biiiiiiitch" episode..... HILARIOUS.

Two of my favorites also, Lowell! I loved the concept behind "Power of Wings" so much.


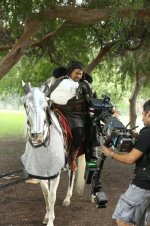
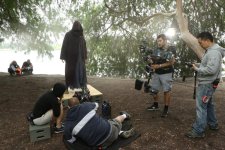
Apparently there are regular everyday people out there who spend significant amounts of money making "vanity videos" (have any of you guys been hired to shoot them?), which was the inspiration for this one. The concept the director and I discussed was that "Wendell" had told the production company to make it look like "Excalibur", so I used overwrought diffusion (black pro-mists 1/2 or 1 depending on the shot) smoke, hard light etc. to give it a dated, grandiose and ultimately silly look.

Image 3.jpgImage 4.jpg

This was also our first (and, to date) last time using a drone for the aerial work. I brought in Vortex Aerials and they did a great job. At that time they were using an A7 onboard, as we couldn't afford their larger craft with the Epic, and honestly it was a tough match to the Log C Alexa footage in color correction, but given the nature of the video, it was excusable. After all, Wendell was using a stunt double who didn't look anything like him!

Once the money runs out, Wendell resorts to shooting in his backyard and so we switched to an HVX200 with a single bounce card and plenty of deliberate shooting errors. We also pushed the sharpening on this footage in post to make it look like it was shot with a cheaper camcorder (the HVX still looks too good!)

The "I said Bi-i-i-i-tch" sketch is a fan favorite, and it's very nostalgic for us because it was the very first thing we shot on Key & Peele; day 1 of the pilot.


We were a much scrappier production back then. I used my 1DMKIV setup that had been my bread and butter at the time, serving me on several pilots. This was actually the last major project I shot on the DSLR's, because we had so many issues with aliasing and moire that it finally become "enough is enough". I still think it looks pretty good otherwise! When the door opens at the beginning of the sketch, I tried to tame the blazing exterior with the old trick of a double net set back a few feet from the door, which does knock down exposure but at the cost of losing contrast (and to my eye, looking like a painted backdrop). Now, I'd just build up the level inside with bigger HMI's and of course the increased latitude of the Alexa makes a huge difference, but at the time both were out of reach budgetarily. This was shot at the warden's house on the grounds of an abandoned juvenile correctional facility which is now used for filming. We returned to this house to shoot the "Das Negroes" sketch in our first season, if you look closely at that one you can recognize the distinctive wall paneling. The scene of the two guys in the field was easy enough because there were plenty of overgrown fields around the grounds, however we had to do horizon and sky replacement because the barbed wire fence in the background wasn't quite the look we were going for! The spaceship set was in the same stages as "Lando's Fan" which I discussed earlier in this thread--it's been refurbished since we shot the pilot, but at the time the control panels were so beat up and rinky-dink looking that I had to keep as much light off them as possible! I know that post had a devil of a time pulling the green screen mattes off that H264 codec the Canons use--another reason we got away from the DSLR's. Regardless of all of the technical things, it remains one of the funnier sketches we've done and again, amazing to think that it was right at the genesis of the show.
 
Last edited:
Also glad I found this thread! If possible I would like to know more about the productions itself, budget often can`t be discussed of course, but size of kit, crew, talent, writers etc. gives an estimate about how much effort goes into the video we end up seeing on YT.
Anyways: Thanks for sharing!

Good question! Our budget is quite a bit lower than some of the sketches would make it appear. We make the show for roughly 1/5 the cost of an average network half-hour prime time comedy, and we do it on location--we never build complete sets. The writing staff includes Jordan and Keegan, our two show runners and five writers, and all of the sketches are written before the season starts (500 were boiled down to the 125 we are shooting this season). Our crew is roughly 75 strong; my camera crew consists of two operators, two 1st AC's, one 2nd AC, DIT and a utility, while I have a 6 person grip crew and 5 electrics (and we day play additionals as needed). We shoot on Alexa Plus's at ProRes422HQ. My lens set is the Alura 15.5-45, 30-80 and 45-250 zooms along with the 18, 25, 32, 50 and 75 Master Primes and an 100mm Ultra Prime which are used when we want extra shallow focus.

The standard lighting package on the HMI side is two M90, two M40, three M18, two Joker 800's which live in a Jo-Leko configuration and two 400's. We have a traditional tungsten package plus pars and Lekos (which I use a lot) going up to a T12. On the LED side we are using an amazing tool called Fernando Flo's, which are direct plug and play replacements for Kino tubes but have the advantage of being switchable at the tube from daylight to tungsten, and can be fully dimmed from a standard 110V dimmer without flicker. I also have a kit of Lightribbon which we use in strip and small fixture form, plus a Zylight IS3 and Z90 which we use for specialty color effects. As of this season, everything except the HMI's are fed into dimmer packs and controlled via Luminaire onto an iPad, which is a massive time saver for me. The dimmer tech and I can walk around the set or sit at the monitor and dial in the whole set virtually on the fly, sometimes even trimming points or building in invisible cues during takes. It's so much more efficient than using hand dimmers all over the set.

We shoot very quickly. We average two sketches a day and we are scheduled to shoot in 11 hours or less. If we go over one day, we have to make it up on another. While it's nice to not have to work the long hours typical of many shows, it does mean a lot of pressure, thinking on our feet and moving fast. No matter how much we plan ahead of time, "calling audibles" is the inevitable especially as we wind down in the last hour or two. Having weapons like the remote dimmer setup are crucial for this efficiency.
 
Charles, I would LOVE any and every picture, video, and description you can post. I just soak it all in. When you see a finished project and see how it was done, that's pure gold! Please keep it all coming. I love how much you give back to the community.
 
Wow.. I would love to see that setup. I also noticed how you changed the light in the car to match the time of day on the plates. High noon shadowed from the top. It looks really great. Wow.. projections screens huh? I've only ever done green screens for car interiors like that. Beautiful!

OK chaps, here is a clip I put together with some of the driving footage that has already aired, with a little behind-the-scenes. I was pretty busy when we were shooting so I could only grab a few shots with the stand-ins, but you can get a sense of what it took to make this happen.


When the discussion began on how we would go about shooting this footage, the original plan was three days in the desert on a process trailer. I was apprehensive for several reasons. Shooting from dawn to dusk means an ever-shifting sun, and the orientation of the street the director liked was north-south so we would be dealing with some difficult scenarios to tame the ever-shifting raw light from one side of the car to the other. Process trailer can be a tiring way to work for everyone involved, and full days of it can really take their toll. In this instance, the actors themselves would have to contend with August heat in a vintage car which meant no AC, and because all of their dialogue was essentially improv, it was very important to keep them fresh. You can only drive so far before having to stop at a red light (which is no good because the stopped footage won't cut with the moving footage), plus turning around and going back the other way, which flips the sun 180 degrees. Basically, I sensed that a practical process trailer scenario would be a tough way to go, and I set out to look for alternatives.

I suggested green screen to our director Peter Atencio, but he felt that the risk of it looking fake was significant, plus our post schedule was so tight that having to comp that much footage wasn't practical. I then found a company called 24 Frame (24frame.com) who specialize in rear projection, and after meeting with them, we decided to go for it. To maximize our angles due to the improv nature of the material we decided to go with five cameras: one frontal wide (unmanned) and two frontal singles, plus two overs. The overs were something of an afterthought and weren't budgeted, so we went with F3's for these against the three frontal Alexas and crossed fingers we could get them to match. The 24 Frame guys were a little dubious that we could pull off so many angles at once, since no-one had attempted that before; most shows shoot a frontal and one side at most and we were doing three sides and seeing nearly 270 degrees at times. We used every inch of their three-sided projection screens setup, plus an overhead screen for windshield and hood reflections. 24Frame went out to the desert to shoot plates using their custom vehicle, an amazing matte-black wrapped stretch limo with five F3's (coincidentally) sticking out in all directions.

We wanted to achieve two looks: a high noon feel that would be most of the interstitials used in the show and also a dusk look for the last piece before credits. My day look consisted of 4x4 FernandoFlo's, which are a fantastic plug and play LED alternative to Kino Flos (using the same housings and connectors). The Fernando Flos can switch at the tube from daylight to tungsten and are dimmable by a standard 110 volt dimmer like a tungsten unit, with no color shift or flicker. I've been gradually tiring of the lack of flexibilty with Kino tubes as I really like remote dimmability and these units have become a great weapon. We used four 4x4's on each side of the car wrapping to the front to effect the look of a daylight wrap, and avoided having any frontal push through the windshield as this tended to look too flat. It was certainly tricky for the cameras on the side, especially when they shot from the passenger windows across the backs of the seats, because they were mostly photographing the fill side but after a lot of massaging I was able to make all of the angles appear natural enough to satisfy myself and the director. A Dedo light strafing the shoulder and back of each of the guys added some sense of raw sun, with another raking across the hood, and a separate 4x4 pushed in through the back window onto the rear seat continued the daylight feel. The dusk look was mostly knocking down levels and removing light, plus switching one or two FernandoFlo tubes to tungsten to simulate the warm setting sun. I'm actually more partial to that look myself.

We lit the stage for half a day, then shot for the remainder and all the next day. Jordan and Keegan were thrilled to have a comfortable (aka air-conditioned!) environment to cut loose in, and we often rolled for 40 minutes straight so they could get into the rhythm and go with it. Our 1st AD estimated that we shot probably 5 times more footage than we would have had we done it practically. Keegan said at the end of the session, "I never want to shoot on a process trailer again".

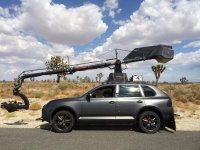
On the third day, we took a small unit out to the very same stretch of road in Palmdale that the plates were shot and did the exteriors of the car with one conventional camera and another on the mightyRussian arm/Flight head. You've probably seen these contraption in various behind-the-scenes of movies and car commercials--it's a three axis stabilized head with motorized arm mounted to a Porsche Cayenne. The arm operator, myself operating the camera, the driver, my AC and the director pile in; the seats are festooned with monitors and away we go. We were able to design amazing dynamic shots on the fly which gave the establishing shots a lot of production value.

And that's how we shot the wraparounds for Key & Peele Season 4!
 

Attachments

  • porsche.jpg
    porsche.jpg
    112.6 KB · Views: 0
Last edited:
Fantastic, Charles! Thanks for letting us in there. I think the F3s held up pretty well! How does it work with the projections? Are they put out of focus themselves or is that the selective focus of the lens and they are in when you shoot them? It's a fascinating process and the results are really great. Did you shoot the front stuff as two shots and then punch in in post? The way it's cut it's like you had 7 cameras!

I can't find anything on the FernandoFlos. Are they widely available or is that someone doing custom boutique stuff out there with you guys?

What a treat to see this. It's no wonder you were able to capture their stellar improv so well. Thanks a million for sharing this. I thought the sunset stuff looked so good when I first saw it and it still looks good after seeing it again, with the color of that car and all... wow!
 
Fantastic, Charles! Thanks for letting us in there. I think the F3s held up pretty well! How does it work with the projections? Are they put out of focus themselves or is that the selective focus of the lens and they are in when you shoot them? It's a fascinating process and the results are really great. Did you shoot the front stuff as two shots and then punch in in post? The way it's cut it's like you had 7 cameras!

The projections were pretty much in focus, we could have racked them out if we wanted but we didn't need to. Turned out that to use the full length of the screens as we did (20 feet), the projectors had to be back pretty far and thus were relative low output. I had to shoot at 2.8, basically wide open on the zooms, pushing the cameras to 1280 to be able to get the backgrounds as hot as I would have wanted. The front camera being so wide, I used a Master Prime (25 I think?) and knocked the camera down with ND to bring it to a T1.8 or so.

My plan the next time around is to go with five F55's, which should be around the same cost as three Alexas and two F3's, which will give us consistency plus I can more comfortably push the cameras to 1600 or more to not have to be just squeaking by on the projector exposures.

The first setup is middle camera dead center and the two side cameras crossing over each other (so, the right camera shooting the passenger and left shooting driver). And the rear cameras doing "french overs" through the rear windows. For the alt pass, the middle camera slid to favor the driver's side, and the side cameras uncrossed (right camera shooting driver etc), and the rear cameras came forward to shoot traditional overs through the drivers window. Five cameras at a time, with the alts added up to 10 different positions that may appear during any episode.

I can't find anything on the FernandoFlos. Are they widely available or is that someone doing custom boutique stuff out there with you guys?

They are made by a guy over at Paramount Studios, and we have to rent through them. He doesn't sell them apparently. Great idea, but we pay top dollar for them and I'd love to see this idea get out there further. Not sure if they have patents on the design. They are simply genius though.

I am hoping to get someone to come by with a camera and shoot a bunch of BTS on set, and I can take them on a little walkthrough of our camera and lighting setup and packages etc. and then cut it into a nice little Youtube piece. I have no time to try to do anything like that myself. We've got some interesting workflows that I don't mind sharing (our iPad controlled dimmer board, my use of the Blackmagic ATEM switcher with frame grabs for lighting continuity etc).
 
Last edited:
Back
Top