If a light meter is good enough for Deakins...

The important thing to understand is that a one stop increase in exposure = double the light level in FC or Lux.
My Sekonic reads FC, but the exposure dial converts to f/stop values in relation to ASA(ISO) speed and shutter speed. f/stop by the meter = T-stop by the lens. The meter assumes 100% transmission by the lens. Close enough in most cases for primes, but zooms fall off a bit in efficiency. Typically only critical if you are talking value differences greater than 1/3rd stop. My late model Angie 12-120 is f/1.9-T2.1. My older model 12-240 is f/4.8-T5.6 at the long end of the range.
 
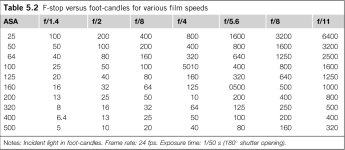
I like using an incident meter giving me readings in footcandles. The Sekonic L-398 has the ASA/ISO setting and an f-stop scale so it will give all that but I like knowing the base quantity of light falling on the subject, in footcandles. For me the whole starting point is this chart.


F-stop versus footcandles.jpg

There are some typos on the chart, the first (L-R) F8 should be f2.8 for example. The basic equations is, 100 FC @ISO 100 = f2.8
 
Last edited:
The meter is a Sekonic L398A, and I just logged the meter readings, (it's just an ammeter afterall), and whether the reading was from a white card, gray card, or incident. I converted it to F-stops shortly before the shooting, and then set the number to the T-stop for the Sony PL prime in use. The ammeter of course reads differently from a white card than a gray card, but that was the whole point of rating the camera for each. The gray card and incident readings match very close to the same ISO, the white card rates a lower ISO. As long as you keep track, even this old school classic seems very trustworthy.
 
I am starting to see the value in the absolute light values. My meter has an EV (Exposure Value) value that maps directly to a foot candle value and each EV is equal to a full stop. With the absolute values it's easier to just deal with the light irrespective of the ISO.

So, more experienced meter readers if I'm getting this right, when gaffers and DPs are talking T stops (those of us less well heeled with our modified still lenses will talk f stops) will the DP and the gaffer meet before anything and say, today, we are shooting at ISO 400 (or whatever ISO) so set for that ISO and I want the key to be T4... shadow side T1, etc.

A stop is a stop but only represents an absolute light value when relative to and ISO or ASA, right? So foot candles and EV, if anyone uses EV, are "better" because they are what they are regardless of ISO.

I'm kind of surprised so many good shooters don't light this way. I completely understand not wanting to get a final exposure with this information alone but it seems a very efficient way to light.... or at least I think it might be ;)
You got it.

Light Bulb Moment, eh?
 
I think someone mentioned stops were a universal measurement vs fc/lux being country-specific. So when you're hired to DP/gaff a film in Europe but you're an American and the crew isn't, you can still speak the same language.
 
You got it.

Light Bulb Moment, eh?

I admit this is an eye opener for me. <nerd alert> Everywhere I go I'm walking around with this meter taking readings. </nerd alert>

I think this is really changing the way I look at lighting a scene. I usually start with a picture in my head, as if on a sound stage (I wish) witih no light but this is much more interesting. I see that I'm good at f2, it's a start, what do I need? How can I keep these shadows? What kind of DOF? Hmm, think how nice that lens is at 5.6 and I can pick up that entrance without racking focus. How much light will I need? ... all sorts of stuff. I'm having a good time with this.

This is, IMHO, the basics of the craft. You make a decision on the aesthetics you want for the project you are shooting; what ISO you want to work at, what f-stop you want to work at and then you choose the locations that you are going to shoot at. Knowing the ISO and f-stop that you want, from the chart I have above, based on 100 FC @ISO 100 = f2.8, you know what amount of light, in footcandles you need for your key light. Now, for creative cinematography, you will have to also have done extensive test of your camera so that you know, for the given ISO, and selected picture profiles, if that is an option, what the dynamic range you have to work with is, where the noise floor is and what the highlight roll off is. If you have the knowledge of you camera parameters in, for example, footcandle levels and you know the photometrics of the lights that you have available, you will be able to scout a location with you meter and have a very good idea of what you need to light it like you want. Of course, nothing is very simple in filmmaking however, having a fundamental understanding of light that a light meter gives you will take you a long ways to being more creative with light and possibly doing it in a more expeditious way. Having a base measure of the quantity of light in your scenes is also the fundamental basis for lighting consistency over a project and detailed notes on this will allow you to recreate set ups easily if re-shoots, or other situations, require it. I will never say that a light meter is the only tool that should be used for digital cinema lighting and exposure determination but I am a firm believer that it is an invaluable tool for creative lighting.
 
It's been a while since this thread died, but wondering if anyone who said they would try using light meters has continued to do so now after several months? Or if everyone has stuck to their same old methods and/or tools?


I carefully rated my F55 according to Dennis' steps, Alister's S-Log2 exposure points, gray card 32% white card 59% (F5/F55 specific), rated the incident mode as well.

Then I set out on a corporate industrial shoot on the factory floor with impossible contrast ratios, no key or fills, and a need to not interfere with the production activities. I went about logging the light levels on paper for each shot beforehand with only the light meter and gray/white card.

Lastly, I made the shots quickly and entirely according to the notes taken earlier, using only a monopod.

In post, when I unwound the S-Log2 curve with an ACES input device transformation, I was shocked how utterly perfect the exposure came out on each of the shots, and the consistency. I was basically left with little to nothing to grade. Very elated with this process.

I missed your post Tom, but doesn't it feel absolutely GOOD to be able to work like that? Go to a location, walk through a hall or step into a room and take readings. Measure the fall off from the center of a room to the side walls or corners.. later plan how you might work with the light variations, and what lighting instruments you might need, or how you might block the scene differently to work with the existing light... This is exactly how I like to work with it, and once you meter is "sync'd" to your camera its the same thing as setting up your grey card before shooting each scene and adjusting your base exposure for a precise level.


I admit this is an eye opener for me. <nerd alert> Everywhere I go I'm walking around with this meter taking readings. </nerd alert>

I think this is really changing the way I look at lighting a scene. I usually start with a picture in my head, as if on a sound stage (I wish) witih no light but this is much more interesting. I see that I'm good at f2, it's a start, what do I need? How can I keep these shadows? What kind of DOF? Hmm, think how nice that lens is at 5.6 and I can pick up that entrance without racking focus. How much light will I need? ... all sorts of stuff. I'm having a good time with this.

Again that's the beauty, go to the location and measure the light then figure out what you'll need to add or subtract,... and if you're lucky manage to get the existing lighting to work with your shot without having to go nuts with HMI's, etc.. and maybe you manage to get away with adding only a little something for some fill, etc..

By the way this is an old post I wrote just a little over 2 years ago about how I adapted using a light meter with I was shooting with the Sony F3 to help get consistent exposures. A bit of a flash from the past: http://cinetiny.com/kB5eeBCj
 
Last edited:
I have my light meter on all scouts now. I shot daylight interiors last week in a bar with big windows. It was a pretty low budget deal. Time and crew were at a premium. I would have normally nd'd the windows behind this one shot but because I had a meter with me I was able to figure out how much light I needed to be able to compensate and still get an acceptably blown window.

On another scene, I had a reading for that time of day using that indirect daylight as a key. It was fine for exposure and I was able to add a little fill on a single diva with the dimmer. It freed me up to better light the set, create more depth and get a much better frame.

I had the meter out today just clowing around with the still camera.

I also had a chance to go to the DIT seminar for F5/F55 at Sony in NYC on 3/5. The advice for shooting raw was use your meter and treat it like a digital negative, figuring a single ISO and figuring your highlight headroom from there . It was apparent to me that this technique is helpful on set with LUTs and monitoring capabilities to know what you're getting. It is not WYSIWIG. Shooting RAW, it appears, is more like shooting film and a good working knowledge of how to use a light meter seemed, at least to me, like a necessary skill for being comfortable that you're staying out of trouble with your RAW capture
 
I missed your post Tom, but doesn't it feel absolutely GOOD to be able to work like that? Go to a location, walk through a hall or step into a room and take readings. Measure the fall off from the center of a room to the side walls or corners.. later plan how you might work with the light variations, and what lighting instruments you might need, or how you might block the scene differently to work with the existing light... This is exactly how I like to work with it, and once you meter is "sync'd" to your camera its the same thing as setting up your grey card before shooting each scene and adjusting your base exposure for a precise level.

By the way this is an old post I wrote just a little over 2 years ago about how I adapted using a light meter with I was shooting with the Sony F3 to help get consistent exposures. A bit of a flash from the past: http://cinetiny.com/kB5eeBCj

Hi Dennis,

Yes I'm still using the light meter. It is a valuable aid. I read your blog (linked above) to the exposure on the F3. On the picture that was backlit by the sun you said:

*This was metered away from the sun because subjects were more backlit. Typicially this works out to about 2 stops less then if metered against direct sun.

I was wondering if you could elaborate on that a bit. My owners manual on the Sekonic L398A for using the spherical incidence globe, it says to position the meter in front of the talent and aim the sphere back at the camera lens, but the comment above makes it sound like you were aiming it toward or to the side of the talent from the camera position. Did I misinterpret that?

Tom
 
Glad I have a fan or two.

I pointed the sphere towards the camera. Even in a backlight situation you want exposure for the shade side, so you still aim the light meter at the camera. Some people would meter the sun, but the sun us not directly on your subject so hence the meter us pointed away...

Hope that makes sense.
 
Just picked up a used Gossen Luna Pro on the web. The seller was a decent guy who barely used it, so I reckon it's a decent steal at $92. Man, they don't make leather cases today like they did back in the old days. This one is solid and rugged hehe.

I tried using it at my latest interview job and it hits the spot… So I'm a happy oyster! :)
 
Even when shooting backlit scenes, I always close down the aperture just a hair, since the subject is obviously in the shade (the shaded side). I take a reading (towards the camera as noted above) then close down just a 1/4 of a stop more, since they are backlit and I want it to look real to the eye. The king of backlighting for my two cents is Caleb Deschanel - check out THE NATURAL for great examples.
 
Back
Top