How to use plus green filters in a fluorescent lit location?

goodgoings

Well-known member
I'm shooting in a factory with fluorescent lights on the ceiling. The space is too large and the ceiling is too low to light the whole space. Can you share some knowledge about how I can shoot this using tungsten and daylit LED lights? I have 1/2 plus green and 1/4 plus green gel filters. Which plus green matches with which light? What temperature should I dial my camera to? Thanks.
 
The space it green. Every introduced light must have green added to it too or if it is RGB be dialled green. Simple.

You will then..

If shooting 'baked' white balance off a grey card.

If shooting 'log' shoot a grey card and WB off it in post.

You could add a mild magenta filter to the camera but still any lights you add need to be green.

If you have an RGB light meter, use it to balance your introduced lights. If you have a DSLR use the RGB histogram to balance it all.
Worst case is to use your monitor. But of course have a look on the monitor befoe you shoot!
 
Thanks Sam.

I will not have a RGB light meter but can look off the RGB histogram.
I could not find any information online. Regarding the 1/4 plus green and 1/2 plus green, which one goes over the tungsten light and which one goes on the daylight temp light?
 
Unless there is some shift in terminology a green filter (physically green - not a magenta filter that cuts green) will cut R and B making a fixture have a green spike (like the flouros) a green filter would not affect the R+B channels so it is equally relevant to a daylight fixture or a tungsten fixture.

If you wanted to throw tungsten fixtures into the party they should have CTB (physically blue filter) to reduce the red from the tungsten.. and then a green (physically green) filter to add the green spike.

--

I keep saying 'phyiscally green' because technically a Magenta coloured filter, which removes green, is a green filter.
 
Last edited:
To use a DSLR you should..

.. no introduced lights.. shoot a grey card

add your filter to the introduced light.. shoot a grey card.

compare the RGB on the two greycard shots.

Fiddle with the filter on the introduced light until that RGB matches the RGB of the ambient.

On really knackered old tubes (in the building) you may have to add both yellow and green (coloured) gels to your daylight lights.
 
Yes, these are physical green gels to add a green spike to tungsten or daylight lights. I did think about adding CTB and one of the plus green filters to the tungsten light, but wasn't sure. At the Lee Filter site, it doesn't say whether the plus greens should be used on tungsten or daylight balanced lights (actually says used on both). A reviewer at a B&H said he added 1/4 plus green to his tungsten and it did the job. Not really sure if there is a standard with using these different plus green gels with different temperature lights.

Thanks for the tip about balancing with a grey card.
 
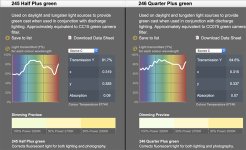
ct-green.jpgCT gel is for colour matching other sources. CT green will convert the tungsten reddish tint to closer, but not the same exactly as the flu lights.

For info the quarter plus converts tungsten to fluorescent colour and half plus does the same thing but is a deeper tint for tubes with a sharper spike.

typically I'd use the deeper colour on brand new flus, and the less green one on older, softer tubes. the tungstens look better but not perfect.
 
The trouble is that matching continuous spectrum lighting to flu tubes is never perfect. fluorescents, being discharge have spikes in the spectrum corresponding to the gas content, so trying to trick a tungsten is kind of a part-lost battle. If you have 3000k and 3200K tungsten/tungsten halogen, the plus green works pretty well. Daylight, as in LED daylight is less good. If you use CTO, then go back to green, the thing will be like a glow worm. you also need to remember gels are subtractive. If you use a red gel and it removes the red and blue, you cannot convert this extreme example back to blue, because you took all the blue out!

If you put the CT green on then as the lamp is already bluer, you get a greeney blue which isn't right, but probably OK unless you try to mix it with the other converted source which the camera will spot. Better than doing without.
 
Does your camera tell you the measured Kelvin color temperature when you set a custom white balance? It can give you a helpful base line if your camera does, my A6300 has that feature, but my D7000 doesn't. You might need a 1/4 or 1/2 CTO (color temperature orange) gel on your LED, in addition to the green gel.
 
Last edited:
Can you do a walk through at the factory and shoot some test footage without your lighting ?

1- First you want to get a usable color from the installed fluorescent lighting, so filter your camera to do this. ( if you don't have a good color meter, you may want to shoot a few filtrations to see what works best )

2- Once you know how you are going to filter your camera, you need to filter your lights to get the best color you can from them. Ideally you should be able to come close to the factory lighting.

3- If there is no way in h*ll you can get reasonable color from the factory lighting, then treat it like background effect lighting and have your subject(s) close to your camera so you can use your lights on them without affecting the background. ( i.e. light the people close to the camera and let the factory lighting do it's own thing in the background )
 
A number of things are missing from this thread and from the information you've provided. So:

1 - it would be very helpful to know what kind of camera you are using and if you are shooting log with no ability to color balance to the fluorescents. Shooting with log on a Sony FS7 or f5/55 FS5 requires a slightly different approach to the camera.

2- Every fluorescent is different so there are no hard and fast rules. They have different amounts of green and they are all generally different Kelvin temps. It helps if you can go in ahead of time & test and/or measure.

3 - As stated in above threads , you want to generally match your lights to the ambient. If the ambient is Warm then you are better off starting with Tungsten lights. If cool then daylight lights. Chances are they are somewhere in between in which case its usually easier to warm up a daylight LED with fractional CTO than to add CTB to tungstun. After the CTO or CTB then you add the correct amount of green.

4 - If you have a good monitor you may be able to eyeball the balance on your lights - . Probably close enough for an industrial.
Also while your green should match your ambient , the Kelvin needn't be exact - i.e. I might often let the ambient go a little cool and have a slightly warmer light on my subject for a little color contrast.

5. Morgan's method of shooting a grey acrd and checking RGB levels is fine and probably most precise but a little cumbersome and time consuming and I've never bothered. But Morgan and I NEVER do the same thing! :)
I strongly suggest spending $25 and buying Adam Wilt's cine meter II for the iPhone. It will measure KELVIN , green/magenta , and Foot-candles all at the same time. It is not precise but none of the color meters are even the $1500 one. It will get you in the ball park. I find that 5 or 6G is usually 1/8 correction , 10-12G is about 1/4. I find this meter fantastically useful but its only for iPhone.
Calibrate the meter as for the LUXI Ball, but you can fake that perfectly well with a little hood or hat that covers the sensor but not the readout on the other side using either ordinary 20 weight printing paper or 216. I use printer paper and always have a little "hat" in my wallet so I'm always carrying a color meter with me. Just fold the paper to make a hat and scotch tape the sides. Double check your calibration by testing outdoors and on an ordinary household bulb (2900 w no Green) or a 3200 tungsten source and a 3200 with CTB added. It should have the Kelvin close and the Green/ Magenta should be 0 or no more than +- 2 or 3. Readings of +-2 or 3 are insignificant amounts of green/magenta shift. Actually I usually find a little green in daylight and it turns out that's actually a correct reading - but that's another story.

This is the best $25 you will ever spend in your life! I GUARANTEE IT!

6. You should also have 1/8 plus green in your arsenal. Valuable by itself or to make 3/8G .

7. If you can white balance your camera do that to the ambient, then add corresponding gels to lights till it looks right or meters correctly but a decent monitor is always suggested and it is your ultimate check.

8. If you're using an FS7 etc in log you are more screwed. The only way to see what you are doing is to create your own green adjusted LUTs in LUTCALC or RESOLVE . (Thanks for nothing Sony). You could do this by taking a test shot of the room in question with your camera in Log and then load that still frame in LUTCALC till it balances, or you could just make a series of 709A or some other basic LUT ( I like a LUT based on Varicam gamma) and then add varying amounts of magenta to make a series of magenta adjusted LUTs. Then on set you can see which one seems to work best with your ambient. Between your 3 presets you can get your Kelvin at least fairly close then play with your adjusted LUT's till you balance out the green. Next add the Appropriate Plus Green and CTB /CTO to balance your lights to the ambience.

9. If you are really digging LUTCALC you can make LUTs that are both Kelvin and Magenta adjusted for fluorescents in between 4300 and 5500. Or shoot through slightly warm or cool filters to adjust .

10. They make fluorescent adjust filters (FLB and FLD) but they tend to be too extreme.

Hope this helps.

Lenny Levy
 
Last edited:
I did a factory build. Huge empty building and we **** every week as it evolved into a working huge clever cleaning business. Initially year transparent ceiling panels let in plenty of daylight, gradually electricians were fitting fluorescent tubes. The footage was gradually changing from dirt tinted daylight to probably 75% Flu, and my assumption was that as the end product was chronological it wouldn't matter if it gradually shifted. In the end the workflow in the edit was going all over the place and I found it far simpler to just have a couple of repeatable tweaks in the editor, just to green down blue up or blue down green up to give a nice similarity between shots. I found that panning around the majority of the time the shift in colour was hardly noticeable because there were just so many light sources, and some would have cloud behind them, some clear blue sky and some green tube. My margined problem just didn't become one at all.
 
Came across this video and thought of this thread:

The poor guy looks like he has an old frezzy up top, or a tungsten colored brick. Tough gig. Would not want to be in that situation.
 
Are we sure that that space hasn't been painted green? Jay Leno's white hair is white, some of the wall panels are white - but the floor is green? This is just a bad colour scheme rather than a flu green issue, isn't it?
 
Sure Looks like green flouros to me. Look what happens when the camera with its sun gun looks in the car. Look at the hubcaps.
 
Are we sure that that space hasn't been painted green? Jay Leno's white hair is white, some of the wall panels are white - but the floor is green? This is just a bad colour scheme rather than a flu green issue, isn't it?
The light is greenish. Could be fluoro, or if you look in the background, looks like metal halide variant or something.

If you have netflix, there is a comedy on there called “Employee of the Month”, which is a story set in a Costco-like store. Those big box stores typically have garish overhead metal halide or something. But when you watch the film the color is nuetral. So they either swapped out all of the lamps in the store, or i mean, they shot on film, i assume they had to have changed the overhead lamps.
 
Back
Top