
Navigation
Install the app
How to install the app on iOS
Follow along with the video below to see how to install our site as a web app on your home screen.
Note: This feature may not be available in some browsers.
More options
You are using an out of date browser. It may not display this or other websites correctly.
You should upgrade or use an alternative browser.
You should upgrade or use an alternative browser.
how to light a window
- Thread starter yia
- Start date

Paul Hudson
Vacuum Tube Member
HMI or daylight Kino-flo daylight lamps.

Chris Santucci
Veteran
And to make it *easier*, try to shoot the scene at dawn or dusk so you don't have to compete as much with the ambient light level if you don't have access to enough HMI lighting.
.
.
what is the easy way to match the lighting inside with the light out of a window
an example would be a guy sitting by the window while is snowing outside
If it is a long scene, you will need to control the daylight rather than limit yourself to a window of opportunity at dawn or dusk. The problem with shooting at dawn or dusk is that both the light level and color temperature changes so rapidly that when you get back to your edit suite you find that the shots don’t match. It is better to diffuse and take the direction out of the natural daylight by flying a silk out the window, and then bring in your own consistent lighting. If you can gel the windows, I would suggest you cover them with a combination of 85/ND9 gel. The gel both converts the exterior daylight from 5500K to 3200K and knocks down the level outside by three stops, so that you can use more affordable 3200K lights inside. But, where a roll of 85/ND9 gel will set you back $140.00, it will be expensive and time consuming to gel the windows if there are a lot of them.
Without gelling the windows to 3200K, using 3200K balanced lights doesn’t make a lot of sense. Balancing tungsten to 5500K is not very efficient because full color temperature blue correction gel (Full CTB) cuts the output of the light by 70% in converting it to 5500K. A 1000W 3200K light becomes a 300W 5500K light when you put Full CTB on it. The output you get after correction is not enough to fill talent in a shot with the windows uncorrected.
Given that the outside landscape is white (snow) and prone to blowing out you probably need at least a 4k HMI par to pick up the interior levels in wide shots, if you can’t gel the windows. For example, my company, ScreenLight & Grip, lit a segment of a special two-hour program for British Television’s Channel 5 that presented the same problem that you are facing.

Host June Sarpong interviewing a marine archaeologists
The show told the story of the Whydah - a pirate ship that sank off Cape Cod nearly 300 years ago. In a unique TV experiment, marine archaeologists on Cape Cod dove to the wreck to salvage pirate booty live on air. In addition to the dive on the wreck, the program also included specially shot dramatic recreations of the story of the Whydah’s notorious pirate captain Black Sam Bellamy. To link between the modern-day adventures of the marine archaeologists and those of Black Sam Bellamy, co-presenter June Sarpong hosted marine archaeologists and pirate historians from a makeshift studio under a tent situated on a bluff overlooking the dive site.

Host June Sarpong interviewing a marine archaeologists
Where they wanted the dive site to serve as a backdrop to the makeshift studio, the show's producers wanted the Salvage Ship to be seen clearly on the water in the shots of June and her guests. This requirement created a similar interior/exterior contrast problem to the one you are facing.
The task of balancing interior levels to exterior levels was further complicated by the fact that it was a clear sunny day. We rigged a couple of 4kw and 2.5kw HMI Pars into the frame of the tent in order to get them as close as possible to our subjects, but even then we didn’t have quite enough output to compete against the sun outside.

A 4k HMI Par was rigged overhead as a key for each subject
The final ingredient for success was a double net strung across the open backside of the tent. The net further reduced the contrast by bringing the exterior levels down and in line with the pumped-up interior. The trick in situations like this is to strike a delicate balance between the interior and exterior light levels so that the net disappears to the camera without the exterior becoming overexposed and losing important detail – the Salvage Ship out on the water in this case. Another advantage to netting the background is that it takes the hard edge off of HD. It creates the illusion of a shallower depth of field or the selective focus we associate with film.

A double net was stretched across the open side of the tent facing out onto the water.
Where it took a 4k Par on the talent, plus a double net across the back, you can see that you need a lot of light to balance interiors to exteriors – especially if the landscape outside is light in color like sand and snow. If you were looking out into dark woods it would be a whole different situation. The problem with using 4k HMIs is usually powering them. If you know how, you can plug them into wall outlets that are available on most locations. Use this link - http://www.screenlightandgrip.com/html/HDPP_Transformer.html - for more details on how to power 4ks without generators.
Guy Holt, Gaffer, ScreenLight & Grip , Boston
Chris Santucci
Veteran
Yes, it's preferrable to rent a truck package, a few thousand bucks worth of HMI lighting and specialized distro, and hire a crew. Certainly...
.
.
Paul Hudson
Vacuum Tube Member
I am pretty sure the OP was looking for a simpler solution than nejuicer suggested. While the information is helpful we should keep in mind some of our posters need "indie" fixes not overblown Hollywood answers. Chris is right, I could have suggested he do it like I would have. Roll up with my Crawford genie, half dozen lighting guys and a head cart full of HMI's but I am pretty sure this was probably not the answer Via was looking for.
Sometimes results can be achieved with a few, smaller instrument, plugged into the home, and ND or double net on the window. We who are fortunate enough to have the equipment and budget to perform complicated setups often times lose sight of the fact that sometimes a perfectly desirable effect can be achieved much easier.
Once again, I really appreciate all the valuable info that Nejuicer provides. He has been a valuable poster and I for one have learned a significant amount from his posts. We should all take time to read Nejuicer's posts in detail but then also be willing to help the guys that don't have the time or resources to performs these setups.
Sometimes results can be achieved with a few, smaller instrument, plugged into the home, and ND or double net on the window. We who are fortunate enough to have the equipment and budget to perform complicated setups often times lose sight of the fact that sometimes a perfectly desirable effect can be achieved much easier.
Once again, I really appreciate all the valuable info that Nejuicer provides. He has been a valuable poster and I for one have learned a significant amount from his posts. We should all take time to read Nejuicer's posts in detail but then also be willing to help the guys that don't have the time or resources to performs these setups.
I am pretty sure the OP was looking for a simpler solution than nejuicer suggested. While the information is helpful we should keep in mind some of our posters need "indie" fixes not overblown Hollywood answers. Chris is right, I could have suggested he do it like I would have. Roll up with my Crawford genie, half dozen lighting guys and a head cart full of HMI's but I am pretty sure this was probably not the answer Via was looking for.
Sometimes results can be achieved with a few, smaller instrument, plugged into the home, and ND or double net on the window. We who are fortunate enough to have the equipment and budget to perform complicated setups often times lose sight of the fact that sometimes a perfectly desirable effect can be achieved much easier.
Please do not misunderstand me. In my post, I was in fact advocating an "indie" fix "of just a few, smaller instrument(s), plugged into the home, and ND or double net on the window” rather than an "overblown Hollywood approach." If you follow the link I provided it was not for a “Crawford genie, half dozen lighting guys and a head cart full of HMI's.” Rather, it was for the “indie” trick of using readily available 240V wall receptacles to power a HMI of the minimum size required to balance interiors to exteriors after gelling or netting the windows. The Bose shoot pictured below was not done with “a truck package, (and) a few thousand bucks worth of HMI lighting.” It was accomplished without a tie-in or generator, with nothing more than what fit into a standard Ford 250 Panel Van and a G&E crew of two.
A lot of shooters lose sight of the fact that it doesn’t require a Crawford generator or tie-in to power a 4k HMI. They don’t realize that common 240V wall receptacles, like the dryer outlet in this loft, is an “indie” trick to powering larger HMIs. Where my point was obviously missed by some readers of my post because they apparently did not follow the link provided, I will explain it in more detail here. For the real low budget independent filmmakers I will also explain how you can power the older 4k HMIs with 120V magnetic ballasts that can be picked up very cheaply from rental houses or on ebay.

Samples from still shoot for Bose where a 4k HMI par was used to fill talent against windows (Bob Packert Photography)
How you power 4k HMIs off of 240V wall receptacles depends on whether the 4k has a magnetic or electronic ballast, and whether the electronic ballast has Power Factor Correction (PFC) or not (Arri calls it ALF for Active Line Filter.) A multi-volt 4k electronic ballast with Power Factor Correction (PFC) will give you the most options. If you are not familiar with Power Factor Correction, a PFC circuit realigns voltage and current and induces a smoother power waveform at the distribution. As a result, the ballast uses power more efficiently with minimized return current and line noise. 4kw electronic ballasts with PFC (like the Power Gems (PG) 425CDP, the Power-to-Light (P2L) 425LVI, and Arri 2.5/4 EB w/ALF) typically have an operating range of 90–125 & 180-250 Volts. At 120V they will draw approximately 37 Amps. At 240V they will draw 18.5 Amps on each leg of a 240V single phase power supply.
These ballasts draw too much at 120V for a 20A wall outlet. But, fortunately there are a number of 240 volt outlets in a typical house, office, or industrial plant in this country that you can also use to power a 4k with PFC electronic ballast. The most common are air conditioner outlets, dryer outlets, range outlets, outlets for large copy machines in offices, and the outlets for motorized equipment in industrial plants. Many of these household and industrial 240V receptacles use a three wire system (no neutral) because they are designed to power single phase motors or heating elements that draw a perfectly balanced load and return no current because the single phase service legs are 180 degrees out of phase and cancel each other out. Where a 4kw HMI with PFC electronic ballast, operating at 240 Volts draws roughly 18.5 Amps on each leg of a single phase 240V circuit, its’ load is well within the capacity of these circuits. You will also be able to operate a non-PFC 4k electronic ballast off of most 240V receptacles like range plugs and dryer plugs because they draw 26 Amps per leg and these circuits are fused at minimally 30 Amps. Where most magnetic 4k ballasts operate at only 120V and draw 40 Amps this method is not an option with magnetic ballasts. Where 4kw ballasts are typically wired with a 120V 60Amp Bates Plug (Stage Pin), you will need a 120V Female Bates to 240V adapter. I keep an assortment of adapters because all these 240V receptacles use a different pin configuration.
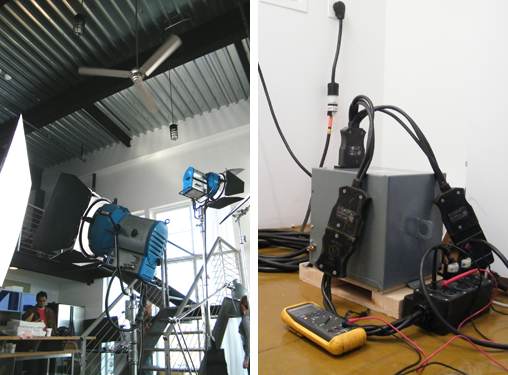
4k & 1.2ks HMI Pars powered from 30A/240V dryer outlet through step-down transformer/distro for Bose still shoot.
The only way to power 120V 4kw HMI magnetic ballasts on wall receptacles is from 240V circuits through a 240v-to-120v step down transformer like the one my company, ScreenLight & Grip (SL&G), manufactures for the Honda EU6500is generators that we modify. Like it does with the enhanced 240V output of our Honda EU6500is Generator, a step down transformer can be used to convert the 240 volts supplied by these industrial and household 240V receptacles to 120 volts in a single circuit that is the sum of the two single phase legs of 30/50 amps each. In other words, out of a “30A/240v” or a “50A/240v” circuit our transformer makes a 60A/120v circuit that is capable of powering bigger 120V lights, like 4kw HMIs with magnetic ballasts (even Quartz 5ks, mini brutes (5850W) or Six Light Mole Par (6000W)).
There are benefits to be gained by powering even 4kw electronic ballasts (PFC or not) on 240V circuits through a 240v-to-120v step down transformer. For instance, like we did for the Bose shoot, you will be able to run additional large lights (like 1.2kws) on the same circuit if, rather than plugging the 4kw electronic ballast directly into the 240 receptacle (operating it at 240V) and monopolizing it, you plug it in through a transformer (operating it at 120 Volts), you will be left with 25 - 37 Amps to power additional lights on the same circuit. That’s a lot of additional power to waste by plugging the 4k directly into the 240V receptacle. And, since an electronic ballast “ramps up” gradually during the striking phase, you don’t have to leave head room as you would with a magnetic ballast. By operating the light through a transformer you can more fully utilize the capacity of the 240V circuit. For example, since the P2L 4/2.5 LVI ballast at 120V operates a 4k HMI luminary at 37 amps, you will still be able to power an additional 1.2kw HMIs (if operated by P2L 575/1200 ballast (11 Amps)), as well as a 800 Joker HMI (if operated by a P2L 800/1200 ballast (8 Amps)), off of the same circuit. That’s a lot of additional light to be gained by not plugging the 4k directly into the 240V receptacle.
A transformer will also simplify your set electrics so that you don’t have to hire an experienced film electrician to distribute power. As long as you plug lights in through the transformer, you no longer have to carefully balance the load over the two 120V circuit/legs that make up 240V circuit because the transformer does it for you automatically. If, like our 60a Full Power Transformer/Distro, the transformer is outfitted with a 60 Bates receptacle, you can use 60A GPC extension cables, 60-to-60 Splitters, and fused 60A GPC-to-Edison Breakouts (snack boxes) to run power around set - breaking out to 20A Edison outlets at convenient points (rather than one central point.) The best part about using a transformer with a 240V receptacle in this fashion is that no matter where in the distribution system you plug in, the transformer automatically balances the additional load, so that you don't have to. It is so simple that you don’t have to be an experienced electrician to distribute power on set. Use this link - http://www.screenlightandgrip.com/html/hd_plug-n-play_pkg.html - for more details about using step-down transformers to power larger lights on interior sets.

A PFC 2.5 & 1.2 HMI Pars, PFC 800w Joker HMI, Kino Flo Flat Head 80, 2 ParaBeam 400s, and a ParaBeam 200 powered by a modified Honda EU6500is through a 60A Full Power Transformer/Distro
Everything I have said thus far is also true when it comes to operating HMIs off of portable gas generators with 240V outputs. An “indie” fix in situations where there are not 240V wall receptacles is to use a small portable gas generator. Where before you could not operate more than a couple 1200W HMIs on portable generators because of their limited 120V power outlets, with a step-down tranformer you can operate bigger lights. For instance, if the generator is one of our modified Honda EU6500is inverter generators, you will be able to run a continuous load of up to 7500W as long as your HMI ballasts are Power Factor Corrected. But, where I have covered this in another post in this forum I won’t go into more details here. For more details read my posts at http://www.dvxuser.com/V6/showthread.php?t=129369
Unfortunately, as these production stills from the Bose shoot clearly demonstrate, there is no “easy” fix. Even with a 4k HMI we were not able to hold detail out the windows because we did not gel or net them (it was not an option as we were on a sixth floor.) The purpose of these production stills, as well as those in my original post, is to give readers a point of reference so that they can see what is required to balance interiors to exteriors.
Guy Holt, Gaffer, ScreenLight & Grip , Boston