Film basics Q&A

-Tom-

Active member
Mods, if you think this kind of thread is redundant, move it where you find appropriate :) but I think we should have some sort of quick draw question and answer thread, for curious Joe's looking for answers and chit-chat about film.

Q for today is about old cameras. I was watching the movie Convoy for education. I'm starting to watch my favorite movies (since I know the plot by heart) to see how the scenes are being shot, how the audio is being mixed, effects, etc...I'm going down the rabbit hole.

One thing I've noticed on the DVD is - there are no blacks on the pictures, the dynamic range looks pretty amazing for 1979. movie. Or is this a feature that any 35mm film can achieve and we at the super advanced digital age struggle with?

When the camera is rolling inside the truck, there's bright day outside coming in thru the windows, yet all the detail thru that window is visible, not a wash-out in sight. Also, the back end of the cabin, the darkest place, is not black, it's a dark dark grey shade, but certainly far from crushed, and the details are preserved. Is this a camera feat, a film feat or DVD/gamma/digital conversion stuff?

Personally I can cope with all the troubles and issues of digital, frankly I don't care much about them (you get what you payed for) but dynamic issue is always bugging me, how can we not have a nice balance in those high-contrast situations without trickery... :D
 
Worth noting the difference between blacks and shadow detail. If your blacks arent black you probably want to adjust your settings. I once talked to a DSLR-shooter who told me he'd pull the gamma curve on his footage to make the blacks and the whites more of a grey-ish color, because he felt it looked more like "Red and Alexa footage". This of course had me bite my lip quite hard.
Honestly, if I watch RED footage that has got shadows underexposed to the point where there aren't any details - And yet they're grey; That makes me shiver, because the colorist most likely wasn't a colorist but the amateur director / editor himself. (Let's not even talk about pulling the whites... UGH!)

Dynamic range itself never really bothered me that much to be honest. I hate the clipping a lot of digital cameras do when you blow something out, but other than that - If you only have x-amount of stops to work with you don't whine about losing detail in the highlights - You ND the **** out of those windows and do whatever else necessary to get the picture you desire with the tools that you have (and hopefully know how to use).
 
There are lots of existing stickies for the basics.

Film has much more dynamic range than digital. The gap is being closed on the top end of digital, but for the most part, there's no comparison -- especially not with the cameras accessible to the consumer/prosumer market. (Though apparently the BMC does pretty well.)
 
Personally I can cope with all the troubles and issues of digital, frankly I don't care much about them (you get what you payed for) but dynamic issue is always bugging me, how can we not have a nice balance in those high-contrast situations without trickery... :D

A couple of points... when watching 'old movies' on 'old DVDs'... anything could have happened... to yield a wide range of quality of image...

I've been contemplating the issue the difference between Film film and Digital film, especially how it relates to lower end cameras that I can contemplate using.

There is a lot of verbage given about the 'latitude' of Film film. Back in the olden days, I don't think I ever heard anyone in the still world refer to the density range a negative could take as 'dynamic range'... most people discussed 'latitude'.

But exactly what was 'latitude'... it is not the dynamic range, but how much over or under exposure a film stock could 'take' and still yield a usable image. I say 'usable' since if one under exposed by a couple of stops, then 'compensated' by developing longer, the result often, almost always, had obvious 'grain' and was considered a 'quality negative'. If one over exposed, then 'underdeveloped' to compensate, there were 'quality costs'.

In stills one could also adjust for negative exposures by using 'harder' or 'softer' print paper, but an over exposed negative would have say, 'flare' in the shadows, or blooming in the highlights, which again were 'negative quality' attributes.

In any case it boiled down adjusting exposure and development of the negative to yield a print. In that case, most print papers for 'normal' printing, had about a 7-8 stop range from max black density to 0 (aka white paper base). This required that any density on the negative to match up to 7-8 stops, or require some set of additional procedures to compensate, including waving hands or other dodging tools to cut 'light' in the shadows, or burn in highlights.

Upon looking at the characteristics for Film film movie print film, it also had a more limited dynamic range than negative film.

The next item is the viewing environment. Film film for theatrical releases is expected to be presented in a 'almost black' theater. This sets the base level of 'how black' can a projection screen go, given a max density on the print. There is also a value of how 'light' the projected image can be as well, and this sets the viewing 'dynamic range'.

In the case of most 'home' or 'high ambient light' displays, the 'blackest black' and the 'whitest white' are many times higher than what one sees in a theater, and that fact alone will change the perceived 'contrast' ratio.

After all that, just briefly mentioned... there's the issue of the quality of transfers... since the dawn of home viewing of movies via Beta/VHS then DVD, now Bluray (we won't mention HDDVD...), the quality of transfer from the Film film original to the home media, has been all over the place.

In addition to the lack of quality control across the offerings in the various media there's also the issue that the target output for home viewing has been in the US, NTSC, and outside the US PAL/SECAM, and recently HD. All of which had their own 'take' on what colors to represent and had various limitations on them.

What does this add up to... Film film is still a 'gold standard', and probably usable for a few people who have the ability to have a well maintained projector, and run only freshly struck prints. The rest of the common masses will have to view any film via some digital means, on some form of display, having potentially totally out of whack calibration to any given standard.

-----

As for 'trickery'... there has always been trickery. Just the forms of trickery that one is required to perform to account for the limitations of the DSLR, vs. Film film cameras, may be different... it is still trickery... or perhaps 'skill'...
 
I can't rate your post, but I sure can +11111 :) thanks for that elaborate explanation.

Reading it, I wish I could somehow get a hold of an actual film studio, handle film stock, or at least see how it's being developed/scanned/cut...unfortunately, I'm a working citizen that has only 8 hours a day to spare on this hobby and I haven't yet dared to fully pursue it, which makes me a perfect average, the type of guy who wants everything without giving up anything.

I know Paul Thomas Anderson said nobody needs film school because everything is "out there" but certain things can only be learned hands-on, at least in my case...that's why I think I'll need to somehow find a place where film is being used/developed, just to get a grasp of basic photographic lessons while filming. It might be redundant, since I'm 99% sure I'll never use anything but digital, but I don't think one can circumvent the basics of the craft.
 
Well, there was trickery involved in the shooting of films like you cite, and it is called "Cinematography". Color negative film stocks in the 1970s did not have as high a dynamic range as they, and modern moderate to high end digital cameras, do today. So what they did, and what we still need to do today in most instances still, is to decrease the luminance range of the shot being filmed to bring it within the levels of the dynamic range of film stock. For a truck cab scene, the windows that you see through would be gelled with neutral density material to bring down the light coming through and supplemental lighting would be added to the scene to bring up the luminance of the subject being filmed. In the 1970s HMI lights had not come in to common use, so other daylight sources were used like carbon arc lights, FAY 9 lights with dichoric bulbs or gelled tungstens.
 
Another Q - color grading in the film days. How did they do it? Did they have to have the final look already planned out and use a certain stock or were there some methods to alter the hue/sat or other parameters once the camera stopped rolling?
 
Another Q - color grading in the film days. How did they do it? Did they have to have the final look already planned out and use a certain stock or were there some methods to alter the hue/sat or other parameters once the camera stopped rolling?

"timing" stems from the photochemical methods that were used on Film film to affect color. (May have also been used in the B&W era to affect density...). In both the developing process and the 'printing' process color film can be affected, in hue, saturation, and density. Masking could also be used to segment an image, and optical printing allowed for compositing of images.

But in most cases, much effort was made to make the film image 'very close' to the final desired image.
 
Oh man, we seem to be extremely lucky having everything under one fingertip in front of our screen...seems like we (by we I mean the Undo Generation :D ) have it somewhat easy.

So wait, that means that modern film film (Tarantino?) was developed in the same fashion? Or did they use computers to edit...how do you edit film on computer anyway?

I don't know what Tarantino may be using currently, but the as I understand it... current Film film production, uses Film film negatives, that is then digitized for post work, then printed out to Film film, or now digital copies, for presentation.

This sort of thing began with "Oh, Brother Where Art Thou"(2000), which was the first film to be digitized in its entirety, processed digitally to achieve the desired look, then print out to Film film prints (there were no major digital projection systems available so there was no digital distribution...).

One of the effects that was doable digitally, which would have been 'hard' Film film wise was the change of the 'green spring/ early summer' fields, to the 'dusty autumn' of the film, along with the overall 'sepia' look the Coens were looking for.

Previous films were made with combos of Film film processes and digital effects compositing, etc, but not 'the whole' film being sucked into the computer world.
 
Film was still timed chemically up until the late 90's/early 00's, even though digital NLE editing came along before that.

You'll generally get a telecine of your dailies, from which the editor(s) will sync and cut the film from. Then, an EDL is made, from which the film is then scanned in for the DI process, using an ArriScan. You can scan in all sorts of resolutions, common was to scan at 2k and finish at 2k, more often these days you find scan at 4k and finish at 2k. Colour timing and all the rest of it happens in the computer, and then DCP packages are prepared and sent off to cinemas. If you need to make 35mm prints for projection, this is done so with an ArriLaser, where the machine lasers the movie back onto the celluloid.
 
Question time!

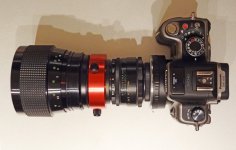
I'm looking at some GH2 with anamorphic lens...and I was wondering, since I dont know nothing about those lens, what does the 1.5X number mean in the lens specs.

Also, if I'm not mistaken, anamophic lens isn't a standalone lens, right?
gh2-isco-helios-44m.jpg
 
Another Q - color grading in the film days. How did they do it? Did they have to have the final look already planned out and use a certain stock or were there some methods to alter the hue/sat or other parameters once the camera stopped rolling?

Image control in "The Film Days" was both more complicated and, at the same time, much less sophisticated than today. It was more complicated in that many of the techniques needed involve complicated photo-chemical processes performed in professional motion picture laboratories and it was much less sophisticated in that the level of control over the image was really not much more, generally speaking, than the image control knobs on a color TV; brightness, contrast and tint. Most NLEs come with image control functionality that, if even contemplated about at all in back in "The Film Days", would been considered as a science fiction pipe dream.... "One day we are going to have flying cars, and be able to select specific parts of an image, correct and adjust the color, exposure and other image qualities and track them in motion!" ......"Ha, Ha, Ha!!! That'll be the day!"....

Film timing is primarily a function of printmaking. When a film print is struck, the exposure is established by three lights; red, green and blue. The intensity of these lights ranged on a scale from 0 (Off) to 50 (Max intensity). The color balance was established by varying the intensity of the red, green and blue lights relative to each other. The brightness of the image was modified by varying the intensity of all of the lights overall. Whenever you got a print back from a lab you would get a "Timing Report", which showed the level of each of the timing lights, on the 0-50 scale. This was very important when viewing your dailies; which for me was always the projected work print. When ordering your work print you had three options for the timing, scene-to-scene correction, best light and one light. A scene to scene corrected print is made by the timer going through the negative, evaluating the color, and making decisions on how to make that specific scene look its best. For a best light print the timer would evaluate the whole roll and make a judgment as to one timing light setting that, in their judgment, would make the footage look the best, on average. A one light print was struck with the timing lights set to one arbitrary setting without evaluation. When I was shooting film for a photochemical finish (Which was a very short 4 years), I usually opted for a one light work print, with the timing lights set at 25-25-25. Doing the work print like this first off cost less and saved on negative handling, which in 16mm was very important. Seeing my footage at 25-25-25 also gave me a consistency standard. Printing with the consistent printer lights really let me evaluate my lighting and exposure choices between shots with the only variables being the choices I made on the individual shots. This led me to become more and more consistent in my exposure and lighting.

When the film was edited to the lock picture stage, using the work print, and after the sound post was completed, the negative would be cut to match the work print. In 16mm it was standard to practice to cut the negative into two strips, A-B rolls, with individual shots alternating between the A roll and then the B roll, with black slug between them. This was also called “Checker-Board” cutting. The rolls would be loaded into the printer and exposed separately. Using a cue sheet the printing timing lights would be set so as to expose the print as it had been decided was best, and this could be automated. The A and B rolls were run through the contact printer and exposed. By using the check-board negative, fades and dissolves could be produced between individual shots by automating the printing lights to fade out and in appropriately. The first print made this way, as a prototype for checking the timing, was an answer print. Once an appropriate answer print, with the timing where you wanted it, was struck the timing light settings would be saved and used to make projection prints. There were some variations to the workflow at this point where an inter-negative could be struck to make multiple prints from (To save wear and tear on the original negative when making multiple prints). For larger projects, an inter-negative to an inter-positive could be made. The inter-positive could then be used to make multiple negatives to produce more prints, speeding up the printing process and cutting down the handling of the more precious original negative and other elements. Of course, prints could be struck from the original negative. No matter the workflow, prints were struck with the timing established when making the answer print. I always worked low budget, and since making an answer print was a very expensive part of the process, I always worked to make sure that the first answer print was time as best as possible, because that was the only print we could afford. That is where learning to be consistent in shooting came in, as well as having a very good timer (At Producers Color Service in Detroit MI, now defunct).

Other image control, over saturation and contrast mostly was likewise as complicated and involved most of the tricks of the trade available to the cinematographer dealing with film exclusively in a photochemical work flow. Art direction decisions, film stock and lens choices, the use of filters and the way the film was lit, exposed and initially processed were all tools that could be used to manipulate the images captured on film.

The most basic ingredient in the way a film looks is the art direction choices, and for a long time, this was the largest element in controlling the saturation of the images of movies. Hollywood, would take care to control the colors of the costumes, settings and even the make up that was used. They shot extensive tests to get these elements to match the style they were trying to achieve. In the digital age, art direction choices are just as important to the look you get.

Film stock, and to a much lesser degree, lens choice also gave control over the image. Film stocks do vary in their saturation, contrast and color rendering characteristics. Generally speaking, a low speed film stock is more saturated, and has less contrast than higher speed film stocks. With modern color negative film stocks, these differences, when exposed and processed “Normally”, are not as great as they have been in the past. I think Hollywood was more concerned about the economies of scale of buying and processing film in bulk and the comfort of a certain consistency in image quality to demand stocks with greater variation between their image qualities, so the major raw stock makers strove for greater and great consistency between their stocks. Now a days there are visual differences between color negative stocks, but when you see discussions about these differences instead of quantifiable items, outside of the actual specs, qualitative evaluations, such as, “More creamy” or “Less snappy” are thrown around.

Outside of Hollywood, choice of specific film stocks was integral to the look of many films. The first that comes to mind is Jean-Luc Godard’s "À bout de soufflé” (“Breathless”). On the Criterion Collection DVD of “Breathless”, cinematographer Raoul Coutard relates that they used an Ilford 35mm still film stock that they could get in large reels. They had issues with a difference in the pitch of the perforations on the Ilford stock, but with the tolerances of Éclair CM3 camera (Which I assume are a little more “loose”) they were able to make the stock work. The stock was fast; 400 ASA (ISO), had less contrast, more dynamic range (My assumption) and was less grainy than the other available high-speed film stocks at the time. Coutard says that they could not have shot the night exteriors on “Breathless”, they way that they did, without the stock.


When it comes to a choice of color film stock that I think greatly affected the look, and reception of a film, I immediately think of the original “Texas Chainsaw Massacre”. That low budget film was shot on 16mm using a color reversal film stock (Kodak Ektachrome 25T 7252 per IMDB). Reversal film stocks were designed for direct projection so they had a higher level of contrast than comparable negative stocks. They also had less dynamic range, less latitude and poorer highlight handling than negative stocks. Shooting reversal film stock is very much like we shoot today, in that you expose for your highlights, just like with digital capture. What I think is most brilliant about the choice of a 16mm color reversal film stock to shoot “Texas Chainsaw Massacre” is that at the time, the mid 1970s, color television news coverage was, for the most part, shot with color reversal 16mm film. By shooting “Texas Chainsaw Massacre” on 16mm color reversal they imparted image characteristics to their film that the audience of the time subliminally associated with “Real events” that they saw everyday on the evening news. This gave the film a unique suspension of disbelief layer and made the events of the film that much more horrific.

The choice of lenses definitely affects the look of a film. Lenses do differ in their contrast and the way that they handle color rendering. At the higher end though, while you do hear about “The Zeiss look” or the “”Cooke look”, I think that professional cinema lenses have advanced to and have been for awhile of such high quality that the differences between them are again, like modern film stocks, evaluated based on subjective qualities. With the proliferation of digital cinema cameras and the experimentation with and use of a wide variety of lenses, including modern and vintage still lenses, I think that the impact of lens choices on exploitable image qualities or styles is more of an option now than at anytime before. Doing that is risky business, and not for the faint of heart, so, thankfully there are amazing lenses of high and consistent quality for almost everyone to use.

Filters on the other hand have been used to manipulate the images shot on film for a long time and are an important tool for a cinematographer. I have to admit that I have very little experience in using filters. I have always counted the watershed era in the evolution of modern cinematography to be the work of cinematographers in the 1970s and I do know that they made extensive use of filters to help create the looks they were after. Filters can be used to for a variety of effects. Polarizing filters, diffusion filters and nets, color filters, contrast-controlling filters and graduated filters, both color and ND, were all mixed and matched to create specific looks. Even with the amazing capabilities that are available with modern camera image control and image manipulation in post that we have, I still think that the use of filters is something that I want to explore more.

The way that a cinematographer lights and exposes a scene is the bread and butter of their control over an image. The contrast level, the total level of light, the quality of the light, the general color of the light and variations of colored lights within a shot are all controllable in the way a scene is lit. How a shot is exposed is also a creative option for image control. The simplest example of this is shooting day for night. The recipe I learned to shoot day for night was to shoot in direct sunlight in midday while avoiding shooting the sky, shoot a low speed tungsten balanced stock without an 85 filter (An 85 filter is full CTO and shooting without it made the daylight expose very blue) and underexpose 2 stops. You process the negative normally and then have the option of “Printing down”, or further lowering the overall levels of the print timing lights to make the scene darker. During printing you also have control over general color and a lot of folks have invariably increased the blue level for day for night shots. I think this has been overdone and I don’t really care much for “Blue Night” but it has become a cinema convention even now that night for night shooting is standard.

Exposure choices can affect the image in more subtle ways than shooting day for night. Generally speaking again, under exposure, within the latitude of a stock, tended to increase saturation and contrast. Overexposing, within the latitude of a stock, tended to decrease saturation and contrast. There are major cinematographers that really stretched the limits of what film was capable of with their exposure choices. On the under exposure end, I think the work of Gordon Willis ASC is the best known. He worked at low light levels like very few before him. His work on “The Godfather Part II” shows this, and shows where he admittedly (In an interview for the documentary “Visions of Light) went too far in underexposure; with a scene between Michael Corleone and his mother in front of a fire. Of course Gordon Willis then explained that even Rembrandt went too far sometimes!

On the other end, the creative use of overexposure, was pioneered by the Conrad Hall ASC, especially with his work on “Butch Cassidy and The Sundance Kid”. In that film he controlled contrast and saturation by overexposing the film at the limits of its latitude. He also insisted on shooting as often as possible through smoke and dust and with strong back light, further decreasing the contrast and saturation of his images.

Film exposure is quantified in the science called photographic sensitometry where the density and distribution of silver crystals through out a film image is measured (As a function of opacity vs. exposure). An image tending towards over exposure, where more silver cystals are distributed through out the image, is refered to as as a “Thick (Or fat) negative” and an image tending towards under exposure, where less silver crystals are distrubted through out the image, is refered to as a “Thin negative”. Shooting a little thick, tending towards overexposure within the lattitude of the film stock, and then “Printing down”, that is, bringing the brightness level of the print image down by decreasing the level of the printing lights, was a common practice and generally preferable to shooting a little thin and trying to “Print up”. While the science of digital capture is different than film capture, a similar approach, where bringng down the brightness levels on a well, or slightly over exposed digial image is preferrable to trying to bring up the brightness of an under exposed image is still applicable, generally speaking of course.

Exposure choices, and their impact on film images also extended to the initial processing of the film raw stock. When processing raw stock, the cinematagrapher had three basic choices, normal processing, “Push” processing and “Pull” processing. Normal processing is just that and is based on the assumption that the film was “Rated”, or exposed at the ASA (ISO) listed for the stock and processed according to the standards set by the manufacture. Push processing involved increasing the development time used in the initial processing, thus giving more time for more silver crystals to be formed and distrubted through out the image. Push processing tended to increase contrast, decrease saturation and increased the graininess of the images. Pull processing involved decreasing the development time used in the initial processing, thus giving less time for silver crystals to be formed and distrubuted through out the image. Pull processing tended to increase saturation, decrease contrast and decrease the graininess of the images.

An experienced cinematagrapher could exert a good bit of control over the saturation, contrast and overall image quality of film by manipulating exposure and processing choices. For example, a film stock could be rated at a lower ASA (ISO) than the manufacture posted, thus overexposing the image, then have the film normally or pull processed. The film stock could be rated at a higher ASA (ISO), thus underexposing the image, then have the film normally or push processed. The actual affect of these choices on the film imags would vary somewhat between film stocks and even between labs. Extensive testing was needed to make sure that the choices being made were appropriate.

Other tricks of the trade were available to control contrast and saturation and a couple worth noting is flashing and the bleach bypass process. In the late 1960s to the early 1970s, film laboratories and adventerous cinematographers developed a system where unexposed film (Pre-flashing) or exposed film (Post flashing) was exposed to a controlled amount of light, or flashed. This technique raised the base fog level of a film stock and in effect increased its speed, decreased its contrast, somewhat decreased saturation and extended shadow detail. Flashing was often done in combination with push processing. Flashing tended to amerliorate some of the increased contrast and increased graininess that push processing caused. One of the most successful practicioners of film flashing was Vilmos Zsigmond ASC on his work with Robert Altman on “Mccabe and Mrs. Miller” and “The Long Goodbye”. Zsigmond chose to post flash his exposed negative, which is a very risky propostion. Panavision (With th Panaflasher) and Arri (With the Varicon) both produced on camera accessories that could put a controlled amount of light through the lens and on to an image to bring up shadow detail and decrease contrast. These devices also increased the effective speed of the film stock. With the advent of finer grained high speed films flashing fell out of favor.

Bleach bypass is a processing procedure where the step in processing a color filmstock where the silver crystals are bleached out of the stock (leaving only colored dyes) is either partially or totall skipped. This leaves both silver crystals and color dyes in the image and gives a black and white image and a color image over top each other. Bleach bypass increases contrast and graininess and decreases saturation and lattitude (Increased gamma). While invented in the 1960s, bleach bypass did not come to prominence until used by Roger Deakins ASC, BSC on the film “1984”. Since then it has actually been extensively used by a host of great cinematographers, including Janusz Kamiński on “Saving Private Ryan”.

As noted, film image control is quite an extensive topic, and I have just touched it with a very broad brush. Even with that, I am amazed at the control that digital capture and image manipulation has given us.
 
Last edited:
David G. Smith thanks for the reply...I've saved it in my "Read" folder, truly thankful that you got into such detail.

Quick question about a camera technique - just watched Miami Vice the movie, the night scenes look as if the ISO has been cranked very high up, how come Mann didn't want the image cleaned up? Some sequences look down right dirty, and I would say not in a good way. The "nigh" feel is great, but on certain scenes it just looks as if he pushed the camera to the very limits.

I really couldn't speak to why Micheal Mann made the creative choices that he did on "Miami Vice". I have a copy of the film, but I haven't had a chance to watch it yet. Mann is a pretty ballsy filmmaker and does seem to push the technology quite a bit. There is a write up about the film in the August 2006 issue of American Cinematographer. The article is not available on-liine, that I could find, but the issue should be available for back order through the AC website. Here is a link to the article.

http://www.theasc.com/ac_magazine/August2006/toc.php
 
Back
Top