DIY Zacuto Striker For $75

BRILLIANT! Thanks for the detailed information. Very well done!

NB: Threaded inserts provide metal threads that will reduce the possibility of stripping out the threads. And they can also be used for replacing stripped-out threads.

wire-thread-insert-210998.jpg
 
BRILLIANT! Thanks for the detailed information. Very well done!

NB: Threaded inserts provide metal threads that will reduce the possibility of stripping out the threads. And they can also be used for replacing stripped-out threads.

wire-thread-insert-210998.jpg

I haven't had a problem with the threads stripping out yet. But that looks like a good way to fix them if they do.
 
Ok I finally got the tutorial for the clamps done!
The pdf file was too big to upload so I put it on my skydrive.
http://cid-b9e9b58a843a412a.office.live.com/browse.aspx/.Public?uc=1
Some of it is sorta brief (I'm not a good writer) but the cad drawings are pretty informative.

Let me know about any questions you have.

Also, thanks to Eric Ferguson for the link to this ebay store http://stores.ebay.ca/The-Great-Ind...14QQ_sidZ356600274QQ_trksidZp4634Q2ec0Q2em322


This is really great! Thanks for your hard work. I have a couple questions:

1. Would you write up a brief description of how you made the gunstock?
2. How did you make the handle?
 
This is really great! Thanks for your hard work. I have a couple questions:

1. Would you write up a brief description of how you made the gunstock?
2. How did you make the handle?

The Gunstock I simply took a piece of delrin and drew the shape on it sorta by hand. I then used a band saw to cut it out. A jig saw or coping saw would work just fine.
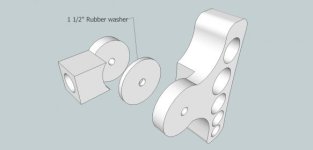
For the pivot I used a combination of bands saw, hole saw and table saw. Basically I made a round part on both the main gunstock part and the smaller part that attaches to the rod.
Then I cut the round portion on both to a little less than half the thickness, drilled a 1/4" hole through the center of both, put a rubber washer in between and used a bolt and wing-nut to hold it together.
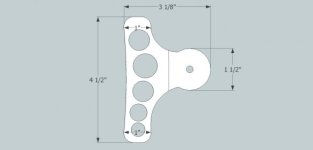
for the holes I simply started with the largest spade bit I could fit reasonably on the piece. I Then kept using different size bits to fill in.

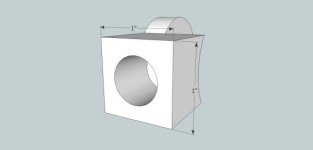
The handle was made by again using a 1" thick piece of delrin. Doing a little bandsawing, drilling a hole to epoxy in a rod on top, drilling holes in the side to lighten it up then using a 1/2" roundover on the router table to round the edges.

That probably sounds kinda rambly and meaningless. I'll try to post at least a pattern for the gunstock soon.

The gunstock is one of the reasons I built this rig. Zacuto is the only seller of a gunstock rig and their prices are sky high!
 
very nicely done! you have excellent crafting skills! I bet you could sell a lot of these :-)

I was trying to find a krasnogorsk pistol grip but they are hard to come by.
 
So for the price of a drill and a saw, looks we can now make any rod based system. Thanks a lot, next few bucks are going towards that ebay link.
 
So for the price of a drill and a saw, looks we can now make any rod based system. Thanks a lot, next few bucks are going towards that ebay link.

Good luck!

I was thinking about making something like the Zacuto DLSR Baseplate http://store.zacuto.com/DSLR-Baseplate.html.
Which would give me the option of mounting a follow focus on the rig.
When I get a week or too off this winter maybe I'll drum something up.

Also, perhaps some hockey tape or something on the rods for friction where the clamps are

The fit on my clamps is pretty snug around the rods. If your holes are a little too big for your rods maybe you could put a bit of hockey tape around the inside of the clamp holes. I think that would work better than putting it on the rods.
 
I talked to a local plastic dealer, and they want 130$ s/f for 1inch.
But he happened to tell me 1 inch polyethylene would probably fit my needs, and is only 20$ s/f, and cheaper online pre-cut to any size.

I think I might try that, then if it works, and if it isn't up to snuff for long term, get delrin once I get the hang of working with the plastic
 
Here is some models of the gunstock that I threw together quik. I don't have time to go through a step by step guide right now but this should give you an idea of how to go about making one.
 

Attachments

  • Gunstock.jpg
    Gunstock.jpg
    8.7 KB · Views: 0
  • Gunstock_rod attachment.jpg
    Gunstock_rod attachment.jpg
    7.1 KB · Views: 0
  • Gunstock_assembly.jpg
    Gunstock_assembly.jpg
    10.8 KB · Views: 0
I wanted try out cad, here's a jpg based 99% (couldn't get the exact dimensions to work somehow) on the pdf you upped. Since there are no fine measurements in the picture, it still should help people wrap their head around on what needs to be done.

haplgaaci.jpg
 
Last edited:
I wanted try out cad, here's a jpg based 99% (couldn't get the exact dimensions to work somehow) on the pdf you upped. Since there are no fine measurements in the picture, it still should help people wrap their head around on what needs to be done.

haplgaaci.jpg

Thanks kevinottawa! That should help people to visualize how to drill the holes for the knobs better.
 
This is great! Thank you so much. Quick question: Maybe im missing something but how did you attach the quick release system to the hollow pipe?
 
This is great! Thank you so much. Quick question: Maybe im missing something but how did you attach the quick release system to the hollow pipe?

I just epoxied a peice of 1/4x20" rod in the end of the pipe and screwed the quick release onto it. I squashed the very end of the pipe a small bit while the epoxy was still soft so that it wouldn't turn loose.
 
Another contact point I have found interesting, when trying to make stabilizers that inter-act with my body, is the back of my neck. If you take a DSLR, put a strap on it and wrap the strap around the back of your neck, along with bracing it from the front like many of the "Chest-Rest" or front of shoulder type configurations like this one, you end up with a push-and-pull system that becomes surprisingly stable. Not to mention, my neck does not cause rise and fall from breathing, or as much side to side motion as my shoulders induce. I can turn my head, look up or down (for the most part), without much problem. You end up steering the camera with your whole body. Especially pulling from the back of your neck, and bracing it from the front of both of your shoulders or your waist. It has it's obvious limitations, but I have found these points of contact on my body are pretty stable when it comes to keeping the camera still.

Hope this makes sense, it is hard to describe with out pics.

Food for thought
 
Last edited:
Back
Top