
Navigation
Install the app
How to install the app on iOS
Follow along with the video below to see how to install our site as a web app on your home screen.
Note: This feature may not be available in some browsers.
More options
You are using an out of date browser. It may not display this or other websites correctly.
You should upgrade or use an alternative browser.
You should upgrade or use an alternative browser.
DIY Loupe/Finder for VDSLR
- Thread starter Ted Ramasola
- Start date
I just joined the forum in order to thank Ted for his plethora of innovative and great ideas! THANK YOU!! 
...and ask some questions while I was at it if I may?
I noticed you said you used 2.5" (63mm) magnifying glass at a distance of about 3" from the display and 1" from the eye. Does this provide any actual magnification or is the idea simply to view the LCD clearly close up and shielded from the sun? I tried building one today but could only find a 2" loupe and used 2" PVC coupling to build the eyepiece. I am very happy with the result as I can view the LCD screen very clearly but am not finding any significant increase in the LCD size (maybe about a 1.25x magnification?). Just wondering if the ones you built actually increase the apparent size of the LCD image in the loupefinder?
Thanks again to Ted and everyone for contributing their ideas!
EDIT: I found the perfect rectangular pencil cup that fits right along the edge of the LCD screen on a Canon T2i! While not as elegant or pretty as some of the other renditions out there, here's a basic concept of what I plan to do with the pencil cup, 2" loupe, and PVC coupler (total $3):
Last edited:

Ted Ramasola
Veteran
Warbandit,
I'm glad you find these ideas useful.
The key to "magnify" the image is to put another spacer between the loupe and your eye. If your eye is next to the loupe, the enlargement wont be apparent. In my designs notice that there is another piece that acts like an eyecup but is also acting as a spacer to create some distance between your eye and the loupe. The key there is to place a spacer with enough magnification but still allows you to see the entire width of the lcd so you wont miss the action.
p.s. welcome to DVXuser!
Thanks for your quick reply! I have put a bit of space in the eye piece and tried to optimize the distance to fit the whole LCD in view but am only getting a slight magnification. Does your configuration make the LCD look any bigger?The key to "magnify" the image is to put another spacer between the loupe and your eye. If your eye is next to the loupe, the enlargement wont be apparent. In my designs notice that there is another piece that acts like an eyecup but is also acting as a spacer to create some distance between your eye and the loupe. The key there is to place a spacer with enough magnification but still allows you to see the entire width of the lcd so you wont miss the action.
Ted Ramasola
Veteran
yes. A very layman way to check, if I place it in front of my palm, view it with my right eye, i can see my fingers much larger than it is viewed with my left eye. Its supposed to give you approximately 3x magnification, give or take.
with 2.5 in loupe, its at 3 and 3/4 inches from lcd surface to CENTER of loupe thickness. or 9.25 cm. Then 1 1/4 inch distance from center of loupe thickness to edge of eyecup rim.
DO note that these distances are dependent of loupe magnification power and is meant as reference only. Your comfortable viewing might also vary.
Last edited:

Rollographer
New member
Thank you for the tutorial Ted! I now have my very own DIY LCD Loupe Finder thanks to you. The design nearly looks the same but I had to source most of the things at the $2 japanese shop Daiso.
Here's my version on my 550D.

Here's my version on my 550D.
Ted Ramasola
Veteran
bravo!!
Rollographer
New member
I can't find the baffle tubes you used anywhere, is there any other name for them or do you have the brand at all?
Heya rjl0000, the idea here is to show you that you can make it from items found anywhere. The thing is that since we are all in different parts of the world, we would need to find alternatives. Guess what my "baffle tubes" are? The heads of torchlights!
It is just up to your creativity! :thumbsup:
Ted Ramasola
Veteran
:thumbsup::thumbsup:the idea here is to show you that you can make it from items found anywhere. we would need to find alternatives.
Costco: your source for DIY viewfinders.
Costco: your source for DIY viewfinders.
Inspired by this post I looked around my house for plastic packaging. I searched for less than 5 seconds and found what appears to be a nearly perfect container for a viewfinder for my Panasonic GH1. I believe it will be even more perfect for the Canon screens.
It is the right size for the screen, leaves a nice distance back to where I can glue in a magnifying glass at the back. If that was not enough, you can use the end of the bottle as an eyepiece. Its sits just over 1" from where the magnifying glass will go. On top of that you can use the cap as a protective cap from the sun.
I hope others find this information workable, it looks like a perfect solution. You can go to Costco and get Cinnamon, sea salt or other spices in these containers. Probably less than $5 plus you get the seasonings.
A little careful cutting,mounting to my Fancier fluid head plate, some flat black paint inside and out, glue in the lens and I am done. This has to be the easiest viewfinder yet!

Costco: your source for DIY viewfinders.
This will hopefully save a lot of many for people like me thats cash strapped -and lives in "isolation". Give me a few minutes to organize and label construction photos.
Inspired by this post I looked around my house for plastic packaging. I searched for less than 5 seconds and found what appears to be a nearly perfect container for a viewfinder for my Panasonic GH1. I believe it will be even more perfect for the Canon screens.
It is the right size for the screen, leaves a nice distance back to where I can glue in a magnifying glass at the back. If that was not enough, you can use the end of the bottle as an eyepiece. Its sits just over 1" from where the magnifying glass will go. On top of that you can use the cap as a protective cap from the sun.
I hope others find this information workable, it looks like a perfect solution. You can go to Costco and get Cinnamon, sea salt or other spices in these containers. Probably less than $5 plus you get the seasonings.
A little careful cutting,mounting to my Fancier fluid head plate, some flat black paint inside and out, glue in the lens and I am done. This has to be the easiest viewfinder yet!
Ted Ramasola
Veteran
thanks teddy, i joined this to thank you for the posts and the TUT, on all this HDSLR keep up the good work bro ive made a post of one of the rigs i started.
your welcome. ;-)
Ted Ramasola
Veteran
Hi y'all!
Just moved in to big ol' Texas!
I'm checkin the nearby home depots and walmarts for local stuff to be able to make it easy to source parts for our DIYs!
Stay tuned.
;-)
Just moved in to big ol' Texas!
I'm checkin the nearby home depots and walmarts for local stuff to be able to make it easy to source parts for our DIYs!
Stay tuned.
;-)
skinheaddave
Member
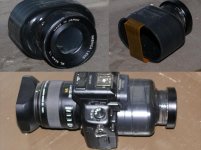
Here's my take. The main casing is off of an old (70s?) aquarium pump. I made a cardboard cut-out of my screen size and then just walked through my parts shed until I found something the right size. The turret and lens are old SLR lens parts. Over the years I've accumulated the odd defective lens, broken lens etc. and taken them apart. So I just forked through the bunch to find a good piece of glass and something to mount it in. The only real variation on the theme here is that I used the data ribbon from an old printer to attach the lens to the swivel screen on my GH2. Because of the wire running through the ribbon, it is very strong, very thin and bendable at a sharp 90 degrees. Right now it is just electrical taped on until I know I am happy with it. Eventually I'll likely put slits in the casing and affix the ribbon to the inside of the case at the appropriate tension.
And yes, that adds some weight to the swivel mechanism but I'm taking a gamble on this one and saying the extra wear won't cause a problem at least until "for parts" GH2s are more available on ebay. It is worth it for me for the versatility vs. a fixed loupe.
Cheers,
Dave
And yes, that adds some weight to the swivel mechanism but I'm taking a gamble on this one and saying the extra wear won't cause a problem at least until "for parts" GH2s are more available on ebay. It is worth it for me for the versatility vs. a fixed loupe.
Cheers,
Dave
Last edited:

Ted, thanks for your ideas. Really helping people out. I am a newbie, and i was wondering the tools you used for boring / drilling the aluminum for your rails, and how do you cut small holes on your mount, when you have some big metal scissors. My problem is : I don't have the tools, what i want is being able to drill 16mm , or 4mm holes in the aluminum parts. Thanks and see you around!
Ted Ramasola
Veteran
mustikit , I used a drill press for the holes that require drilling. Hope that helps. Having just moved, I'm also in the process of acquiring new tools.
Ted Ramasola
Veteran
Hey Ted- Glad to have you out here in the states! Welcome!
Though this is late as I've just opened this thread, Thank you for the welcome.
 I appreciate it.