I made this crane about a year ago and wanted to make a video about building it. Still working on that, but I was using it and thought I would take a few pictures. In the background you will also see the doorway dolly I am making. All the material was purchased from the internet. If you can drill, tap, and cut metal anyone can build this. Pull the pin on the yoke and you can control the tilt by hand. I have about $150 in the material. I am making a much better one. You will build it in 3 foot sections and should have a 16 foot boom without extra support. The turret will be heavy construction with bearings and a drag for resistance and stopping.

Navigation
Install the app
How to install the app on iOS
Follow along with the video below to see how to install our site as a web app on your home screen.
Note: This feature may not be available in some browsers.
More options
You are using an out of date browser. It may not display this or other websites correctly.
You should upgrade or use an alternative browser.
You should upgrade or use an alternative browser.
DIY Jib Crane
- Thread starter jimith
- Start date
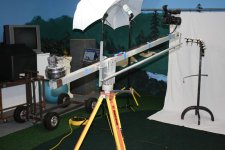
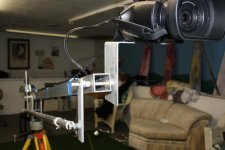
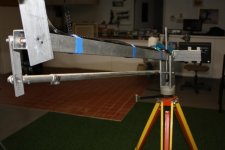
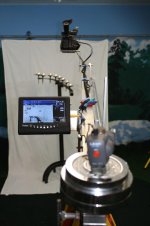
I'd be interested to see how you add the drag.
The surveyor's tripod is a good way to go. Cheap, very solid, and flat top. I did the same thing. I don't see a spreader in those pictures. I recommend you add one if you don't already have it. You won't be happy if one of those legs slip out from under the weight.
The surveyor's tripod is a good way to go. Cheap, very solid, and flat top. I did the same thing. I don't see a spreader in those pictures. I recommend you add one if you don't already have it. You won't be happy if one of those legs slip out from under the weight.
aeriallens
New member
Thanks to you, Jimmy, I put something together utilizing the Go Cart hub idea! You were correct - solid as a rock. Because of parts I could access easily, mine does differ in a number of respects...because of the materials I could access most easily and because the camera (Pany LX7 with wide adapter) will weigh less than 2 pounds.
... the tripod is a salvaged work light stand modified to hold the gocart hub and yolk very securely;
... main element is a telescoping pool skimmer pole with locking collars (Ace Hardware);
... control element is fabricated from laundry line supports and a hollow painters pole -- all very inexpensive (parts can be made into a telescoping assembly;
... main bearings at yolk and camera head are from set of flea market/GoodWill Store roller blade wheels;
... many parts are from "sit-up" style exercise equipment (like the weight holders, and tilt handle) for around 3 or 4 dollars, etc., etc.
Functionality looks like it will be good, maybe 95% of yours, but obviously the durability is going to be more like 60-70%, but should last a good long time if taken care of. It is not rikkety or flimsy at all - pretty solid. The camera will reach past the yolk when setup from 3-1/2 to about 7-1/2 feet. The maximum lens height measures 11-1/2 feet from the ground (with light stand extended to full 5 feet).
This all breaks down pretty well to be about 5 feet long. As you can see from the photos (sorry - phone quality only), this has just been assembled for fitup and adjustment. Should be done with it tomorrow.
Anyway, here are the photos...notice my "camera" stand-in for this fitup session is a solid rubber wheel of the correct weight.
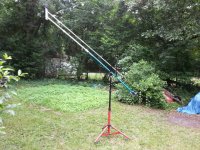
Fully extended during fitup process.
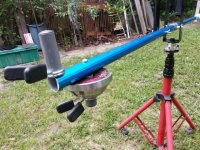
Weight holders (savaged for pennys).
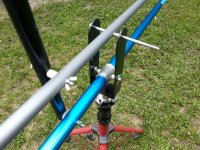
Yolk is cut and welded from 8 Ga sheet metal/flat bar. This is just for fitting - all bearings/bushings not present in photo.
Notice a section of (found) aluminum tubing is added over the pool pole at the pivot location to de-concentrate bending forces.
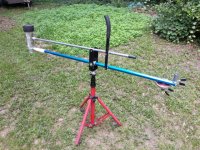
In its unextended form, this will be good for smaller spaces. All works very smoothly.
Thanks for the inspiration -
Phil
... the tripod is a salvaged work light stand modified to hold the gocart hub and yolk very securely;
... main element is a telescoping pool skimmer pole with locking collars (Ace Hardware);
... control element is fabricated from laundry line supports and a hollow painters pole -- all very inexpensive (parts can be made into a telescoping assembly;
... main bearings at yolk and camera head are from set of flea market/GoodWill Store roller blade wheels;
... many parts are from "sit-up" style exercise equipment (like the weight holders, and tilt handle) for around 3 or 4 dollars, etc., etc.
Functionality looks like it will be good, maybe 95% of yours, but obviously the durability is going to be more like 60-70%, but should last a good long time if taken care of. It is not rikkety or flimsy at all - pretty solid. The camera will reach past the yolk when setup from 3-1/2 to about 7-1/2 feet. The maximum lens height measures 11-1/2 feet from the ground (with light stand extended to full 5 feet).
This all breaks down pretty well to be about 5 feet long. As you can see from the photos (sorry - phone quality only), this has just been assembled for fitup and adjustment. Should be done with it tomorrow.
Anyway, here are the photos...notice my "camera" stand-in for this fitup session is a solid rubber wheel of the correct weight.
Fully extended during fitup process.
Weight holders (savaged for pennys).
Yolk is cut and welded from 8 Ga sheet metal/flat bar. This is just for fitting - all bearings/bushings not present in photo.
Notice a section of (found) aluminum tubing is added over the pool pole at the pivot location to de-concentrate bending forces.
In its unextended form, this will be good for smaller spaces. All works very smoothly.
Thanks for the inspiration -
Phil
Last edited: