
Navigation
Install the app
How to install the app on iOS
Follow along with the video below to see how to install our site as a web app on your home screen.
Note: This feature may not be available in some browsers.
More options
You are using an out of date browser. It may not display this or other websites correctly.
You should upgrade or use an alternative browser.
You should upgrade or use an alternative browser.
DIY IndieSlider...
- Thread starter ZazaCast
- Start date
Hey all
So I finally got around to shooting a bit of test footage, nothing major, just some clips of my car. Just wondering if anyone has any tips for post processing where there is a slight jerk in the video? Maybe it's the way I exported the clips from Premiere CS5, not sure, but has anyone done any post such as slowing down the clip, frame blending, or any plugins etc. that may result in a more smoother motion? Maybe it's the frame rate (I shot this at 24fps)?
This slider is smooth as silk though! Thanks zaza for all the tips!
Cheers.
Last edited:

ZazaCast
Major Contributor
Nice car! Looks good. You can see all kinds of slider shots in my web site(s). If you're shooting 24p, remember the 7 second rule, nothing can cross the screen in less then 7 seconds or you will get that 'jumpy' look...so just slow down a bit. Also, like anything else, you have to practice sliding to get nice smooth starts & stops. Make sure your rig is centered on the carriage & keep your sliding hand low (down by the carriage).
Happy sliding!
Happy sliding!
pedromfgomes
New member
Can I buy the WS-10-40 with the WW-10-40-10-HKA? ?
Is it too different to be 10-40 or 16-60? Its for a DSLR.. so i think 10-40 is enough. no?
Is it too different to be 10-40 or 16-60? Its for a DSLR.. so i think 10-40 is enough. no?
ZazaCast
Major Contributor
Can I buy the WS-10-40 with the WW-10-40-10-HKA? ?
Is it too different to be 10-40 or 16-60? Its for a DSLR.. so i think 10-40 is enough. no?
Yes, the 10-40 will work for smaller camera rigs...just be sure to center the rig on the carriage & don't make it too heavy.

SkunkWorks
Member
Nice, mang.Upgrade glide to movement with belt :shocked:
Saw this and realized I never did post my mods here at this forum. I motorized mine witha 12VDC window crank motor (high torque) and pwm speed controller with direction switch. Wanted the belt to run over and under so it would pull on the center of the carriage. Never got around to installing my safety cutoff switches at either end... maybe that'll be my next project after putting the finishing touches on my DIY jib. Here's a pic, more can be found at this link...
http://www.skunkworksonline.ca/misc/slider2/
click to enlarge...
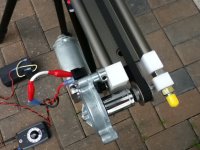
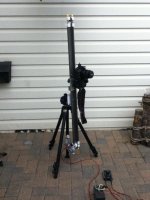
Here's a quick shot of my moterized zaza slider:
This was pretty easy to do although the parts for the wheel and motor shaft were a bit of a pain to find. In the end after lots of searching I found the parts at a local RC hobby store. I used a wheel hub from an RC car and a small shaft (that screwed onto the motor shaft) off an RC helicopter! Total cost was about $25 so not bad!
This was pretty easy to do although the parts for the wheel and motor shaft were a bit of a pain to find. In the end after lots of searching I found the parts at a local RC hobby store. I used a wheel hub from an RC car and a small shaft (that screwed onto the motor shaft) off an RC helicopter! Total cost was about $25 so not bad!
DeterminedFilmmaker
Active member
Look's great and professional. The video you took looks really good.
SkunkWorks
Member
Thanks, mang.Skunkworks & mrl72....great job on motorizing the ZazaSlider! I keep looking for just the right kit at the right price.
I Just DIY'd it all

- pwm circuit board from ebay
- project box and switches, LEDs, DC jacks, wire, knob, Ohmite dial plate from my local electronics supply store
- GM automobile 12vdc window crank motor, fuse, 12vdc sealed lead acid AGM battery, quick connects, 12-point 19mm socket, heat shrink tubing from my local Harbor Freight type store, Princess Auto (Canada)... most of it from the surplus section
- various diameters of brass, aluminum and stainless tubing from local hobby store for adapting shafts to other diameters (keep a supply on hand, 1 ft. lengths, very inexpensive, all fit snug inside each other)
- nuts, bolts, L bracket, bolt protector caps, JB-Weld (steel reinforced epoxy) from local hardware stores (Home Depot, Rona etc.)
- block of Delrin ordered from my local Fastenal (keep on hand for all my DIY projects... drills, sands and machines like butta!)
- sometimes buy pieces of aluminum bar or rod from my local Metal Supermarkets (didn't need any this time)
- belt ordered from polybelt.com (USA) and pulleys bought locally from Motion Industries
- lots of free time and Molson Canadian/Budweiser (*disclaimer... do not use while working with power tools or hand saws)
Tools
- protective eyewear (safety first!)
- drill press
- hack saw
- bench mount belt/disc sander
- tap & die set
- soldering iron
- crescent wrench
- allen wrenches
- tape measure, pencil/scriber
- multimeter
- lighter or heat gun
- internet (research, research and more research)
Last edited:
ZazaCast
Major Contributor
- lots of free time and Molson Canadian/Budweiser
- internet (research, research and more research)
Ain't that the truth! :thumbsup:

tom_wise
Well-known member
Nice, mang.
Saw this and realized I never did post my mods here at this forum. I motorized mine witha 12VDC window crank motor (high torque) and pwm speed controller with direction switch. Wanted the belt to run over and under so it would pull on the center of the carriage. Never got around to installing my safety cutoff switches at either end... maybe that'll be my next project after putting the finishing touches on my DIY jib. Here's a pic, more can be found at this link...
http://www.skunkworksonline.ca/misc/slider2/
click to enlarge...
d00d! Quite the set up with that Window Motor! Lovin it!
ZazaCast
Major Contributor
Not a lot cheaper... but cheaper. I'll PM you information...ZaZa you mentioned the price was a lot cheaper for a shorter igus slider I believe. Can you tell me how to get that pricing if it is still available (reading really old posts)
I would prefer something that is 24" long.

jasperfx
New member
I'm looking to construct one of these. I've added the parts to the shopping cart:

Am I good to go here? Just wanted to verify before proceeding with the order...
I also notice the Carriage "3D Cad" diagram on the igus website does not have a hole in the middle, but in your photo, you show "Bottom of carriage, with bolt in place"?
EDIT: I just found the detailed instructions on the zazaslider website, so ignore the previous question!
Last edited:
ZazaCast
Major Contributor
Sorry for the delay, missed this one. Yes, you look good to go.I'm looking to construct one of these. I've added the parts to the shopping cart:
View attachment 42871
Am I good to go here? Just wanted to verify before proceeding with the order...
I also notice the Carriage "3D Cad" diagram on the igus website does not have a hole in the middle, but in your photo, you show "Bottom of carriage, with bolt in place"?
EDIT: I just found the detailed instructions on the zazaslider website, so ignore the previous question!
Slide on!
can anyone tell me in what circustances besides making a longer video shot that a 64inch slider would be better than a 40inch? i just cant justify a $400.00 price difference for 24 extra inches.
Has anyone ever felt that they wish they purchased the longer dolly?
any help on this is much appreciated.
Thanks,
Chris
Has anyone ever felt that they wish they purchased the longer dolly?
any help on this is much appreciated.
Thanks,
Chris
ZazaCast
Major Contributor
can anyone tell me in what circustances besides making a longer video shot that a 64inch slider would be better than a 40inch? i just cant justify a $400.00 price difference for 24 extra inches.
Has anyone ever felt that they wish they purchased the longer dolly?
any help on this is much appreciated.
Thanks,
Chris
Chris... I don't know where you got that $400.00 price difference? But, it's simple... a slider fits in places that a dolly won't, it's easier to set-up and transport...and you can get all kinds of different shots with a slider (dolly in, dolly out, horisonal slide, vertical slider, dutch angle slide, etc...). If you need anything longer then 3'-4'...you should be looking into a dolly, not a slider.
Hope that helps...

BigBoxPro
Member
I have a 60inch slider. The reason I put together a long dolly is the type of shots I needed to achieve. I do a lot of live run-and-gun video. I don't have time to setup a dolly track and hire an assistant to help me get a 4 second shot. When I am shooting classic cars I can lay down my slider and quickly get the shot I need and move on to the next car. You can see some of the shots here:
http://vimeo.com/11461307
I also do a lot of wedding shooting. I wanted to get a shot from behind the pew tracking to the center of the isle. A 40inch slide just would not cut it. There are a lot of slider demos out there that have great shots that end too short. You really get into the shot and then the videographer ran out of track. At the 00:18 mark in this video you can see one of those slides: http://vimeo.com/22194095
One last example is product shots for commercials. I shoot a lot of commercials when the businesses are open for business. In this commercial I was able to setup with minimal disturbance to the customers.
Take care,
Derrick Perrin
BigBoxPro
Member
Hey all
but has anyone done any post such as slowing down the clip, frame blending, or any plugins etc.
Cheers.
Have you tried Twixter for super slow-motion shots? I have wanted to try but have not gotten around to it.