DIY igus (style) home depot slider

wgzn

Veteran
i found myself needing a slider for an early morning shoot tomorrow, and all the local rental shops had already rented theirs out for the weekend.

so i decided to cruise down and explore what i could find at home depot.

after about 90 minutes looking at a variety of rods and closet track stuff, i settled on a collection of bits i thought i could cobble together into something reasonable.
get back home, dig up some surplus skateboard mounting screws, 3 or 4 drill bits (spade bits being pretty crucial) and about 3 hours of cipherin' sawin' and... BAM!

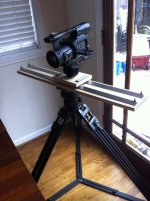
this is what i came up with.

it accepts a head as well as a quick release plate on the bottom. so it mounts up just like normal slider-things.
slides and stops surprisingly well on the tabletop.

shoot is at 9am saturday, will post more pics and results thereafter...
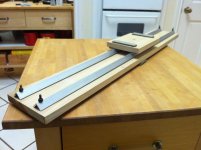
photo (7).jpg
 
Last edited:
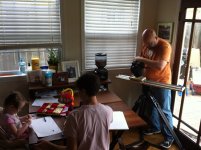
Just finished the shoot. Slides like butter. Absolutely no problems!
Will post more pics and sample video later today
 
ok, after playing with it a good deal this afternoon. i have to say that im really quite pleased - especially considering i didnt really even expect it to work at all...

good points:
- being that its controlled by friction, its MUCH easier to achieve clean starts and stops than it is (in my experience) with sliders with bearings.
- pretty quiet. unless the room is dead silent, you wont even hear it
- since the sled isnt connected to the rails, its easy to pick up the camera if you suddenly have the need to go hand-held.

less than good points:
- since the sled isnt connected to the rails, it would be likely to fall off when unattended. so when not in use, place the camera sled on a safe surface
- since the sled isnt connected to the rails, its harder or sometimes simply impossible to achieve some of the crazy angles you can with a slider where the sled is connected to the rails

so really, for achieving most common slider moves, my only complaints come from the fact that the sled isnt connected to the slider itself.
not bad for an evenings worth of work.

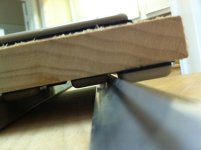
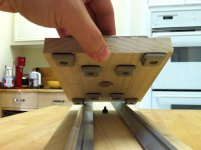
i will say, if you plan on building one. be very, very, VERY meticulous about drilling the rail mounts as near to perfectly parallel as possible. same goes for the nylon slider pads. the more play you leave yourself, the harder it is to get consistent paths.

video sample from this morning's shoot:
http://www.youtube.com/watch?v=EEKa9Pl-m9g&list=UUU3awgmoTZc3tBiJv4qzz9Q&index=2&feature=plcp

another testing video from this afternoon:
http://www.youtube.com/watch?v=AMYeK8tx56g&list=UUU3awgmoTZc3tBiJv4qzz9Q&index=1&feature=plcp

bIMG_5357.jpgbIMG_5362.jpgbIMG_5376.jpgbIMG_5383.jpg
 
Last edited:
Looks nice. How about the sound? Silent?

On a side note, if you want to "upgrade" yours eventually, I've done one with bearings:

Pictures
 
On a side note, if you want to "upgrade" yours eventually, I've done one with bearings:
yours looks great. very well done!

but i intentionally didnt want to use bearings or wheels, because i find that the friction of the two static surfaces makes moves (especially starts and stops) easier to control. at least in my experiences...
 
yours looks great. very well done!

but i intentionally didnt want to use bearings or wheels, because i find that the friction of the two static surfaces makes moves (especially starts and stops) easier to control. at least in my experiences...

Totally agree! :beer: Nice work.
 
refined the design last night. am heading to home depot for some more supplies. its a little more complicated (requires routing and a table saw) but should be much more elegant and easy to use

QUESTION: on the subject of the sled being completely separate from the rails...
does the fact that the sled is completely not connected to the rails make this a deal breaker for anyone?

i kind of thought it added to the simplicity and ease of use. BUT i can see somebody thinking it would be too easy to forget and leave your camera sitting there and watching it a some point get knocked off.

so, ive designed a little keel and groove thing to keep the sled loosely connected to the rails, but it raises the center of gravity of the whole thing by about an inch.
 
Last edited:
shooting with it all day, i never had a problem taking the camera +carriage off and setting it on the ground. but it WAS a pain to have to do it every time i moved the rig.
if it doubled the material cost, id say just deal. but for just a few bucks more? would be kinda dumb not to. ; )
 
simplicity and ingenuity at its finest.
I agree!
QUESTION: on the subject of the sled being completely separate from the rails...
does the fact that the sled is completely not connected to the rails make this a deal breaker for anyone?
Not for me, as my design isn't connected to the rails: the top bearing rolls on them while the side bearings keeps it along the rails. But you simply pull the "sled" to remove it from the rails. Of course, the rails are adjusted in consequence to make the whole thing "tight" enough, so it rolls without problems, but it's not too loose at the same time.
But no, it's not for me. I mean, when you know it, you don't let the camera on it if you're not operating it!
 
decided to forego the keel concept in the interest of size+simplicity.
if someone is going to be that careless with their camera. they'll have bigger issues than this ; )

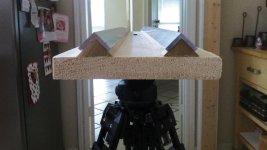
this is pretty close to how the final device will look. but im going to add 1/4" extended vertical base to the pryamid shapes and rout a groove in the base that same depth to accept it. so it will be the same overall profile as this, just be a bit more rigid - not that it needs it. this baby is STIFF!

and i got rid of the bolts in favor of just gluing the aluminum to the foundation...

base.jpg
 
Last edited:
progressed the design and put it up on kickstarter:

drivingboardmark2.jpg

(click the logo above to go to the kickstarter page)

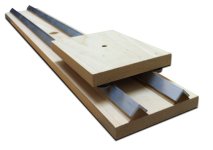
workingmodel.jpg
 
just added a $20 "parts list and plans" and a $100 "bones" (ready to assemble parts) reward levels for the DIY-ers out there...
 
Back
Top