Cinematography lighting game

2dwcmjs.jpg

This time I had no volonteers, so I had to do it all myself. Used some cardboard and taped it unto a window in my garage. I used one 650W with CTB on it and pointed it directly at the gap. As I was the "actor" and camera man all in one. I pulled focus on a wooden stick, started recording and then replaced the stick with myself. Did not work out too great. But I can live with it for testing purposes :)

In the original shot there also seems to be some fill that is filling out Leo's hair a bit. And I should have turned my body and my head more towards to camera, did not see until watching the footage :)
Also my 650W is again a bit too harsh. I should invest in a dimmer or either a 300W bulb. Or I could have stopped down a bit more. Once again not easy to see when not having a actor :)

I love your attempts to learn lighting; keep at it.

I take it you do not have much money to buy gear, so I will offer some suggestions that can be had on the cheap.

As for a dimmer, I use the Harbor Freight Router Controllers which is a standard voltage rheostat and it works great as a dimmer for lights under 1000 Watts. The do warm up a bit so keep an eye on that. They are fused so you will want to have spare 15 amp fuses with you, and they are also sold by Harbor Freight.

Dimming a tungsten light will make it warmer so having some CC gel around to deal with that is a good idea. You can also dim a light by using ND gel or scrims. You can get standardized scrims for your 650s. They come in full single which lowers the light by one stop, full double which lowers the light by two stops and in half singles and half doubles. The half scrims allow you to control the exposure for portions of the beam spread of the light and can be adjusted by rotating them. This lets you light objects in for foreground and back ground to the same light level...Ish, with one light. Using a scrim lowers the intensity of a light without affecting the color temp. Scrims are wire mesh, very much like commonly available window screening and a low budget DIY solution is to actually use metal wire window screens, cut to size with a good pair of tin snips, for lowering the intensity of a light without affecting the color temp. This may take a little trial and error to get the level of light control you need but the material is very cheap. If you are using the scrims near the lights make sure that you use metal screen material. I have some unconventional lights in my kit and I have several rolls of metal screen material that I have cut to use as light control for them. I like a very tight pattern screen made with black colored material. As a safety tip, watch out for the cut edges of the screen material. It is sharp and will play hell with you fingers.

Having blank frames to apply diffusion, gels, or screen material is pretty important, IMHO. You can make some very versatile, sturdy and inexpensive frames from 1/2" PVC pipe. I made two 48"X48", two 36"X36" and two 24"X36" frames out of 1/2" PVC pipe for a cost of less than $25.00. That includes the price of the pipe, corner elbow pieces, T-connectors and the PVC cement. Another safety tip, make sure that you can open the jar of PVC cement before you leave the hardware store. It is sticky stuff and I have had instances where the can caps were sealed tight when I got to making the frames. Just an FYI. The largest frame size you can make with 1/2" PVC pipe, that is stable IMHO, is 48"X48". I leave a 36" pipe in the bottom T-connector for mounting.

To mount these kind of frames you need a grip (Gobo) head that will take that sized pipe. I am a fan of the dmk2 E-Image Gobo Grip Head from these guys on eBay.

You will need stable stands to set up and use frames, and most other light controls. That is actually a topic for another thread, but you should think about it. I have a big pile of cheap stands, and have sworn them off. The best low budget stand that I recommend is the Matthews Studio Equipment Maxi-Steel light stands. Of course, if you have to use inexpensive stands, I understand but good stands are a great investment and will service you for a long time. Cheap stands are, well... Cheap stands and are a PITA to deal with on a day to day basis. Of course you have to do what you have to do.

Like David W. Jones suggested, also get some sandbags. They are indispensable. I did a post on some inexpensive ones I got, but they do not seem to be available anymore. There are a lot of inexpensive unfilled sandbags available on eBay. Pick up a few, fill them with dry sand in double plastic bags and you should be fine. I think that you might want to pick up some more lights. I have some inexpensive suggestions for that but it is late and I am going to bed.
 
Do with what you got for now, but as a side note, I have my best advice for newbies lined up for when I'm rich and famous:

suck it up and buy lights (and real lighting gear).

I'm dirt poor and built up a modest kit little by little (lowel mostly, a cheapo Impact "scoop" for fill etc) , every time I shoot, it proves its value. Using the old hardware worklight and clip on scoops with tracing paper is like trying to do a "painting" with cray-pas. Its close, but....yeah, do what you can to get real lighting gear.

example:

instead of using a flammable destructo-death hardware worklight for fill-- I got a Y connector and two normal 200 watt bulbs, (400 watts0, a (real) sheet of diffusion material (lasts forever)..I mean its not 1000 watts, but it works for fill in low key setups in the tiny locations I shoot in in this learning stage Im in. I'll replace with a tota light eventually.

I was also glad I had this light when it worked (again with 400 watts of regular lightbulb) as frontal lighting/fill (no diffusion) in the on-sight theatre production I lit for a friend.

http://www.bhphotovideo.com/c/product/271348-REG/Impact_401004_Floodlight_Reflector_with_Socket.html

buy lights.
 
Last edited:
Thanks for the comments.

I own 2 Arri 650W, those arent that cheap you know :)

_Anyhow Next Thursday I will upload a new image if nobody replied with their own image :)
 
Great game and you're doing a great job with the gear you have, but yes, the "extras" people have pointed out are essentials, and very helpful!

With light, it's quantity, type, location and control. You need a little help controlling yours.

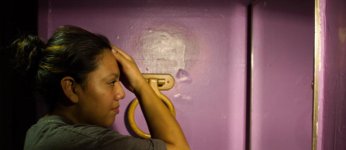
As for the film grabs, note Carrie's raised arm (light on front, shadow on rear) and shadow on her back seem to me to say the key is in front of her.

And Leo has blue/blue green light on his hair and on the wall (colored gels/party gels). Do you have colored gels (not CTB)?

Keep up the good work, and hopefully someone will reply in lighting, not writing... :happy:
 
Yes I have some party gels, where I will playing with this weekend. :)

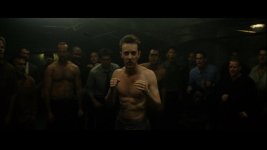
OK next up:
Fight-Club-fight-club-5121213-1706-960.jpg

Note: All the extras are not needed :), only + if you have them.
 
This is one with a Arri 650W upside down with one scrim and a umbrella in front of it.
jv292s.jpg


This one is with the available TL light that is hanging in my garage.
24c8qch.jpg


Thanks for my dad helping me out :)
 
fastest and best way to learn an art form they say

keep it goin folks

let me crit the above even tho Im largely a newb myself:

big overlook/lost opportunity for us beginners is not lighting the background. Youll see in lots of hollywood movies the "hottest" part of the frame is often in the background, creates a feeling of space and depth. Notice the ceiling light in the upper right corner of the fight club frame- brightest part of the frame! theres also the beam of light behind one of the characters in the left background- not as bright, but same principle.

I say take a very low wattage light bulb and hang it as a practical behind your dad or your next victim/volunteer, (let it overexpose into a little "hotspot", it should be brighter than the subject in foreground) and youll be one step closer to hollywood heaven.

OR....related, if you just made the the light on the car BRIGHTER than the light on the foreground subject, you'd get a semi-silhouette effect that will also create drama and depth.
 
Last edited:
This is one of my favorite threads in this forum.
There. Had to say it. :)


Yup. Someone not only asking questions but taking action. Someone bothering to do test shots outside of a big shoot. If I can get on top of my dayjob I'm feeling inspired to play this game. Kudos, keep 'em coming. :thumbsup:
 
View attachment 81854

well i tryed lol my restroom was way to small for this


actually, lighting a small room is good practice, it forces you to think about how to NOT blast the whole room with light and kill all the drama. If you can create a low key effect in a small room then I'm sure you've learned something along the way.

sounds obvious, but in a smaller room use smaller and/or lower wattage lights so you get falloff thats in "scale" with the room. someone tried disagreeing with me on this, but I didnt quite get what they were saying. I'm quite sure location lighting involves the scale of the lights relative to the room size.

Id jump in, but I have a short to shoot next week, Ill post that (elsewhere here).

carry on
 
Last edited:
Thanks everybody for the nice comments :)

@ Joey46: please go ahead and post a other image from a film :)

Ill post one now in case you dont want too ;)
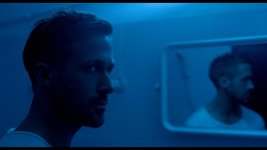
still-of-ryan-gosling-in-only-god-forgives-(2013)-large-picture.jpg
 
Last edited:
Every time I do a study of film lighting & cinematography I am struck by a single element that seems to be in almost every scene: atmosphere. So while a lighting kit is good, one of the first things I'd recommend spending a little cash on would be a hazer. Yes, there are plenty of scenes without atmosphere, but more often than not if you look it's there. It turns the air itself into a canvas upon which to paint with your lights. So powerful, yet it almost hides in plain sight unless you look for it.
 
A hazer is also an excellent way to get fill light when using a single source light, say if you are only using a single light as your backlight. (very similar to the frame posted above of Ryan Gosling)

And no, a hazer is not the same thing as a fog machine. They produce two entirely different effects.
 
Same old 650W with one scrim, some CTB and 1 dark blue partygel, pointed above the mirror.
Indeed some haze may increase the shot a lot(blue fill), too bad hazers are so expensive!
e96onp.jpg


Should I invest in a 300W bulb or a dimmer?
 
Last edited:
Here's my attempt. The quality of the uploading is bad, not sure how your pics are much clearer than mine. How are you uploading?

I wanted to make sure the lighting on the right side of the face wasn't completely dark (in the sample, there is detail in Goslings face, his ear etc).

I have no lights apart from 2 LED panels so this was a little tricky. I used one top left angled down with CBT, so it bounces off the wall and illuminates the front of the subject. Had to bear in mind not to get any harsh rim light. I placed another LED panel slightly off right, to highlight a bit more of the face and contrast the left. I tried to flag it slightly also :D

I know the perspective, positioning and spacing is quite off but hey, didn't have much space to work with.


SamGosling1of1-1.jpg
 
Last edited:
Looking great andrew, you may post a new image if yuou want!

Yes i had problems with the room alsof, this actually my office desk, just put up a mirror, there is Also a table between the mirror and my brother that I coulndt move :)
 
Back
Top