Being Cinematic

PerroneFord

Deals in Lead
Being Cinematic

There is often a lot of discussion on the forums about how to get your recorded images to look more "cinematic". I thought it might be instructive to look at what I consider to be the biggest differences between the common language of western (aka Hollywood) film, and what I tend to see in small budget shorts.

While there are a lot of techniques used in Hollywood that are VERY difficult to replicate on small budgets, there are a number of things that are easily replicated on most budgets that can go a LONG way toward making your piece feel more like Hollywood feature films.

I intend this to be and ongoing discussion where we'll talk initially a week about each of the subjects before migrating to the next piece. The general topics I want to discuss are these:

Framing
Lensing
Camera and Camera Movement
Lighting
Color

Certainly these are not the ONLY subjects in the matter of cinematic feel, but I feel they are among the most important, and among the ones where the greatest differentiation occurs from Hollywood films to backyard films if you will.
 
Framing


We will open our discussion with the idea of framing.

Cinematographers take great pains to construct the frame of narrative work, and a lot can be learned from this. While I don't want to get too bogged down in the fundamentals and minutia, so I'll hit the highlights and we can explore from there.

In constructing your frame, there are a number of things to keep in mind. Certain of these could fall in other categories as many are related, but we'll just start discussing there here:


Frame Size:

Often the first discussion to have in pre-production is what is going to be the frame size of the project. Popular choices are 1.33:1 (aka 4:3), 1.78:1 (16x9), 1.85:1 (now commonly known as Academy though this has changed over the years), 2.35.1 (aka Anamorphic), or 2.40/2.39:1 (or what I call digital anamorphic because it works out to be 1920x800 ).

This choice should serve the story. Though many people LOVE the anamorphic shape, it does not serve every story well. If your film will have open vistas, or will contain scenes where a large number of people must appear on screen together, this shape can work quite well. However, if you are trying to tell an intimate love story, or you are working in tight spaces where you cannot control everything that might show up in a large frame, this is likely not your best choice. If your film will have a heavy mix of people of different heights, like adults and children, then this format can make things quite difficult for you. It will force you onto a wider lens so that you can get everything in the frame.

On the other hand, going to something like 1.33:1, or as was popular years ago, the 1.66:1 frame, you can tell more intimate stories without having to compromise your frame so much. Though today we tend to see this frame size as more TVish.

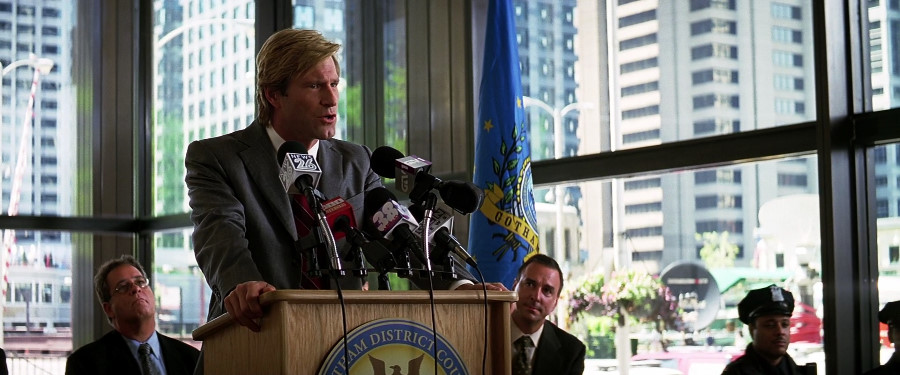
This should be a choice made early in production, before you commit to storyboards and it should serve the story. The movie The Dark Knight, broke new ground by mixing frame sizes in a theatrical presentation. Since they shot to IMAX and 2.35 spherical, the director chose to show both sizes on screen rather than just extract a portion of the IMAX frame. A bold move that worked out beautifully.


Building the Frame:

Now that you have the frame, how do you build it? Books can and have been written on the subject, but the number one thing I notice when I look at Hollywood features compared to small films is "screen depth". This is not the same as depth of field. Instead it's very intentional design of the Hollywood frame to show the size and scale of the "stage" we are playing on. Many small films are shot in very small spaces. Small apartments, small stores, etc. Whereas many popular Hollywood films are filmed in much larger spaces. This simply cannot be faked. However, there are a few things you can do to increase screen depth.

The first and most basic tool for increasing depth in a frame is to move your subjects away from walls. Not only will your gaffer thank you, but you'll be able to get better angles and give the illusion of depth.

900%20largesupremacy4s.jpg
760_9.jpg


Second, is to shoot toward corners of the rooms. This is an amazingly simple trick but one we see every day. shooting on the diagonal in a room gives more depth. That lovely 50" TV in the showroom isn't 50" wide or tall. It's 50" on the diagonal! So move your camera toward a corner and frame your shots so that at least one other corner of the room is in view in the frame.

800%202008_26.jpg

760_13.jpg


Third, bring the outside in. If you are in a room with windows, light the shot so that you can see outside of those windows. Even if you have to fake it with green screen. If you are shooting in a high rise apartment during the day, light so that can see the cityscape out the window. Or if you are in a student apartment, allow us to look outside. This opens up the framing beautifully, and gives some depth to the shot.

900%202.jpg
thedarkknight62.jpg


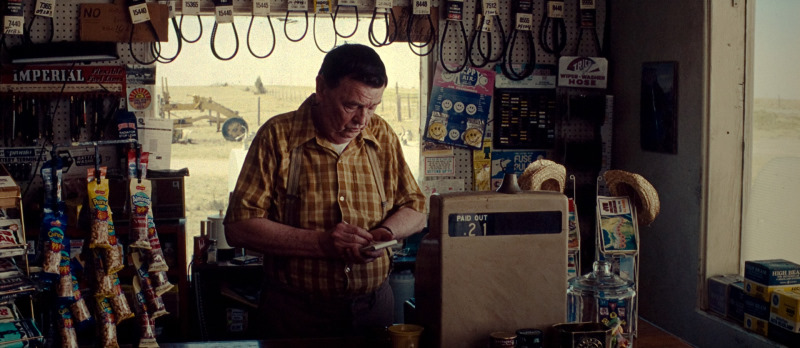
Fourth, if you are outside, try to frame so that we have some scope of where you are. If you're in a field, show us the house or a tractor off in the distance. If you're on a city street, show us what's three blocks behind the character. Those elements don't need to be in focus, but they should be discernible.

screenshot.php
Unfrgn_BD_waiting.jpg
thedarkknight35.jpg


Finally, I want to briefly touch on the idea of DOF. We'll discuss this more when we get to lensing, but I wanted to touch on it here. A great many beginning filmmakers seem to think that shallow DOF = cinematic. Well it doesn't. It's a tool of cinematic language just like all the others we're discussing. And if you truly take note, shallow DOF is typically only used in two primary instances in feature film.

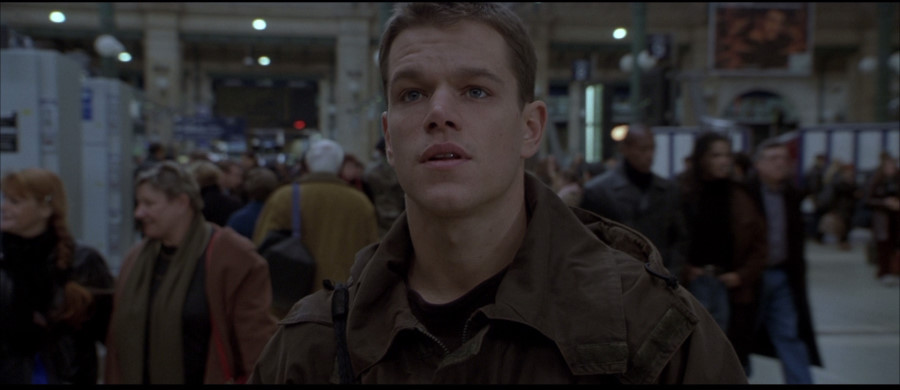
The first, is if we are on a semi-wide shot in a scene with a lot of elements, and we want to guide the audiences eyes to our subject of importance. Think outdoor restaurant scene with 20 patrons, and we want to focus in on our hero talking on his cell phone, or to someone across the table. Here we use shallow DOF to tell the audience who they should be paying attention to.

800%20identity2i.jpg
3004_3.jpg


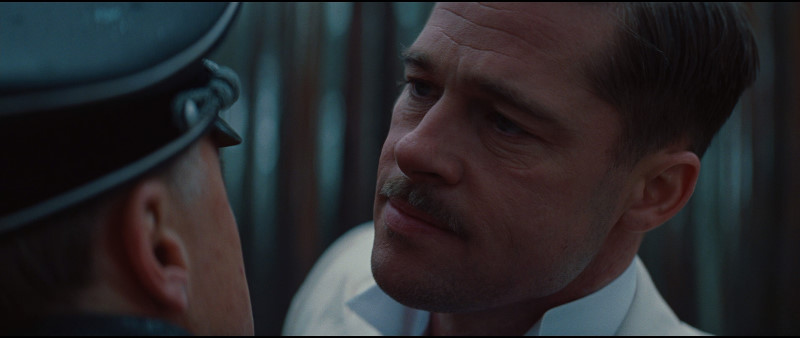
The second primary use of shallow DOF in Hollywood is for the closeup or medium close. And we do this to remove distractions from the frame so the audience can focus on the dialog.

800_inglorious_basterds_blu-ray13.jpg

1_5.jpg


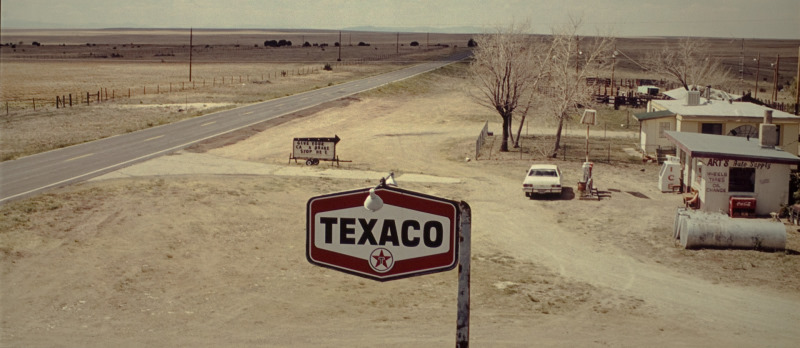
Beyond that, the feature film has gone through TREMENDOUS pains to get great locations to film, and they are very interested in having you look at them. So deeper focus carries the day for all the establishing shots, and a great many of the dialog shots between 2 or more actors. Deep focus shots make your film appear larger and more grand. Many small films feel claustrophobic because they are shot with so little depth.

800%202008_25.jpg
416_10.jpg


So take a cue from Hollywood and get some depth in your framing. You'll be amazed at how the scope of your projects seem to take off.
 
Last edited:
Reserved for Discussions of: Lensing

While I have a few moments this morning, let's also broach the subject of lensing. Now most people are of course aware that if you want a wide shot you grab a wide lens (generally 35mm or less on a FF35 camera), and if you want a tight shot, you grab a longer lens (generally 70-135mm on a FF35). But surely there is more to it than that....

Well of course there is. But not all of it is obvious at first. And some concepts seem to elude new filmmakers, so let's take a look at them stating with outdoor shots


Set your Horizon:


Outdoors, probably the very first decision you need to make is where to set your horizon. Huh? That's right. The point at which the ground meets the sky. Typically, this is set VERY explicitly in the frame for a reason. And we'll discuss that in a moment. There are three customary locations for the horizon in western cinema.


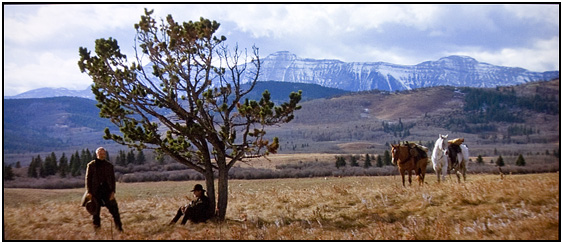
1. On the lower third line

25_5.jpg


2. Center of frame

1346_13.jpg


3. On the upper third line

1435_3.jpg


How do you know which to choose? Choosing the lower third line for the horizon is popular for epics or expanse shots. If you want to show the vastness of the space you are in, then putting the horizon in the lower third does this beautifully. Mid-frame is fairly common and is usually seen when we want a pleasing balance between telling the story, and giving the audience a feeling of "cinema feel". Placing the horizon on the upper third line is usually done with something VERY engaging is happening in the foreground. Maybe two characters are arguing or fighting. Or we're tight to a character as they deliver some weighty dialog. This will make more sense when we get to lens height.

Try to make your choice of Horizon's match shot to shot as it sets the cinematic tone for the scene in which you're in. If you want to show your hero riding off into the sunset (ala any John Ford western), you'll be on a wide, and your horizon will be low. If you are showing a showdown on the main street, midday, the horizon will likely be center frame. And if you are showing the villain being thrown headfirst out of a bar, then the horizon is likely going to be high in the frame.


Choose your lens height:

If there is any single thing which I see new filmmakers get totally messed up, it's this one. Right behind bad audio, and poor lighting choices. How high should the camera be. For the sake of this discussion we are talking about tripod, hand-held, or dolly heights. Not doggie cam heights or crane/jib heights. We'll discuss those in camera movement.

In general, for narrative story telling we have four common heights.


1. Knee height

3092_19.jpg


2. Waist height

685_7.jpg


3. Chest/Shoulder height

791_10.jpg
1296_graded.jpg


4. Eye height

477_3.jpg


These are very, very specific.

When we go to watch a movie, we want to see larger than life characters on the screen taking us through a story. The easiest way to take us out of our "real" world and into the "world of make believe" is to position the camera at a height that is improbable. The "normal" height for your narrative should be shoulder height. Fortunately, if your camera is level, and you attempt to frame the eyes on the upper third line, you'll generally find the camera needs to be positioned near the height of the shoulder to make it work. It's amazing how many movies of new filmmakers I see where the camera is tilted down for most of the production and it diminishes the entire experience.

We move slightly lower to chest height in the closeups. This let's us have a slight up angle on the actors, and really pops them off the screen. The audience is made to feel that they are somehow watching giants on the screen and they are important, and what they are saying is important.

The waist high shot is common for medium shots, and for group shots. We've got to pull back here to get these shots, and we move the camera lower to get the eyes in the right place. Nothing particularly difficult about this one other than the fact it's best executed on a dolly, and most new filmmakers don't have one.

And finally the knee shot. In the wide, we drop the camera here to set the horizon lower, since we are nearly always tilted up. And we do this to add "menace". The audience feels like a 5 year old watching giants on the screen. Don't stay here for long or it get's terribly uncomfortable. But think how often in your favorite movies, the antagonist is either introduced this way, or is shown this way as they are doing things that MAKE them the antagonist.

A final thought on lens height and tilt. I can think of 100 reasons why you might want to tilt the camera upward. And I can think of a lot of reasons to make sure it is absolutely level. But I can only think of a couple instances where the camera should be pointed down, and the primary one is POV. As a general rule, set your camera lower rather than pointing it down. This is usually really bad form, and will diminish your story.


Shooting clean vs. filtering

I've only got a couple words here. I prefer to shoot clean. Any by clean I mean with only ND or polarizers. A lot of people go into their shoot knowing EXACTLY what they want in post. Generally, I don't know exactly. So I light to my general ideas, and lens to my ideas, but I leave a little crop room for post, and I keep the lens free of unnecessary glass. If you are going to filter, be SURE you know why you are doing it, and understanding that you may be walking off a cliff.


New glass vs old glass

New glass is sharp, rich, and contrasty. Old glass is soft, generally less rich, and generally not that contrasty. My shooting style and the subjects I prefer make old glass more the better choice for me. But that's not the case for everyone. So choose the glass you need.


More?

I'll leave this one open to discuss more topics later.
 
Last edited:
Since I am battling insomnia, I thought I'd take a few moments to start a discusssion on lighting. Everyone seems to know that lighting is the primary tool of the cinematographer to tell the story. Thus lighting is a huge subject, and many, many books have been written about it.

We will only go over the most basic of concepts here including:

Intensity
Direction
Quality (hardness or softness)

Ordinarily we'd discuss color, but I am leaving that for it's own subject.


Intensity:


So let's start with a discussion of lighting intensity. At the most fundamental level, the intensity of your light must be enough to create an image on the film or the sensor. I would take that a bit further and say that the fundamental level of light on your set should create a noise-FREE exposure. What you do from there is up to you. The two most common ways of measuring light on a set are the light meter and the waveform monitor. Each of these tools do similar things in very different ways. And in some regards have different strengths. Suffice it to say that having at least one on a set is absolutely CRITICAL, and having both is a very good idea.

How much light is required to make a noise free image? Well, in ye olden days of film, you'd test for that. Load up some film in a camera, set your lighting to a known level, and expose the film in half stops until you arrived at the noise level you liked. In the digital world, you are looking to see where on the waveform the blacks should sit to lift them out of the noise zone. And this varies by camera. Some cameras may be relatively noise free when the waveform monitor is at 7IRE. Others may want 10 or 15. Don't listen to what someone on the internet said. Test YOUR camera for yourself and see. By bringing up this "base level", you will be reducing the contrast. Your shadows will be gray instead of black. That's ok. You'll put them back where they belong in post, and they will be crisp and clean blacks, and not noisy mush.

With base levels established, it's time to worry about highlights. Notice I skipped over lighting the talent. We'll get there, but your MAJOR job on set is to make sure that you capture everything. If your darks are too dark, or your whites too white, you'll lose information, and likely lose future work. Get the image into the camera cleanly, and many things are fixable in post. Lose the information, and you're toast. So, on the top end, we want to make sure that the whites are not out of range. On some cameras this is hard limited at 100 IRE. In others, it might allow for up to 109 or 112 IRE. You'd like to be sure that whatever it is, you never exceed it. And you probably want to give yourself a bit of cusion. The "knee" settings in professional level cameras let you dictate how those highs are reined in. Learn the knee settings for your camera and practice with them!

Ok, technicals aside. Now lets worry about the talent. The primary objective is to light the talent in such a way that we get their image onto the camera in a pleasing way, while trying to follow the directors intent. This is a crucial point. The director is not a cinematographer. You are. I've shot too films where I asked the director their intent, and they told me they wanted it DARK. Crushed black. To be fair, both were quite new directors, and that statement can sink your heart as a Cinematographer after you spend a lot of time figuring out how to craft the lights just right, and get the shadows placed, and then you find out it's all going to just get hammered.


Direction:


So how do you light the talent? Well, there are a million ways. Old Hollywood used primarily front lighting up high. Lights were placed on the camera side of the talent (meaning the lights were either behind the camera or between the camera and the actor(s). This is very theatrical, especially with "hard" lighting which we will discuss in a few moments. You could place your primary, or key lighting to the side of the talent, about 90 degrees to the camera. Or you could place the key behind the talent at some varying degree. This has become the newest Hollywood style and is considered more correct right now. With the talent lit from behind, it becomes far easier to separate them from their background, and we end up shooting the front of their face in shadow. To bring those shadows to the desired level, we then fill in on the camera side. Look at the first image in this series of Gary Oldman. The construct here is that he is key lit from camera left, and filled from camera right. If we were to diagram that, ignoring screen depth it would be:

Key light - Talent - Camera - Fill

You will see this motif over, and over, and over again in modern movies. The direction may change to:

Fill - Camera - Talent - Key

if we are shooting a subject placed on the other side of the screen, but this is common visual language of film. There is something else VERY critical here with lighting and it bears breaking out on it's own. It is the absolutely RARE occurance that the actor is the brightest thing in the frame. About the only time you can really get away with doing this, is if there are no light sources in the frame, and we are playing in the dark, dawn, or dusk. Otherwise, making your actor the brightest thing on-screen is a risky proposition.


Quality:

Should you use hard light of soft, and what does that mean? Hard light produces a very well defined shadow edge on whatever it falls on. Look at the image of Humphrey Bogart. Notice the shadow of his hat aross his face. It's sharp and well defiend. This is the kind of shadow produced by taking a common lighting instrument like a fresnel or open faced light, pushing it up about 6-10ft above an actor's head about 15ft away, and pointing it at them. This was the way it was done all those years ago. It's rarely done now. Today's trends are more toward natural lighting. We want the light to appear as if it's happening naturally. Look at the third image with Morgan Freeman seated at the table. The light behind the two gentleman is a HUGE source. It's tall and wide. And as such it creates very soft shadows. And the two men are backlight. Had the scene been shot that way, these men would be silhouettes against a window. So, fill light was provided from the camera side. But you don't see it. And the reason you don't see it is because it is also a HUGE source of light that is casting very soft shadows. You know it's there and that it's intense, because the lower reaches of the tablecloth are WELL light, and that doesn't happen by chance. Look at the shadows of the bowls on the service table. The strongest light is coming from camera left, but it's "hidden" inside the very soft backlight and front light. This scene, lit by Wally Pfister, is a masterpiece. There are dozens upon dozens of them in The Dark Knight. It's no accident he as tapped again to light Inception.

So hard lights cast a strong shadow, and soft lights produce soft shadows. So what? If you are playing a scene in a small space (say a small kitchen or bathroom) then it's very unrealistic to use a massive source in there. It just won't look natural. Similarly, if you are in a hotel lobby with a dozen bay windows hitting the talent, a hard light is going to stick out like a sore thumb.

One other point. The closeup. Here is a basic rule to keep you in the good graces of your actors. The closer we are, the softer you want the light in general. Soft light smooths wrinkles on-screen. It hides bags under the eyes, and skin issues. Hard light makes them all stand out. The closer the light is to the angle of the camera-to-talent, the more it will remove bags under the eyes, wrinkles, etc. So if you place a large, soft source right over the camera position, you're going to be very flattering to the talent. That is not always easy to do in a wider shot, but in closeup, it's not too bad. This is critical for lighting women in closeup. And for goodness sakes, as your actors age, especially women, don't push in super tight. No actress, or actor for that matter, wants to see their aging skin magnified 100;1 on a 40ft screen. Back up some and protect your talent. And get some light in there!

Ok, real quick...


Soft sources:

Bounces (the bigger the bounce source the softer the light. A bed sheet makes a nice source)
Fluorescents (These are naturally soft, and usually quite flattering.)
Zips (Advanced tools. You'll know them when you need to know them)
Diffused Open Face (Putting diffusion in front of open face lights is the least soft of the group, but effective)


Hard sources

Bare bulbs (A common home light with no lamp shade)
HMI/Fresnels (These are the most common movie lights on a set. Bounce them to get them soft)
Pars (VERY hard sources)


There's a ton of other kinds of lights, these are just the most common for beginners. By the time you're playing the world of Brutes, Dinos, etc., you'll know everything and won't need this thread! :)

Pay attention to movies you watch. Pause the scenes randomly on a movie you know well, and play "guess the lighting". I still do this, and learn something from every film I watch.
 
Last edited:
Threads like these are why the cinematography forum on DVXuser is the best.

'What tripod should I use?' or 'how do I get this look?' threads are never this classy! :)
 
Perrone,

This is fantastic and very well presented. Thank you.

I would also look forward to your thoughts regarding shot size and the general motivation for using a Close Up versus a Medium shot, etc.
 
Perrone, since your covering all the basic textbook stuff can you use examples from your own work. In fact I'd like to see other cinematographers also use examples from their own work in the cinematography section. I'm just a simple producer who gets to be behind the camera from time to time and I have no problem showing examples of my stuff. Inspire all of us who fumble along doing the best we can under our non-existant budgets how you handle things. Lead by example. I know I'm always trying to improve whenever I can.

For example even on longer shots I try to explore the environment from more than one angle:

pits_003.jpg


pits_008.jpg


pits_005.jpg
 
Perrone, since your covering all the basic textbook stuff can you use examples from your own work. In fact I'd like to see other cinematographers also use examples from their own work in the cinematography section.

That's a good idea. Unfortunately, a lot of my work is corporate so I don't get to explore this stuff all that often for myself. However, I do have some pieces I could share.
 
That's a good idea. Unfortunately, a lot of my work is corporate so I don't get to explore this stuff all that often for myself. However, I do have some pieces I could share.

That would be excellent. The more visual sharing around here amoungst us all the more we can grow and develop. I got a lot of what I try to apply from the Hollywood Camerawork DVD series. So I know that understanding and applying the basics really has an impact on the look and feel of your shots.

So in looking for opportunities for deep staging, instead of this:

school_018.jpg


Use extras to help give the shot more emphasized depth and make your scene more like its part of the real world.

school_013.jpg


And then build them into the entire scene.

school_022.jpg


school_023.jpg
 
Another aspect of composition and blocking that is often overlooked is the role of EYE-TRACE: meaning, the point within the frame where the audience's attention is fixed. proper planning for eye-trace to match across edits results in a more seamless, fluid, invisible cut.

As an editor, I'm keenly aware of a top cinematographer's prep and planning for the handling of audience attention between shots. It's no accident. EYE-TRACE is most often fixed upon an actor's face. But it can and should move within the shot. The mindful filmmaker has visualized these markers and charts where the viewer's attention is at each intended edit point so they may synchronize it across each cut. After emotional continuity, it is one of the first considerations a film editor makes to execute a good cut.

The most beneficial tool, I imagine, is to extend beyond just storyboards and to pre-vis your film. This serves as an audition of the film's composition and editing, using EYE-TRACE to unify the two through subsequent revisions.

Now you better sit down for this part because I'm about to praise a Michael Bay movie. I was in a waiting room and of all things BAD BOYS 2 was playing. It was a morgue scene. If you have the opportunity to take this scene in, watch how carefully EYE-TRACE was managed. You'll often see the point of attention move within a shot especially as dialogue swings your attention from one character to another, but in perfect sync with the point of your attention in the subsequent shot.

SKIP AHEAD TO 4:45 and witness how matching EYE-TRACE connects across a good number of the shots to help guide the audience's attention across cuts within the same location but also as location changes with cuts to parallel action.

WARNING: Not Safe For Work - Nudity and Violence
IMPORTANT NOTICE: No media files are hosted on these forums. By clicking the link below you agree to view content from an external website. We can not be held responsible for the suitability or legality of this material. If the video does not play, wait a minute or try again later.
I AGREE

SKIP AHEAD TO 4:45

Any DP and director who are storyboarding and composing not only for each shot, but for the way in which they will connect, are operating on a level that warrants our study.
 
Another aspect of composition and blocking that is often overlooked is the role of EYE-TRACE: meaning, the point within the frame where the audience's attention is fixed. proper planning for eye-trace to match across edits results in a more seamless, fluid, invisible cut..

Totally agreed with you here. It's the most telling sign to me between hobbyists, new filmmakers and the bigger boys.

Funny how the use of editing is inherently the unique about the medium.
 
Good post indeed specially for those who are new to filmmaking.

This confusion that people usually experience is a proof of how competent these professionals are, who not just make beautiful images but make the technique behind invisible a true achievement of cinematic prouductions.

The key is to get in contact with every aspect of cinematic production, every technique behind the result, so our own analytical capability is raised and then we can discern, analyze and learn. With this in mind the statement that "is better to learn on a set than on filmschool" makes sense. Note that I'm not saying filmschool is worthless, I went to one, I made lots of movies, I read a lot about filmmaking and I learned and still am learning.

Filmmaking is a learning process spread across the entire span of our lives, true passion.
 
Good thread.

Could you explain this a bit more?

The movie The Dark Knight, broke new ground by mixing frame sizes in a theatrical presentation. Since they shot to IMAX and 2.35 spherical, the director chose to show both sizes on screen rather than just extract a portion of the IMAX frame. A bold move that worked out beautifully

I don't really get why you'd mix the frame sizes.
 
Back
Top