

Gabriel Berube
Well-known member
Hi guys,
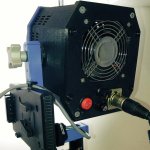
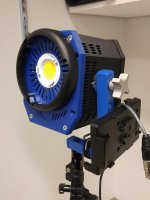
Just wanted to show you a little LED project I've been working on for more than a year. I've designed and built a prototype single-source LED light, with the housing entirely 3D-printed by me at home. The unit is 90W, daylight-balanced, 90CRI (min) and can be dimmed between 10 and 100%. The 3D-printed plastic housing is heat-resistant so that it won't deform even when left in a car on a hot sunny day, and can be printed out in many colors. The max light output is around 1400 lumens at a distance of 2m (120 degree angle), or 2300 lumens with a 90 degree reflector. I also added a bowen-s mount to use some accessories I already had on hands, and a v-mount battery bracket so that the unit can be as mobile as possible. A 130Wh battery lasts a bit more than 1h40m at full power. The main point of this project was to build myself some LED lights that I could easily repair and customize, and also upgrade when technology gets better. LED manufacturers are still making good strides in lumen/watt efficiency and most video LED manufcaturers are making it very difficult and expensive to upgrade, so I wanted to see if I could do better.
All in all, I'm quite satisfied with how this project turned out, and thus built myself 5 units : 3 daylight and 2 tungsten. I'm currently finishing the design of a custom barndoor holder and also a fresnel lens specially made for this unit. I'm currently renting these units from my little business, and lots of my customers really love 'em, so I thought I'd share this here with you guys
I'll be taking orders soon if any of you want some for your projects!
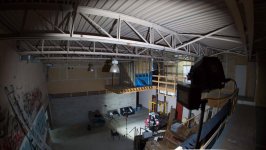
Joking aside, here are some photos for those curious to see what it looks like, and a photo from a friend who used the unit from far up on one of his shoot. Let me know your thoughts, or if you'd like to see more photos in actions, I always appreciate insights from other professionnals!
Just wanted to show you a little LED project I've been working on for more than a year. I've designed and built a prototype single-source LED light, with the housing entirely 3D-printed by me at home. The unit is 90W, daylight-balanced, 90CRI (min) and can be dimmed between 10 and 100%. The 3D-printed plastic housing is heat-resistant so that it won't deform even when left in a car on a hot sunny day, and can be printed out in many colors. The max light output is around 1400 lumens at a distance of 2m (120 degree angle), or 2300 lumens with a 90 degree reflector. I also added a bowen-s mount to use some accessories I already had on hands, and a v-mount battery bracket so that the unit can be as mobile as possible. A 130Wh battery lasts a bit more than 1h40m at full power. The main point of this project was to build myself some LED lights that I could easily repair and customize, and also upgrade when technology gets better. LED manufacturers are still making good strides in lumen/watt efficiency and most video LED manufcaturers are making it very difficult and expensive to upgrade, so I wanted to see if I could do better.
All in all, I'm quite satisfied with how this project turned out, and thus built myself 5 units : 3 daylight and 2 tungsten. I'm currently finishing the design of a custom barndoor holder and also a fresnel lens specially made for this unit. I'm currently renting these units from my little business, and lots of my customers really love 'em, so I thought I'd share this here with you guys
I'll be taking orders soon if any of you want some for your projects!
Joking aside, here are some photos for those curious to see what it looks like, and a photo from a friend who used the unit from far up on one of his shoot. Let me know your thoughts, or if you'd like to see more photos in actions, I always appreciate insights from other professionnals!


