Nathan Beaman
Well-known member
Here it is, the HVX solution we’ve all been looking for – a cheap, reliable and personally I think better alternative to finicky P2 Stores and the cumbersome FS-100. People have been trying to find a battery-powered portable drive system to be able to dump their P2 footage while in the field. Unfortunately most of the products on the market are only available with a USB bus – which isn’t supported by the HVX200 in Host mode and I have yet to find an affordable drive that can act itself as a USB host. It would seem that the simplest answer to this puzzle is to find a self-powered portable drive with a supported firewire bus to link into the HVX200’s native 1394 Host mode – and if possible shock resistant for those run and gun shoot days we’re all far too familiar with. People have been frantically searching for this self-powered pocket sized firewire hard drive since the HVX200 came on the market – it’s been right in front of us all along.
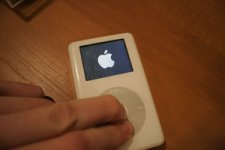
The Answer: 4th Generation and older iPods.
With the release of the Video iPod Apple disabled the firewire interface on the iPod for any use other than use as a power source, but the earlier iPods are dependent upon this firewire interface – as they used to be an Apple focused product and have since switch to USB 2 to appeal to a wider PC market.
I am using a 60GB iPod Photo in this tutorial. Grand Total of my cost was $20 as I was given the iPod from someone who thought is was broken. You can grab a 60GB iPod Photo off of ebay for a little over $100.
Now let’s make an iStore!
Step 1: Get yourself a 4th Generation iPod with an iPod to 6 pin firewire interface.
Step 2: Pick up a 6 pin to 4 pin firewire adapter – if the demand grows I may potentially just make an all in 1 cable.
Step 3: Reset the iPod and start it up in Target Disk mode. This not absolutely necessary but I find it most reliable in this situation. You do so by switching the hold button on, then off. Immediately after press and hold both the Menu and Select buttons at the same time. Hold them for 6 seconds. This will reset the iPod. After the reboot, the Apple Logo appears on the screen – Immediately press and hold the Select and Play buttons at the same time. Once again do this for 6 seconds and it will boot up in target mode. It could take you a couple tries to get the timing of this but be patient – once again you can actually skip this as the iPod will force itself into Target Disk mode once recognized by the HVX – but it is good to now these simple iPod commands if you’re going to be using this a lot.
Step 4: Set your HVX PC mode to 1394 Host. This is in the “Other Functions” Menu
Step 5: Put your camera into PC Mode by first making sure that the P2/Tape switch is on P2 and then tapping the toggle button to get into MCR mode – then hold until it boots into HOST mode.
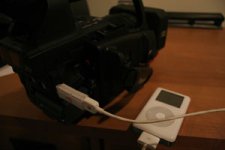
Step 6: Connect the iPod to the 1394 port on the HVX using your adapter.
Step 7: Format the HDD
Step 8: The HVX recognizes your new iStore and you’re ready to dump.
Step 9: After Dumping – power off the camera to disconnect. You’ll notice that your iStore keeps rebooting when not connected to a host. This is because there is no longer an OS and it is rebooting in search of one. It is important to switch the HOLD button to the on position to stop this rebooting. It should take effect the first cycle after you initiate it.
Step 10: Connect to your computer. Similar to a P2 Store each dump will mount as it’s own P2 Volume. After a moment you will notice all the icons change to iPod icons and that iTunes opens. Close iTunes and for heaven’s sake don’t do anything with it. You may even want to disable the automatic open feature in iTunes. The icons change because your computer will start to recognize the Apple contaminated HD with its permanent iPod tag – you will always see the iPod source when looking at disc information.
A few things to note about this process before dong this:
The HVX will operate in a verify mode, just as the P2 Store. It will check the validity of the transferred data and notify you of any corruptions in the copy before you delete your master. Of course this added security almost doubles the transfer times. You can enable/disable this feature on the HVX while in HOST mode.
This solution is far more shock resistant than a P2 store and allows you to avoid having to record and deal with all the extra GBs that a Firestore sticks you with by making you use 24p at 59.94 over 24pn mode (1394 external is disabled while shooting in 24pn mode - making it impossible to utilize an external 1394 record device)
The HVX200 Host mode formatting will treat this 60GB iPod so that it operates in a mode very similar to the Panasonic 60 GB P2 Store. The Host mode formats a drive into 15 equal partitions – so a 60GB iPod is ideal for 4 GB cards as you will end up with 15 4GB partitions.
Each time you dump a card it entirely eats up a partition. So if you dump a 4GB card that only has 1.8GB of data on it, it will still reserve 4GB of space on the drive. Likewise, an 8GB card will take up 2 4GB partitions and regardless of how much data is on that card it will take up 2 partitions. So basically dump the cards when they are as close to full as possible in order to optimize your drive space.
Your iPod will not be available for use as an iPod once you make it an iStore. The formatting and partitioning systems will prohibit this. I have done a couple tests to try to maintain use as both, but haven’t successfully been able to isolate the iPod Control system from the HVX files system – I will update this as I try more.
The process is reversible – so if you want your iPod back just reinitialize and restore the system OS. This is easily done through the iTunes 7 interface.
Very Important!! When dumping, always make sure that the iStore and the camera have sufficient battery power – as a power failure amidst a transfer will cause you serious headaches and probably kiss your footage goodbye.
That’s about it – though I could be forgetting some tidbits due to exhaustion. Now everyone should send me a dollar or a copy of DV Rack HD so I can live while figure out how to modify an iPod video to play the MXF files that you transfer to it so you can preview your footage in the field… Oh we can dream can’t we?
The Answer: 4th Generation and older iPods.
With the release of the Video iPod Apple disabled the firewire interface on the iPod for any use other than use as a power source, but the earlier iPods are dependent upon this firewire interface – as they used to be an Apple focused product and have since switch to USB 2 to appeal to a wider PC market.
I am using a 60GB iPod Photo in this tutorial. Grand Total of my cost was $20 as I was given the iPod from someone who thought is was broken. You can grab a 60GB iPod Photo off of ebay for a little over $100.
Now let’s make an iStore!
Step 1: Get yourself a 4th Generation iPod with an iPod to 6 pin firewire interface.
Step 2: Pick up a 6 pin to 4 pin firewire adapter – if the demand grows I may potentially just make an all in 1 cable.
Step 3: Reset the iPod and start it up in Target Disk mode. This not absolutely necessary but I find it most reliable in this situation. You do so by switching the hold button on, then off. Immediately after press and hold both the Menu and Select buttons at the same time. Hold them for 6 seconds. This will reset the iPod. After the reboot, the Apple Logo appears on the screen – Immediately press and hold the Select and Play buttons at the same time. Once again do this for 6 seconds and it will boot up in target mode. It could take you a couple tries to get the timing of this but be patient – once again you can actually skip this as the iPod will force itself into Target Disk mode once recognized by the HVX – but it is good to now these simple iPod commands if you’re going to be using this a lot.
Step 4: Set your HVX PC mode to 1394 Host. This is in the “Other Functions” Menu
Step 5: Put your camera into PC Mode by first making sure that the P2/Tape switch is on P2 and then tapping the toggle button to get into MCR mode – then hold until it boots into HOST mode.
Step 6: Connect the iPod to the 1394 port on the HVX using your adapter.
Step 7: Format the HDD
Step 8: The HVX recognizes your new iStore and you’re ready to dump.
Step 9: After Dumping – power off the camera to disconnect. You’ll notice that your iStore keeps rebooting when not connected to a host. This is because there is no longer an OS and it is rebooting in search of one. It is important to switch the HOLD button to the on position to stop this rebooting. It should take effect the first cycle after you initiate it.
Step 10: Connect to your computer. Similar to a P2 Store each dump will mount as it’s own P2 Volume. After a moment you will notice all the icons change to iPod icons and that iTunes opens. Close iTunes and for heaven’s sake don’t do anything with it. You may even want to disable the automatic open feature in iTunes. The icons change because your computer will start to recognize the Apple contaminated HD with its permanent iPod tag – you will always see the iPod source when looking at disc information.
A few things to note about this process before dong this:
The HVX will operate in a verify mode, just as the P2 Store. It will check the validity of the transferred data and notify you of any corruptions in the copy before you delete your master. Of course this added security almost doubles the transfer times. You can enable/disable this feature on the HVX while in HOST mode.
This solution is far more shock resistant than a P2 store and allows you to avoid having to record and deal with all the extra GBs that a Firestore sticks you with by making you use 24p at 59.94 over 24pn mode (1394 external is disabled while shooting in 24pn mode - making it impossible to utilize an external 1394 record device)
The HVX200 Host mode formatting will treat this 60GB iPod so that it operates in a mode very similar to the Panasonic 60 GB P2 Store. The Host mode formats a drive into 15 equal partitions – so a 60GB iPod is ideal for 4 GB cards as you will end up with 15 4GB partitions.
Each time you dump a card it entirely eats up a partition. So if you dump a 4GB card that only has 1.8GB of data on it, it will still reserve 4GB of space on the drive. Likewise, an 8GB card will take up 2 4GB partitions and regardless of how much data is on that card it will take up 2 partitions. So basically dump the cards when they are as close to full as possible in order to optimize your drive space.
Your iPod will not be available for use as an iPod once you make it an iStore. The formatting and partitioning systems will prohibit this. I have done a couple tests to try to maintain use as both, but haven’t successfully been able to isolate the iPod Control system from the HVX files system – I will update this as I try more.
The process is reversible – so if you want your iPod back just reinitialize and restore the system OS. This is easily done through the iTunes 7 interface.
Very Important!! When dumping, always make sure that the iStore and the camera have sufficient battery power – as a power failure amidst a transfer will cause you serious headaches and probably kiss your footage goodbye.
That’s about it – though I could be forgetting some tidbits due to exhaustion. Now everyone should send me a dollar or a copy of DV Rack HD so I can live while figure out how to modify an iPod video to play the MXF files that you transfer to it so you can preview your footage in the field… Oh we can dream can’t we?


")