How to build a static 35mm adapter (DIY)

drjass

Member
Hi, this is my first post in this forum and here some videos i made about yhe 35mm adapter. This is the video where Im showing how I built my adapter

http://www.youtube.com/watch?v=PivErUHl-Yo


And this a the test footage with raw material without any color correction recorded with a very cheap camcorder...

http://www.youtube.com/watch?v=rijBSvcH5Ag

Please tell what you think about its quality

This is how it looks:
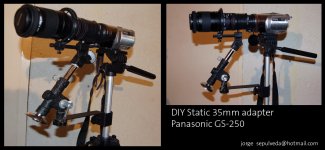
 

Attachments

  • DOF35mmadapter.jpg
    DOF35mmadapter.jpg
    241.4 KB · Views: 0
That has got to be the oddest lens support system I have ever seen. Also, you can't judge quality with YouTube compression. Please upload less compressed video to your own site or a file hoster if you want your quality to be fairly judged.
 
I think that looks pretty damn good. What did it cost you for all the stuff to build it? And if you could post links to the best place to get these materials, it would help a lot. I wonder how well this would work on my DVX 100b.
 
how far are you zoomd in and what fstop are you at. im trying to figure out how big of a difference its making because i can get depth of field like that in certain situations
 
2.8X in the camcorder zoom but with no macro lens... with a macro lens I think you will need less than 1X or even you can get closer for reduction of vigetting... see u
 
ok i wasnt sure if the effect was really from the adapter or if it was just an effect of zooming in on the camcorder. but it seems it is the adapter. nice job can you explain how u made the support and how much it cost.
 
The support was made from a microphone stand and an anti-pop stand but right now im not using it because the adapter is not heavy and it can perfectly be handled without any support... the cost of my adapter was less than $100 dlls without the lens, the most expensive device was the focus screen. I just bought a Canon HV20, Ill post later the new footage with some modification I made to the adapter....
 
i want to copy your systwem and build my own adapter, for me it looks as the best system right now.

could you tell me how many uv-filters you used and which distances from what to what?
im planning to build it for my panasonic nv-gs140, which should enhance the pictures a lot.
 
I just made a new one yesterday with no support because is very light and I use 3 58mm rings and one 43-58mm adapter for the HV20 from the screen with a Canon Ee-a and 4 more rings from the screen to the lens. Still working in the light issue that all adapters have but soon Ill post my footage. The great thing is that i needs no support and you have all the motions from the tripod avaliable. No achromat needed becasue the HV20 has a great macro focus. Drjass
 
I just made a new one yesterday with no support because is very light and I use 3 58mm rings and one 43-58mm adapter for the HV20 from the screen with a Canon Ee-a and 4 more rings from the screen to the lens. Still working in the light issue that all adapters have but soon Ill post my footage. The great thing is that i needs no support and you have all the motions from the tripod avaliable. No achromat needed becasue the HV20 has a great macro focus. Drjass

I would love to see pictures of this adapter and see the footage, because this sounds exactly like what I'm looking for.

Without the lens, how much did making the adapter cost you?
 
This is the equpiment I used in my last adapter:

1) Five used 58mm rings (try to buy used equipment because you only need the rings, not the glasses)= 25 dlls
2) Two new 58mm rings (for covering the focus screen)= 16 dlls
3) One Canon Focus screen Ee-a = 35 dlls
4) Canon plastic rear lens cover = 3 dlls
5) 43mm to 58mm adapter = 9 dlls
TOTAL= 88 dlls
*the prices may vary in every country but this is the price en USA buying almost all the stuff at B&H.

So if I plan to use a 50mm lens, all the stuff you have listed as 58mm I should get as 50mm?

And you don't need any support for that? It's static? No grain??!
 
Yes, that would be the best option.... also if you can buy the vibrating device from the same company... better but that incresases a little bit the price but i think it would be the best to do it. good luck.

Yes, you need to change the diameter size to 50mm but be sure that it can fit in the lens rear cap.
 
Well if I go with the jetset vibrating adapter, I do run a much higher price, and I'll also need rails/a support system.

Could you show us what the static adapter which doesn't need any support looks like on the camera? Also, what some footage looks like :) ?


And after all of that is said and done, does the vibrating vs. static make a huge difference? Your static footage looked pretty nice...
 
Last edited:
Actually, this post is part a BUMP and part more of me ranting...

I think I'm gonna go with the jetset vibrating adapter, and spend somewhere around $300 for the parts. However, I need a little help. I can't see in the tutorial where I'll need the Canon EOS tubes, or what they are, exactly. Could somebody please help?
 
In the tutorial i made i didnt use extension tubes because i use the rings but if you want tu use the tubes you might not need too much rings. just to protect the screen. good luck and post your work as soon as you have it
 
Back
Top